Make Your Own: Princess Mononoke
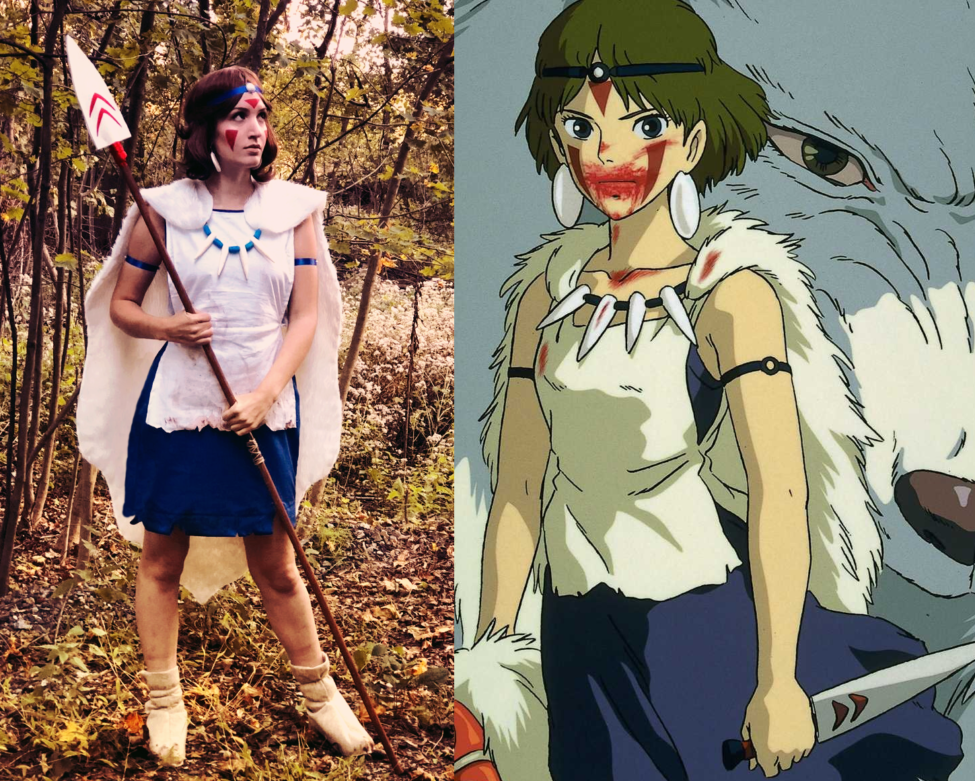
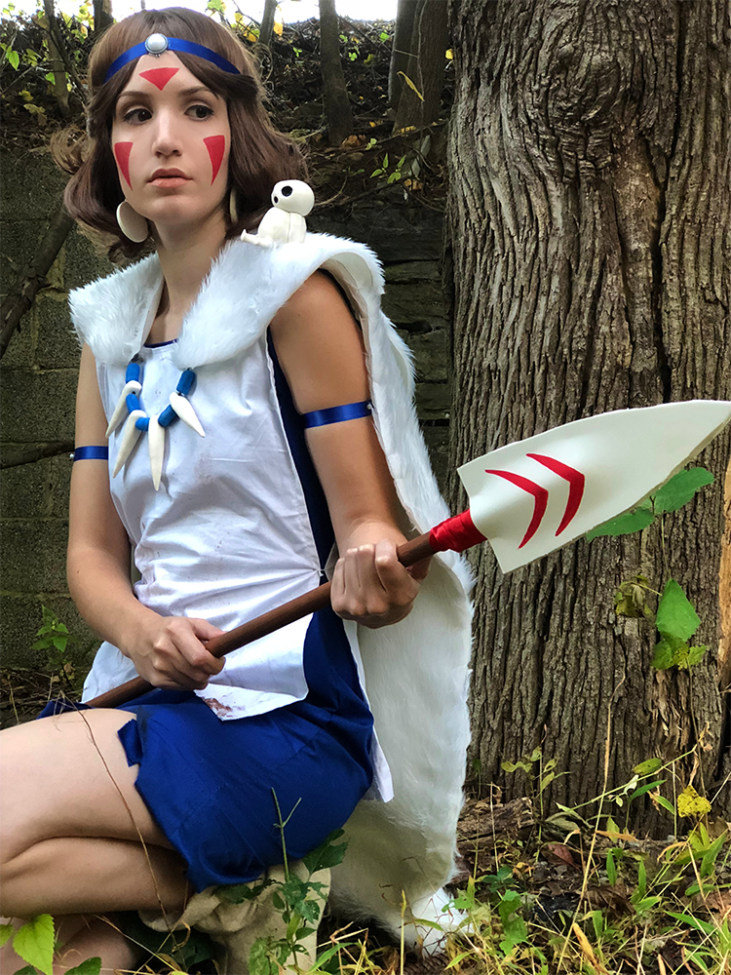
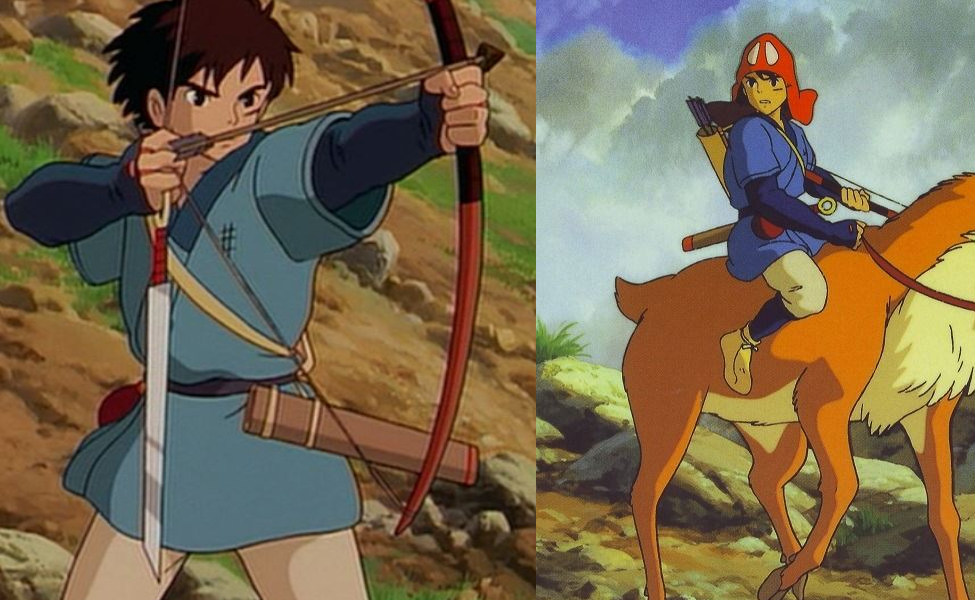
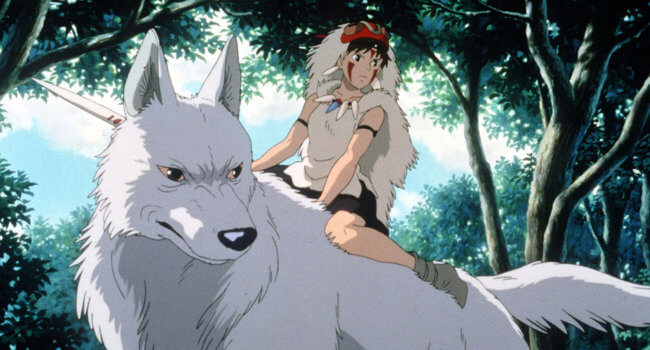
Princess Mononoke is Studio Ghibli’s 1997 epic fantasy film, taking place in Muromachi-era Japan. The only Studio Ghibli film to receive a PG-13 rating, Princess Mononoke was, and still is, extremely popular in Japan, and the US as well. Though the main protagonist of the story is an Emishi prince named Ashitaka, the focus of the film shifts to a girl named San. San, who calls herself “Princess Mononoke”, was raised by wolves and, as such, harbors a resentment for humans. (I feel you, girl.)
San’s costume is that of a sleeveless dress with a white pinafore. She also wears a white (presumably wolf) pelt, and is often seen carrying a knife or a spear. Though somewhat simplistic, this costume has quite a few accessories, so let’s begin with the main article of clothing – her dress. This is an intermediate guide — check here for a beginner tutorial for San.
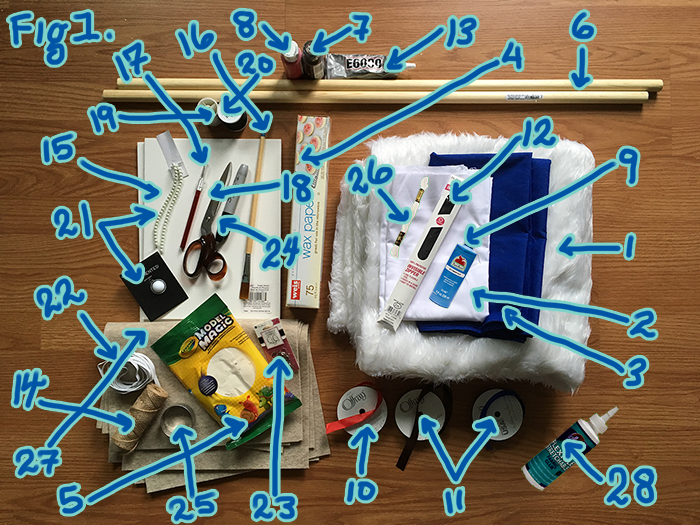
YOU WILL NEED:
1. White faux fur (at least 1.5 yards)
2. White cotton fabric (at least 1 yard)
3. Deep blue cotton fabric (at least 1.5 yards)
4. Wax paper
5. White Model Magic clay (1 pack)
6. A dowel rod (your choice in size)
7. Brown craft paint
8. Red craft paint
9. Blue craft paint
10. Red ribbon (1 spool)
11. Blue ribbon (at least 1 spool)
12. White 18 inch invisible zipper
13. E6000 glue
14. Twine (1 spool)
15. White 3mm craft foam (2 sheets)
16. A paintbrush or foam brush
17. X-acto knife
18. Sewing scissors
19. White thread (1 spool)
20. Blue thread
21. Pearl flat back cabochons (1 large, 2 small)
22. Elastic (1 pack)
23. Earring hooks (1 pair)
24. A Sharpie
25. A large circular cookie cutter
26. White embroidery thread (at least one skein)
27. Large sheet of tan or sandstone felt (at least 4 pieces)
28. Fabric glue
STEP 1:
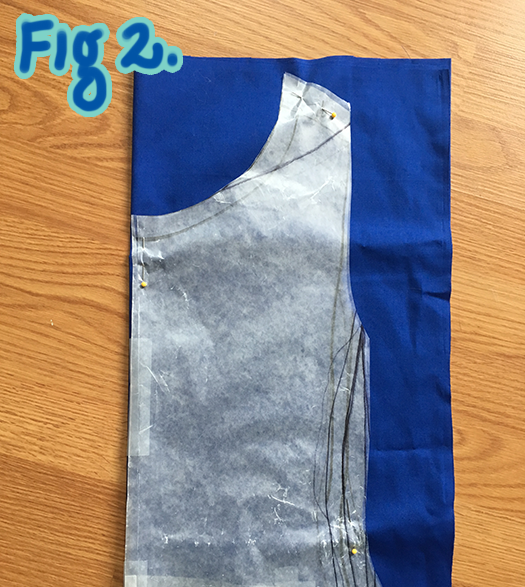
Let’s start by getting your pattern ready. Lay out a few long pieces of wax paper and tape them together. Lie flat on your back and trace around your body down to about your knees with your Sharpie marker. (You can also have a friend do this for you!) Once you have your body traced, fold your wax paper in half right down the middle. On one side of your half, draw the shape of the dress and how you would like it to look on your silhouette. Remember; you are making a simple, sleeveless dress, so don’t stress too much about the shape. The bottom hem of the dress should end roughly 2 inches above the knee. Since you’re only drawing out the pattern, remember to leave about a half inch to an inch of leeway space all around your pattern to give you some extra room while you’re sewing your seams.
Once you have your pattern figured out, cut it out and lay it on your piece of folded blue fabric. Make sure to line the fold of the fabric with the fold of your pattern. Pin your wax paper down and cut your pattern out. Do this twice, so that you have 2 identical and symmetrical dress pieces.
STEP 2:
Now that you have your two dress pieces cut out, it’s time to sew them together. Sew along each side, then along the top of the dress, making sure to leave the neck hole and arm holes open. Pin down the edges of these holes and sew the edges down so that your dress won’t fray. However, when you get to the bottom hem of the skirt part of your dress, you can feel free to leave that edge raw. If you like, you can do what I did and cut a few notches here and there out of the bottom of your dress so that it looks damaged.
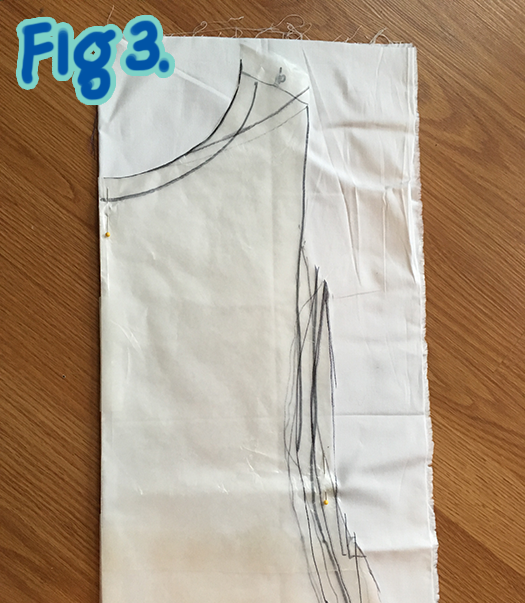
STEP 3:
Using your wax pattern again, cut the same 2 dress pieces out of your white cotton fabric, except this time, make the bottom several inches shorter and the sides of the dress a bit more narrow and straight. This is going to be your pinafore. Instead of sewing the sides together, simply attach the top of the 2 pieces of the pinafore together, and fold over the sides of the dress, sewing them down. Do not sew these sides together. Hem all the raw edges except, again, for the bottom edge, which you can cut notches out of as well if you like.
STEP 4:
Place the blue dress inside the pinafore, so that the pinafore overlaps both the front and back of the dress. Using your white embroidery thread, sew the tops of the dress and pinafore together along their respective top seams. Now that the pinafore is on top of and attached to the blue dress, attach the sides of the pinafore together, again using your white embroidery thread.

If you so choose, you can use some watered-down brown paint to make stains on your dress and pinafore to add some authenticity to your costume. This is an optional step, and is dependent on how “distressed” you want her dress to look. Install your invisible zipper into the back of the dress.
STEP 5:
Now, moving on to the shoes. Grab a pair of base shoes (flats work really well for this. Don’t worry, you won’t be ruining them or gluing anything onto them.) While wearing the shoes, trace the side of your foot and leg (up to about the midway point of your calf) on a piece of wax paper. Leaving about a half-inch around your tracing, cut your pattern out, place it on a piece of felt, and cut that out as well. (Make sure there is a lot of room around this pattern so that you can easily slip your foot in and out of the boot.) Do this four times so that you have four identical pieces (2 for each foot).
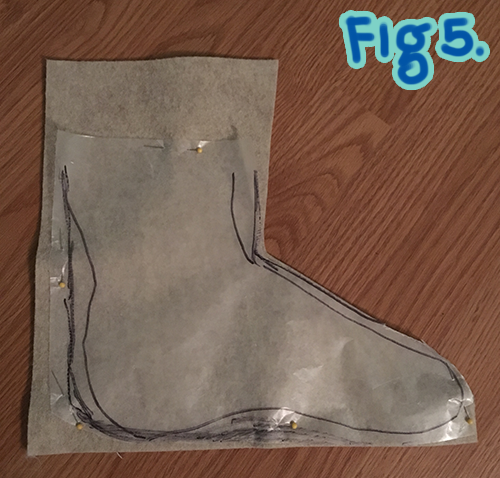
Sew two pieces together along the back and front part of the foot pattern. Turning your boots right-side out, put them on your feet. Next, put your base shoe on and attach a piece of elastic to each side of the bottom of the felt boot around the bottom of your shoe right by the tip of the toe, and another piece of elastic right across the middle of the foot. Do this using your embroidery thread for ensured strength.
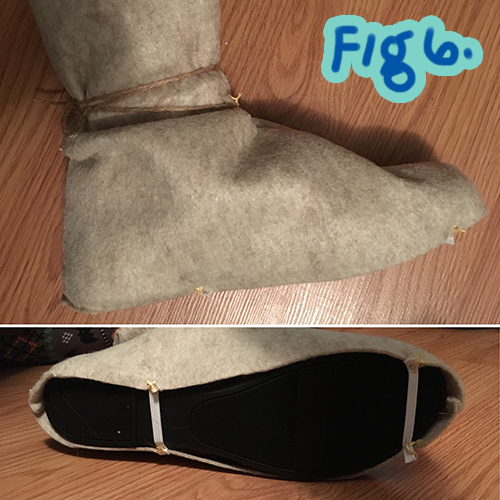
Next you can adjust the boot’s shape to your liking. I chose to fold down the tops and stitch the fold in place with some embroidery thread. I also secured a piece of twine in the middle to the center of the front of my ankle with embroidery thread as well. As you can see, San has a small bit of rope or string wrapped around her boots a few times, so this embellishment helped to emulate this style. Again, you can use your brown paint to add dirt marks to your shoes as I did, or leave them as they are.
STEP 6:
San’s wolf pelt! Take your white fur and fold it in half, right sides together. Using your marker, trace out the half-shape of her cape around the fold. To make this look more like a pelt and less like and amorphous blob of fur, I added some various movements in the lines.
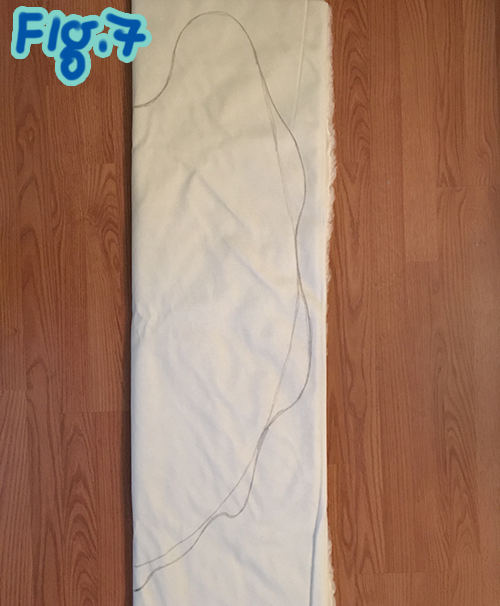
Cut this shape out twice so that you have two identical, symmetrical pieces. Using your fabric glue, glue the pieces together. For added security, hand-stitch the edges as well using your white thread. When the pelt is completely dry, take your embroidery thread once more and stitch the top sides of the pelt to the top of the blue and white dress, between the neck and arm holes on either side.
While you’re working on her pelt, cut out an additional, smaller pelt. This pelt needs only 1 piece, as it will lay over the larger pelt you just made, and will ultimately be used as part of her necklace.
STEP 7:
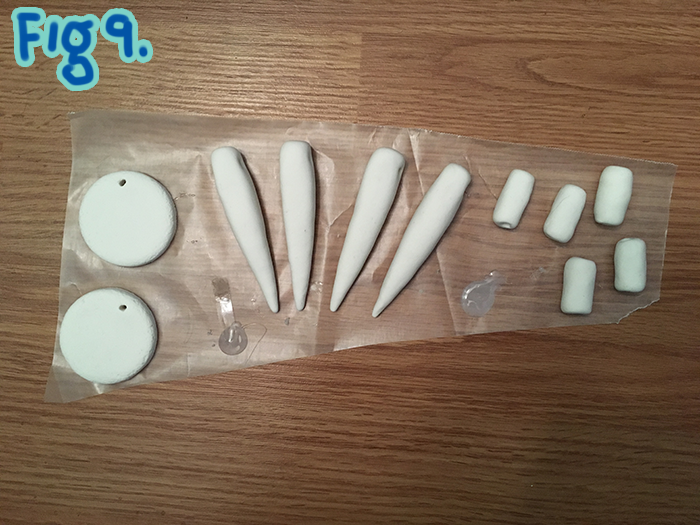
For San’s necklace and earrings, we will be using the white Model Magic clay. The convenient thing about this kind of clay is that it air-dries, so make sure you’re completely satisfied with your pieces before leaving them out overnight. To begin, roll up 2 small balls of clay that are roughly the size of a quarter.
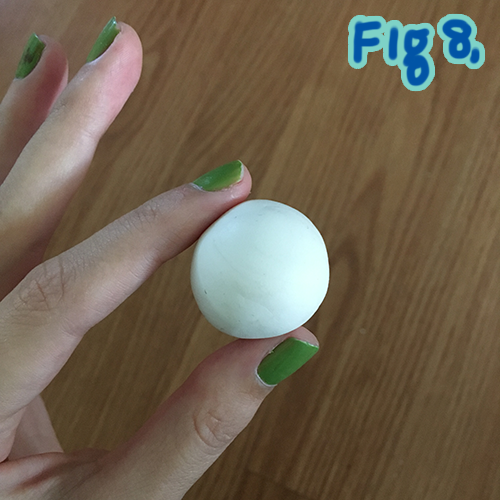
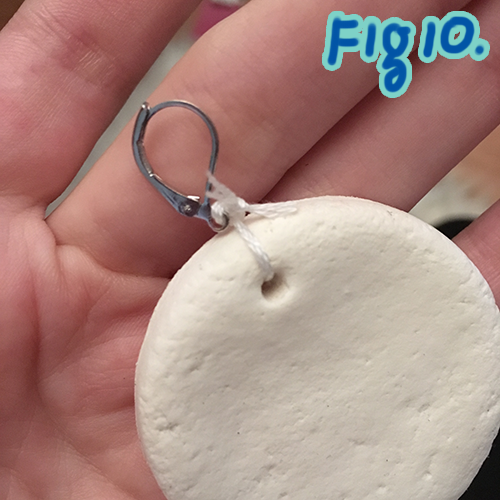
Flatten them out on a clean surface, and cut out a circle from each of them using your cookie cutter. While your circle is still inside the confines of the cookie cutter, take something small like a matchstick or something similar and gently poke a hole a few centimeters from the top of the edge of your circle. This will be the hole where you will string your embroidery thread through to attach it to your earring hooks.
STEP 8:
For San’s necklace, roll up 4 balls that are slightly smaller than the ones you made for her earrings. These are going to be the “teeth” of her necklace. Roll them out long-ways gently between your hands, tapering them at one edge. Take your time in finding the shape of each tooth that is right for you. Using your match, gently poke a hole straight through the top of each tooth horizontally. Next, roll out 5 even smaller balls, and roll them out long-ways as well. These are going to be the blue beads the sit between each tooth of her necklace. Again, using your match, poke a hole through each bead, vertically this time. Let all of your clay pieces sit out to dry for at least 24 hours.
Next, when your pieces are all dry, string your earrings to the earring hooks using your embroidery thread.
Similarly, string your necklace together, alternating between beads and teeth, using a piece of twine or embroidery thread. Sew the ends of your necklace to the front of the smaller pelt you made. Ta-da! You’ve got a necklace-pelt!
STEP 9:
Next, measure a piece of your blue ribbon around your head, allowing the ribbon to be about an inch or so smaller. Cut out this piece of ribbon and sew a piece of elastic to it in one continuous circle. Take your largest pearl cabochon and, using your E6000 glue, glue it directly to the center of your ribbon. If you would like, you can cut out a small foam circle and glue it to the back of your cabochon and ribbon, so that it is more comfortable to wear and doesn’t press too deeply into your forehead.
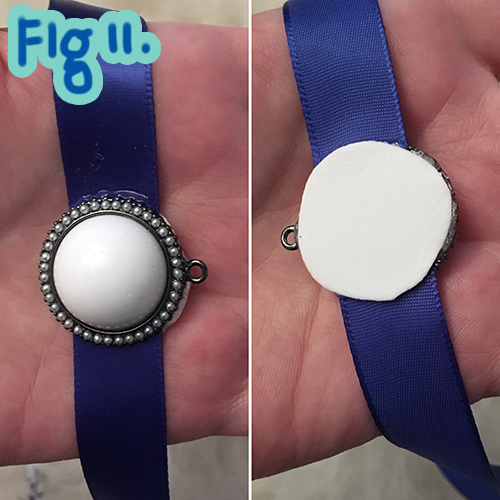
Use this method again to make her 2 armbands as well, this time using 2 of the smallest cabochons you have.
STEP 10:
Last but not least, Princess Mononoke’s spear. Paint your dowel rod with your brown craft paint. Next, design your spearhead on a piece of folded wax paper to ensure your head is symmetrical. Make sure to leave a rectangular tab at the bottom of your design as an anchor to tie down to your dowel rod. Cut out your design from a piece of 3mm craft foam. Do this twice so that you have two identical pieces.
After you’ve cut out your spear pieces, paint the 2 red dashes she has on her spearhead using your red craft paint. Glue your spearheads together using your E6000 glue. Make sure you are only glueing around the very outer edges of your spearhead, leaving the bottom open.
Once the glue has dried, carefully slide your dowel into the bottom of the spearhead, about half-way through. Tie your red ribbon around the top of your dowel and the tab of your spearhead, tightly securing them together.
BONUS STEP:
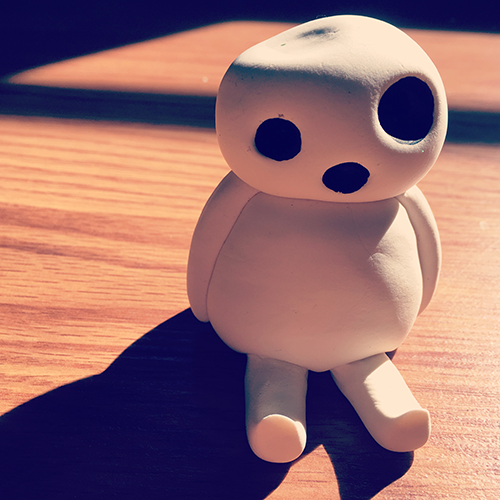
Looking for something to do with all your leftover clay? Roll up 4 small balls, one medium ball, and one large ball.
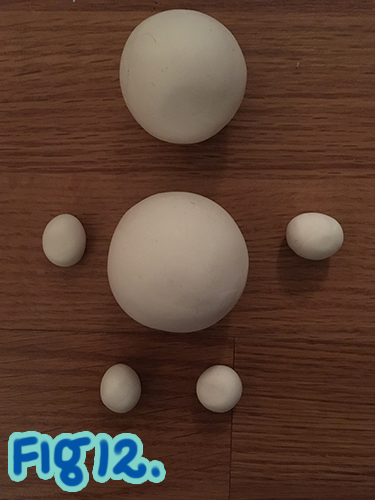
Roll your 4 smallest balls into little logs and place them on either side of your large ball. Do the same with the other 2 pieces, and place them at the bottom facing outward, making 2 little sitting legs. Place your medium-sized ball on top for the head. Using the rounded tip of your matchstick, poke in some eyes and a little mouth. Manipulate the clay to your liking until you are satisfied. It’s okay if your eyes, mouth, and headpiece look a little melty and wonky. Grab some black paint and paint the mouth and eye holes. Voila, you have a little forest spirit friend!
Congratulations! You’re all done your Princess Mononoke costume. You’re now ready to abscond from polite society entirely and live amongst the wolves forever, you lucky, lucky human.
About the Author
Diomira Keane
Cosplayer, artist, cat-lover, party princess extraordinaire.
There are no comments yet, add one below.
Stay connected. Don't miss out!
Get new costume guides in your inbox once a month.


Leave a Comment