Make Your Own: Booker DeWitt from Bioshock Infinite
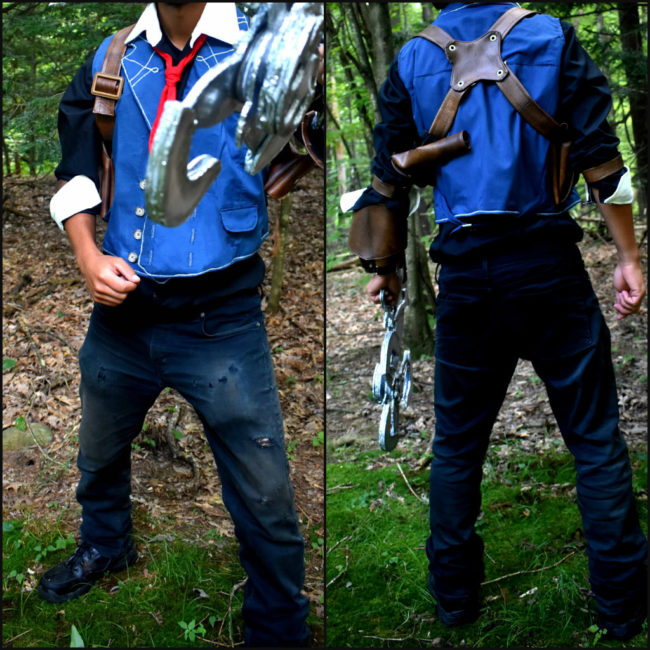
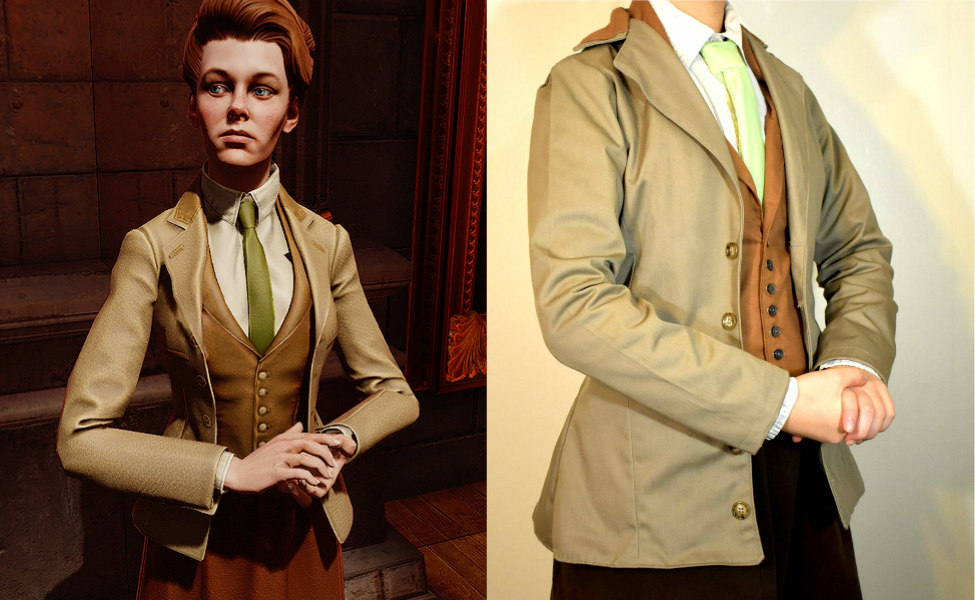
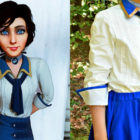
Private Investigator Booker DeWitt is the main character of 2013’s Bioshock Infinite. Formerly of the 7th Cavalry Regiment and Pinkerton Agent, Booker is sent to the flying city of Columbia to “find the girl and wipe away the debt.”
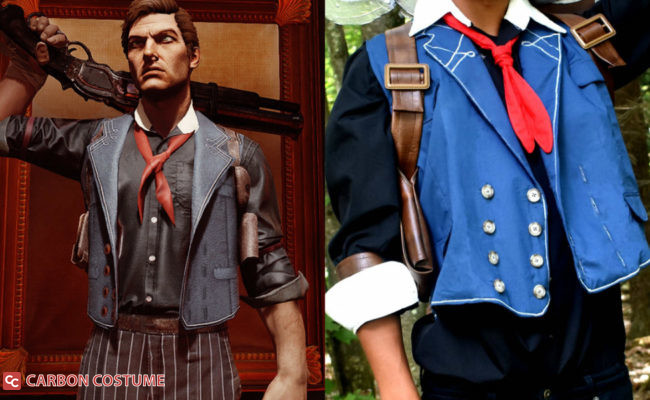
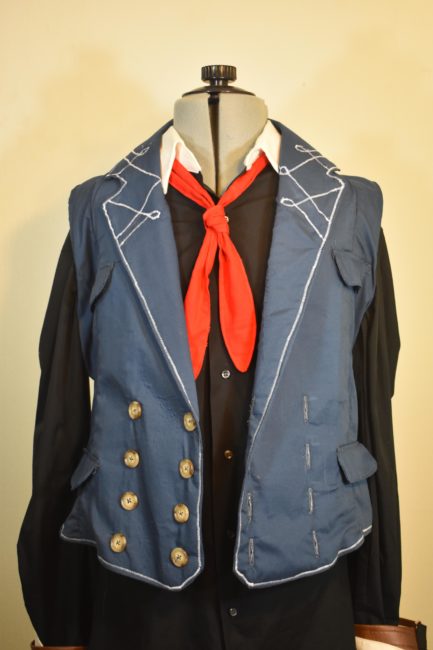
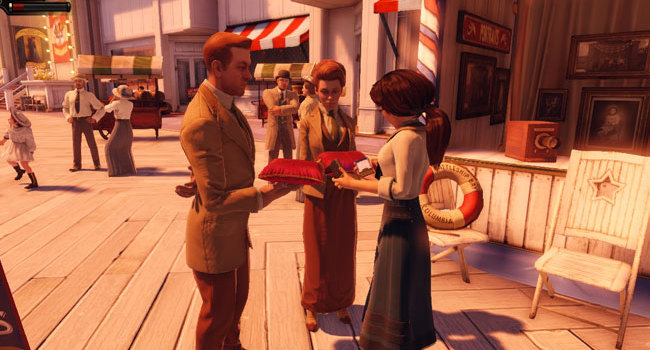
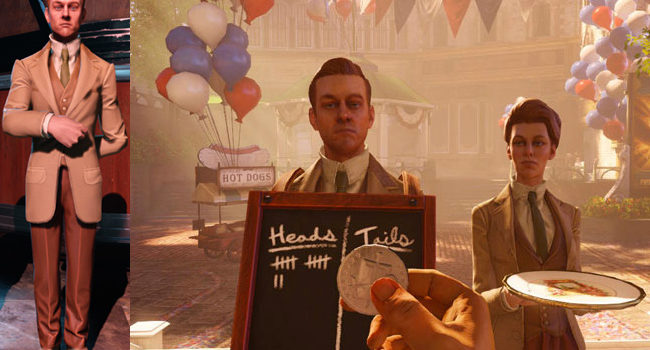
While Booker isn’t really seen, as the game is played from his perspective, Booker does appear a couple of times wearing a black shirt with white details, a blue vest, a red necktie/neckerchief, a shoulder gun holster, and brown pinstriped trousers.
In this tutorial, I hope to show you how to make your own Booker DeWitt cosplay.
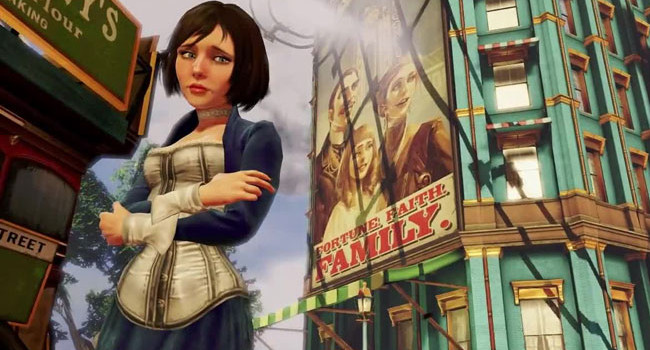
If you’re doing couples costumes, pair it with this Elizabeth costume guide. Or for an easier cosplay, follow this Booker DeWitt closet cosplay guide. And check out all of our Bioshock costume guides.
Materials
Shirt:
Vest:
- 2 yards navy or blue-grey cotton fabric
- Light grey thread
- 1″ Brown Buttons
- 1 1/2 – 2 yards black cotton fabric
- 1″ Tri-Glide Slider
Holster:
You will also need:
- 1/2 yard red cotton fabric
- Chalk Pencils
- Sewing Machine
- Matching thread
- Seam Ripper
- Sewing needles for hand stitching
- Sewing shears
- Fusible Interfacing
- Measuring tape
- Pins
- An iron
- Pattern making paper
Step 1:
To make Booker’s shirt, take the black button down shirt and start seam ripping off the collar and cuffs. Take the loose collar and cuffs and use them to trace out a new collar and cuffs on white fabric.
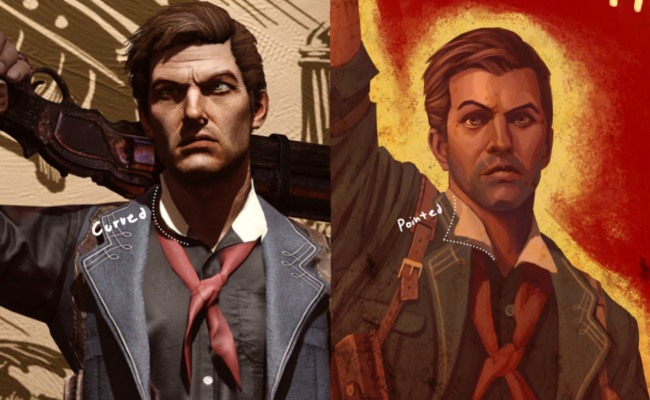
Depending on the picture of Booker, the style of Booker’s collar changes. On several images seen throughout the game, Booker’s collar appears to be pointed, while on his character’s 3D model, his collar seems to be curved. You can choose whichever collar style you prefer, and modify the pattern accordingly.
Before cutting out the pattern pieces, make sure to add seam allowance. Sew on the collar and cuffs the same way they were originally attached to the shirt. If you want, you can add on buttons and buttonholes to the cuff, but it’s not necessary because Booker always has his sleeves rolled up.

Step 2:
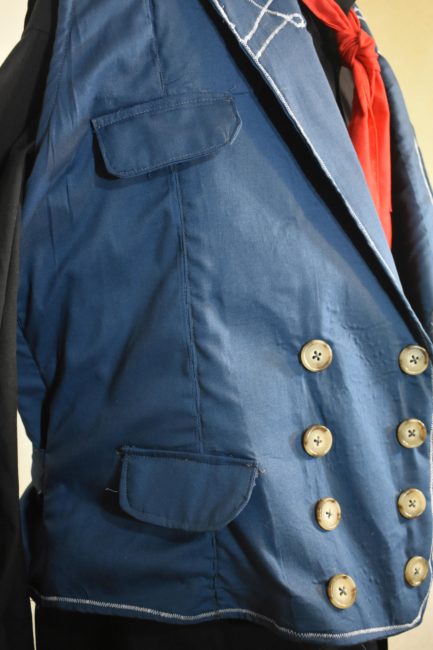
Booker wears a simple vest with his outfit. Depending on the image, it can look navy blue and other times gray. For my Booker cosplay, I chose to make it blue. The vest extends to just below Booker’s waist and is higher in the back than it is in the front. His vest is also divided into a few different panels.
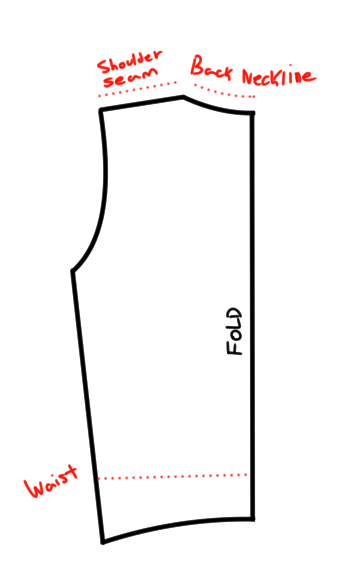
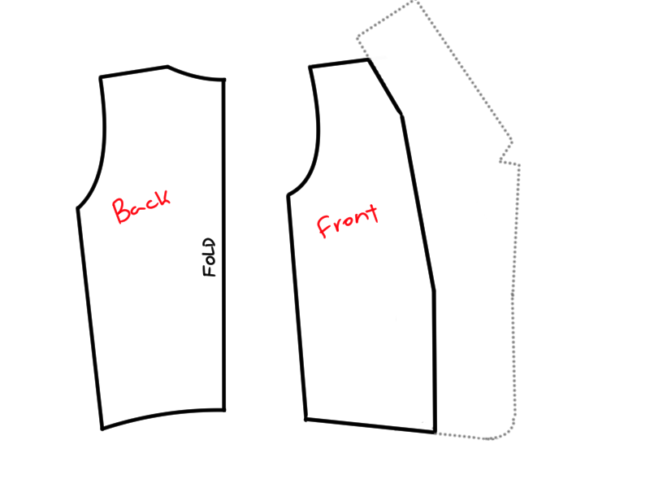
To start making Booker’s vest, first we’ll want to start drafting a pattern for the back of the vest. Start by drawing a basic bodice pattern. To make the back of the vest shorter, first determine how long you want the vest to be, which should be a little below the waist. Then you’ll want to draw a curved line at the bottom of the vest pattern from the side seam to the center back that is higher at one end. Your pattern should now look something like this:
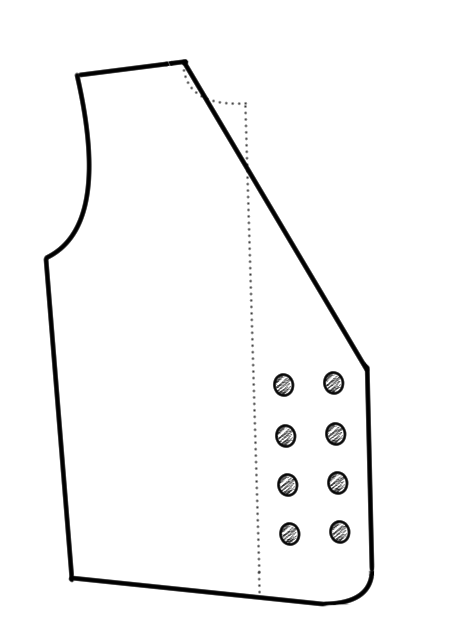
Next you’ll want to trace the back pattern to make the front pattern. Booker’s vest is double-breasted, so you’ll want to extend the front by a few inches so as well as the width of the buttons you’ll be using so that the fronts can overlap. There will be a total of 8 buttons, 2 rows of 4 buttons, so you’ll want to make sure this extended section is big enough for all the buttons. Now draw a straight line connecting the shoulder seam to the top of the extended section.
For the bottom of the pattern, you’ll want draw a line from the side seam to the front that angles down slightly instead of up like we did for the back.
Your pattern should now look something like this:
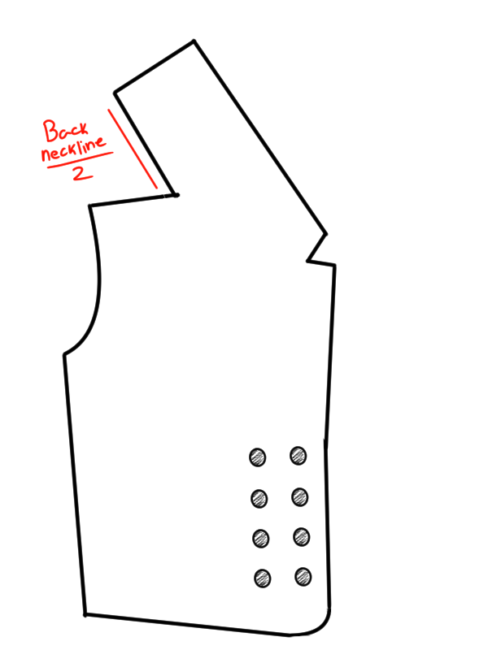
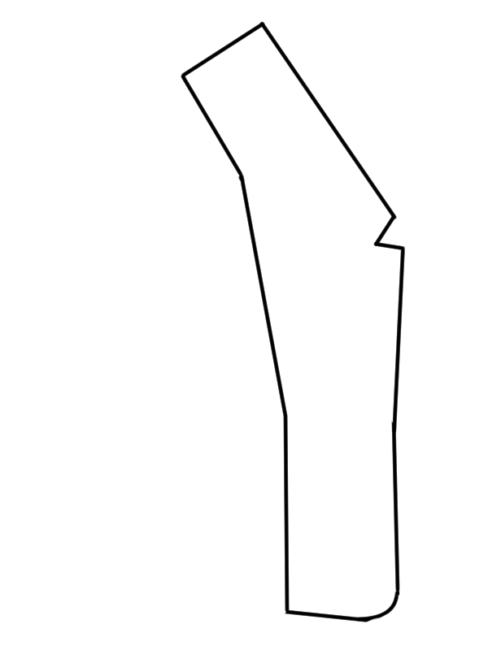
Next you’ll want to add to this pattern another section for the lapels of the vest. This section should extend higher than the shoulders at a slight angle and connect with the extended section for the buttons, making the pattern look more rectangular. You’ll want the extended section above the shoulder to be the same as the measurement for the neckline of the back pattern. The pattern should now look something like this:
Step 3:
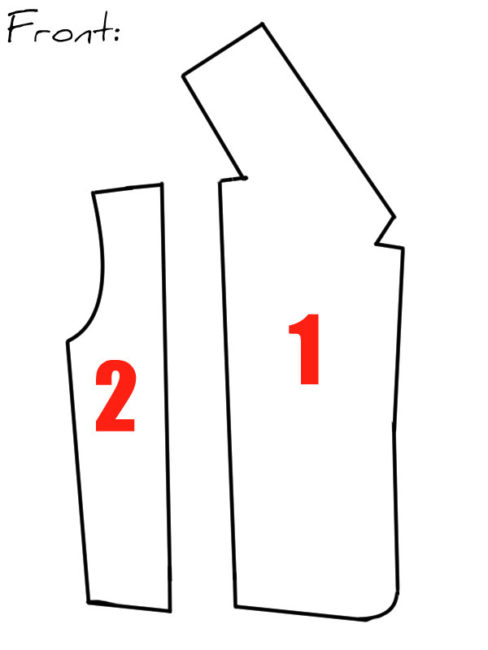
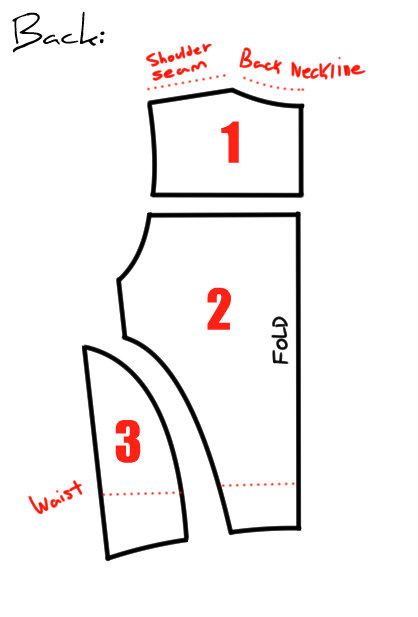
Booker’s vest is divided into a few panels, so to do this, you’ll want to take the front and back vest patterns that you made and cut them into pieces like so:
Step 4:
Now that you have the main pattern for the vest made, you’ll want to cut it all out and trace the pieces onto your navy fabric. Remember to flip over and trace the front pieces a second time so you’ll have the two fronts of the vest. You’ll want to cut the back pieces labeled 1 and 2 out on a fold, and the rest you’ll you can cut out normally. Remember to add seam allowance to all of the pieces before cutting them out.
You’ll also want to cut out an additional piece that is the same as the front piece labeled 1, but slightly thinner. You’ll also want to flip this over and cut out a second one for the other half of the vest as well.
Depending on how stiff your fabric is already, it’ll help to cut out and iron on some fusible interfacing to the wrong side of these pieces that you just cut out.
Step 5:
To assemble the vest, you’ll first want to join the different panels that we initially separated together. It can be a little tricky to sew the pieces together because of they’re curved shape, but as long as you sew slowly and use lots of pins to hold the pieces in place, you should be able to sew it smoothly.
Once the panels are all sewn together, you should have two complete front pieces and one complete back piece.
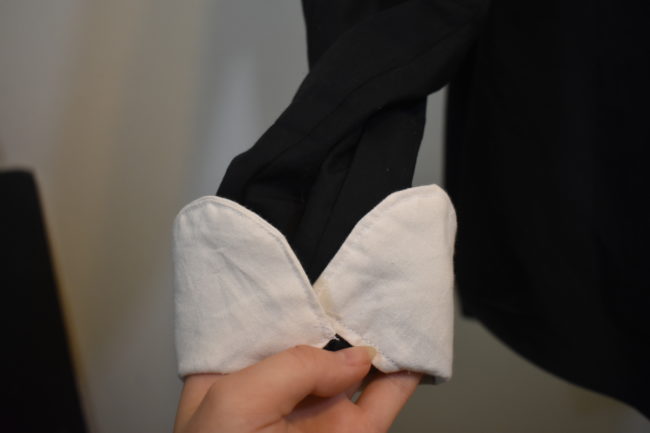
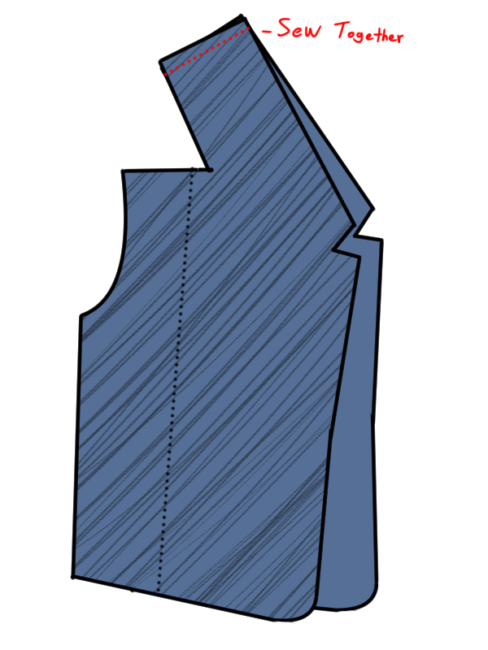
Now take the extended lapel pieces on both front pieces, stack them good sides to good sides, and sew them together at the tops as shown in the image below:
Once those two pieces are joined, you’ll want to line the seam you just sewed up with the center of the neckline on the back piece for the vest, good sides together, and pin it in place. Pin the straight edge to the curve of the neckline and sew them together. It can be a little tricky lining up a straight edge with a curve, but once they’re attached, you can cut little notches along the seam, not cutting through the threads, to release some of the tension.
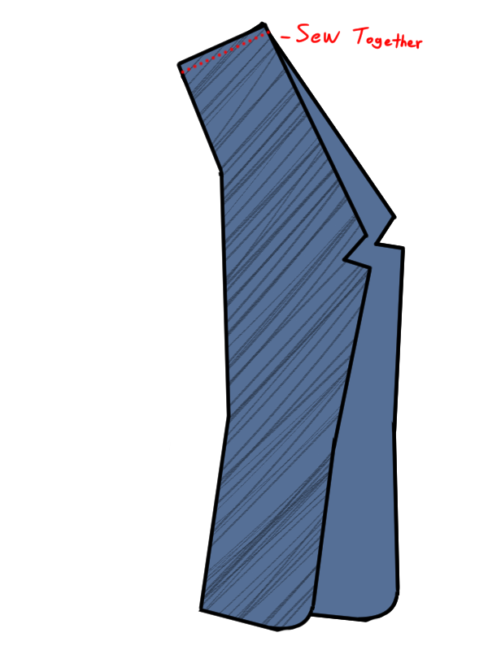
Now you’ll want to repeat with the thinner lapel pieces that have interfacing attached, stacking them good sides together and sewing them together at the tops like so:
Now take the now joined lapel pieces and stack them onto the front of the vest, lining them up good sides to good sides, and sew along the outer edge.
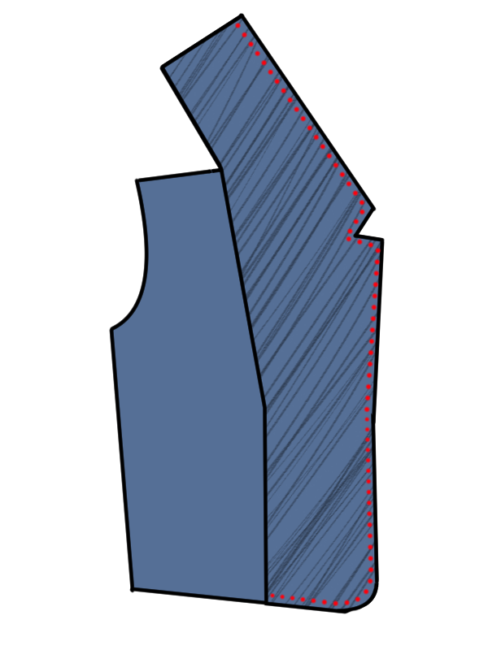
Once they’re sewn together, you can flip the lapel to the inside, giving you a nice clean edge.
Finally you can sew along the shoulder seams, joining the vest together.
Step 6:
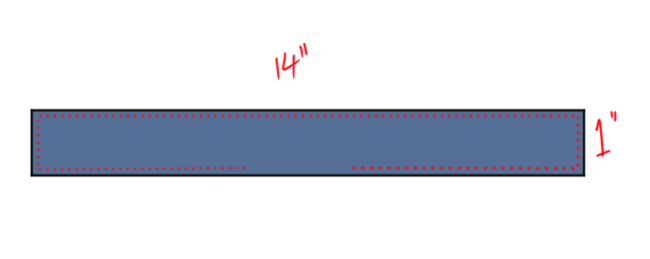
Before moving on to sewing the sides together, you’ll want to cut out of your navy blue fabric a total of 4 1″ by ~14″ strips, with seam allowance. Stack two together good sides together, and sew along the outer edge, leaving a small gap so you can turn them right side out afterwards.
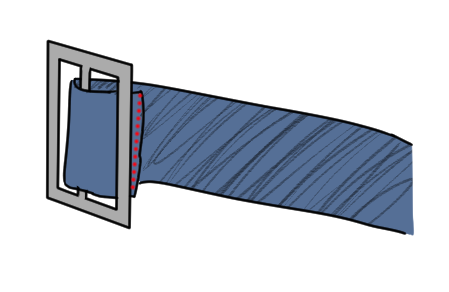
Repeat to make two straps in total. After turning them right sides out, iron the strips flat with an iron. If you want, you can slip stitch the openings shut, but it’s not necessary because the next step is to top stitch all around the strap which should seal the openings. Once that’s done, take the 1″ Tri-glide slider and connect one of the straps to it by looping one end of one of the straps around the center bar and sewing it down. It can be tricky to sew it together using the sewing machine because of how tight the space is between the loop of fabric and the tri-glide slider, so you can sew it together by hand if you’d like.
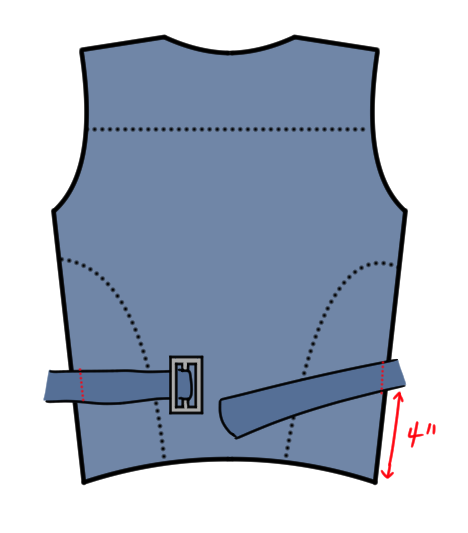
Now you want to take the straps and position them on top of the back of the vest, good side facing up, about 4″ up from the bottom. You want to position the strap with the tri-glide slider attached slightly off center. Pin the straps down and sew them on each side of the vest.
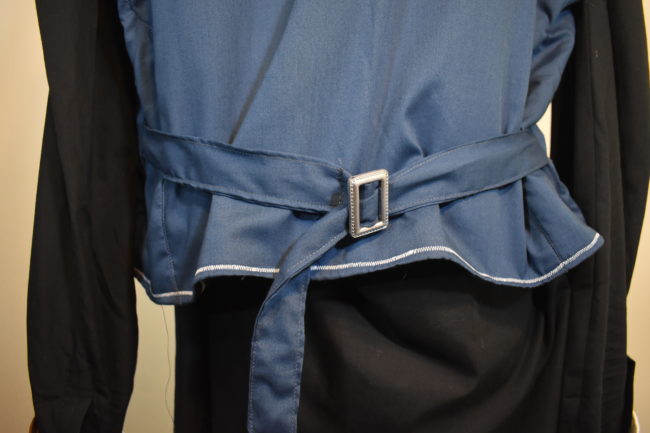
Finally, sew the sides of the front and back pieces together, sandwiching the straps in between. After the sides are sewn, you can cut off the excess tails of the straps.
Step 7:
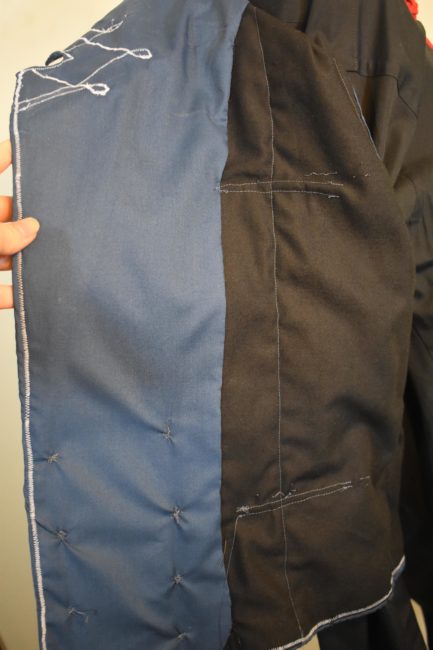
To add lining to the vest, you’ll want to take the patterns for the vest and trace them onto the black fabric. For the lining you won’t need the separated panels like we have on the vest itself, so you can trace out the pattern as one piece. For the front of the vest where we have the extra lapel piece we attached, you don’t have to include it for the lining because we already have two layers for the lapels. Before cutting the pieces out, remember to add seam allowance.
Once you have the lining pieces all cut out, sew them together at the shoulders as well as the sides. After that’s done, line the vest and lining together, good sides facing each other, and pin them around the armholes as well as along the bottom edge. Then sew them together at those areas. Once that’s done, flip the vest right sides out.
Now you’ll want to take a needle and thread and join the raw edges of the lapel piece to the raw edges of the lining using a slip stitch. This should give the lining a nice, clean edge.
Step 8:
The next step is to top stitch over all the seams – around the arm holes, along the panels on the front and back of the vest. However you don’t need to top stitch along the outer edge and lapels.
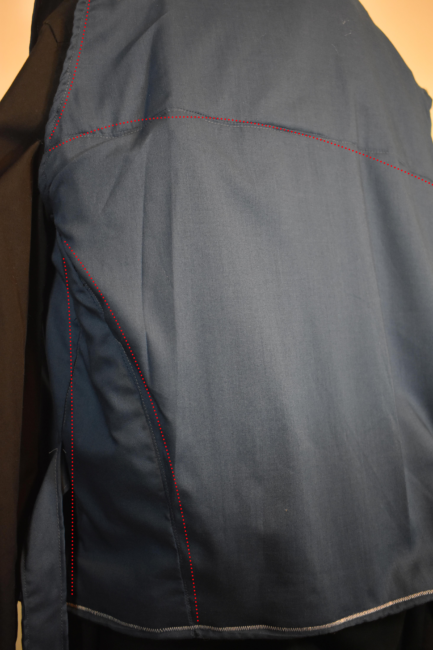
Now, switch your thread to a light grey color and use a very narrow and short zig-zag stitch to stitch all around the outer edges of the vest. Using the same method, you’ll want to sew this design onto both lapels of the vest:
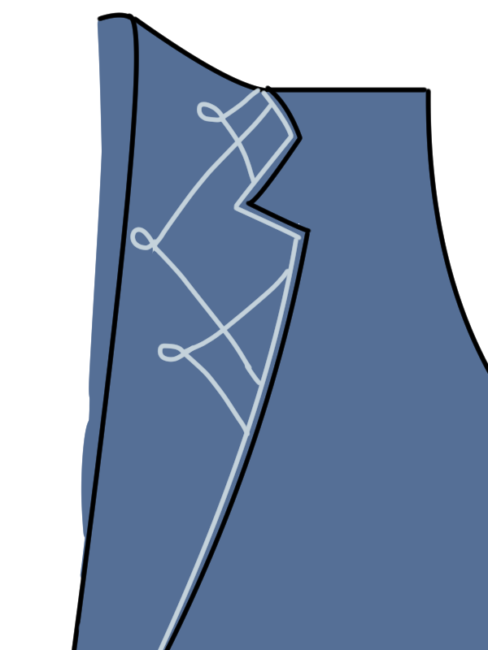
It helps to draw the design onto the lapel before sewing onto it. It can be a little tricky making the circles so small and the same size, so take your time and work slowly.
Step 9:
Booker’s vest has a total of four pocket flaps, two on each side of the front of the vest. To make these, draw a rectangle that is 4″ x 1.5″. Curve the bottom edges slightly and then use this pattern to cut out a total of 8 pieces out of the navy blue fabric.

Don’t forget to add seam allowance before cutting them out. Sew the pocket flaps similar to the way we did the straps: stacking two together, good sides facing each other, sewing around the outer edge, however you can leave the entire top edge open.
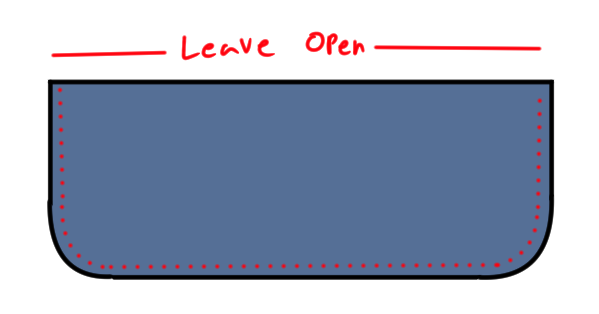
Continue to flip them right sides out, and then top stitch around all edges put the top.
Next you want to sew them to the vest, one towards the top and one towards the bottom. To attach them, place them good sides together, with the top edge facing down instead of up. Pin it into place and sew a straight line along the upside down top edge. Fold the pocket flap back down and iron flat before top stitching along the top edge.
Step 10:
The final step is to sew on the buttons and buttonholes. You’ll want to space them accordingly, not too close together or far apart. If you wanted, because Booker doesn’t seem to ever button his vest, you could leave out the button holes. When sewing the buttonholes, make sure to sew them vertically instead of horizontally.
Once the buttons and buttonholes are all sewn, the vest is done.
Step 11:
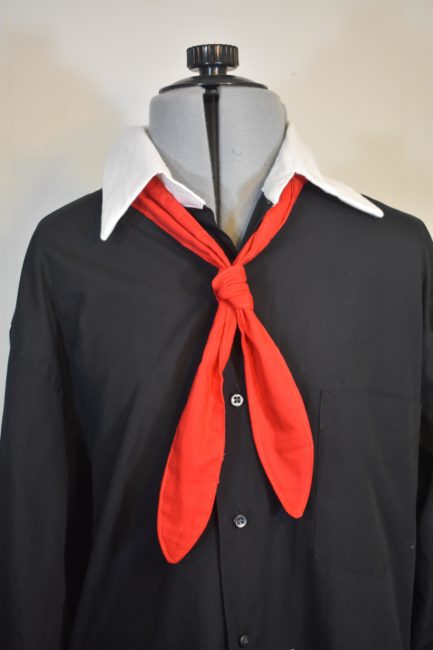
The next step is to make Booker’s neckerchief/neck tie. I don’t know if the way I made it is completely accurate, but I made an extremely simple version. To make it, first take a measuring tape and measure around your neck how long you want the tie to be. For me, that was about 41″. Cut a long rectangle out of red fabric that is the length you want the tie to be and the width about 1.5″. Taper it in at each end to have more of a triangular shape. Before cutting this out, make sure to add seam allowance.
Sew around all the edges, leaving a small gap so the whole thing can be flipped right side out. Once that’s done, iron it flat and then top stitch around all the edges. And the neckerchief/neck tie is done.
Step 12:
Finally, all we have to make is the holster. Start by taking your fake leather/vinyl and drawing out a 5″ x 5″ square. Round out all the edges and draw a shape like this within the square.
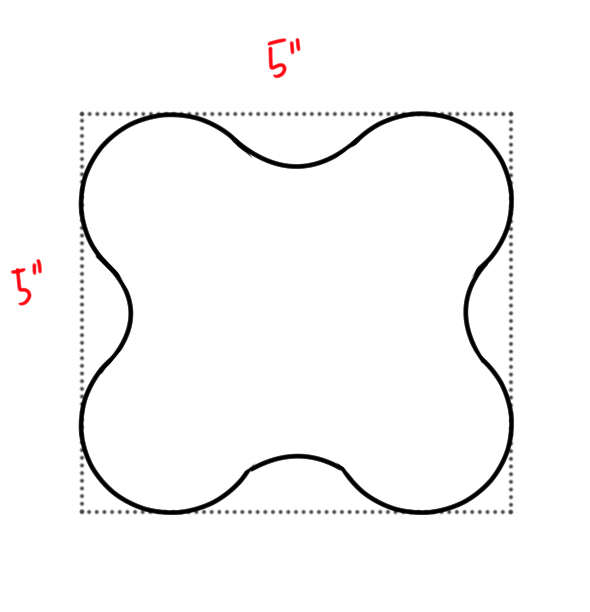
Add seam allowance and cut it out. Use this piece to cut out another out of brown cotton fabric. Layer the two pieces together, good sides together, and sew along the edge, leaving an opening so you can flip it right side out after it’s sewn. Depending on the type of fabric you’re using, it can be a bit tough for the sewing machine to sew through, so take it really slowly. Once your done sewing, flip the pieces right sides out and then use a needle and thread to sew the opening shut. Finally, top stitch over all the edges.
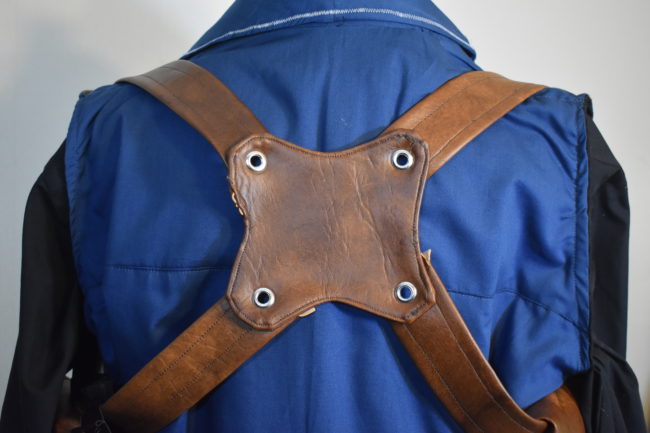
Now you want to take the measuring tape and measure from your mid back, over your shoulders, under the arms, and back up your back to just below the mid back. For my cosplay, this measurement was about 32″ long. Take the fake leather/vinyl and cut out a strip that is the length your measured with a width of 1.75″. Add seam allowance and cut it out. Repeat to cut out two, very long straps.
Cut the straps at around 2/5 of the length, splitting each strap into two sections, a longer and a shorter section. Now fold over the lengthwise edges of each strap and sew them down. Once they’ve been sewn down, take the 5″ rounded square piece we cut out earlier and line up each strap with each corner of the rounded square, with the two shorter straps at the top and the longer ones at the bottom. Use eyelets to attach them, sandwiching the straps and rounded square piece in between the halves of each eyelet.
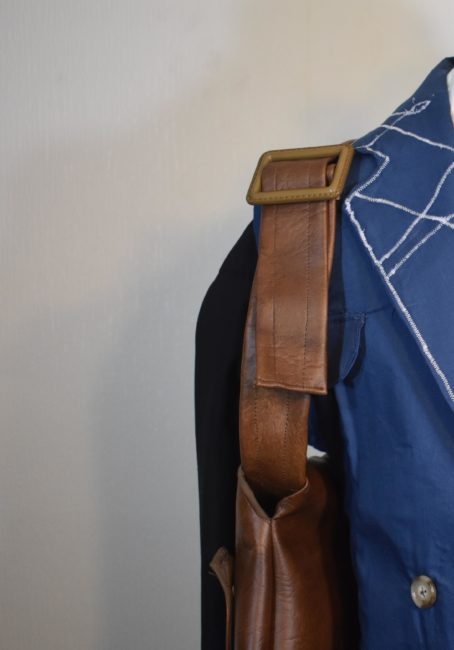
Now take a 2″ Tri-glide slider and attach it to the top of each longer strap the same way we did the strap at the back of the vest, by sliding the strap through the middle bar of the tri-glide slider and sewing it down. Repeat for both straps. Next fold over and hem the bottom edges of the shorter straps.
Now the basic construction of the holster is done.
Step 13:
To make Booker’s bag/pouch, you’ll want to draw out this pattern onto your fake leather/vinyl:
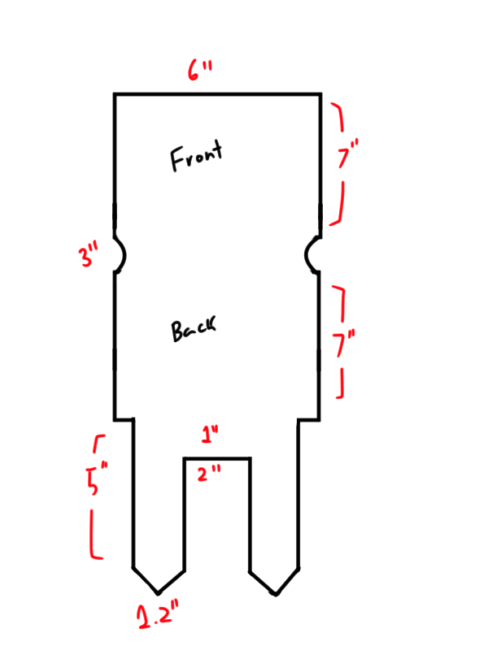
Add seam allowance to the pattern before cutting it out. Then use the cut out to trace out a piece of the exact same shape out of your brown cotton. Stack the pieces good sides together and sew along the edges as indicated below, leaving the sides open.
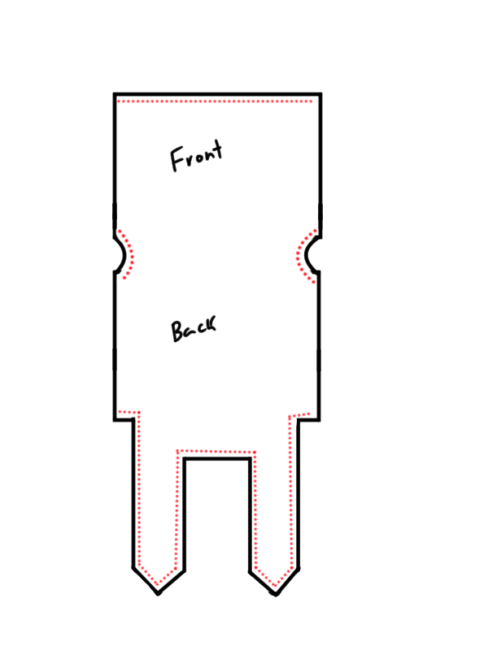
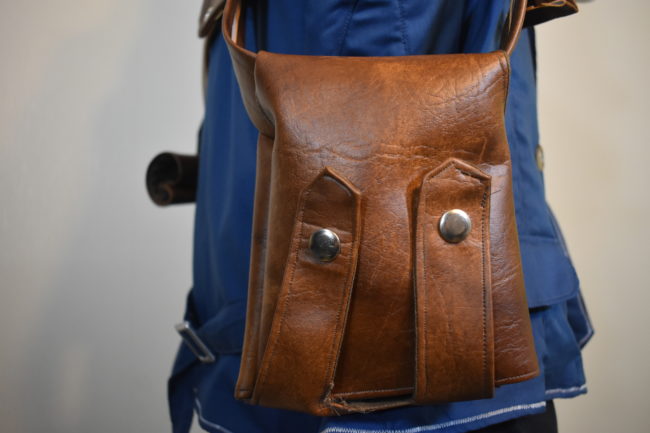
Flip the entire thing inside out, top stitch all the sewn edges, and then fold the entire thing in half so the good sides are together again. Sew along the raw edges and then flip the pouch right side out again. Attach heavy duty snaps to the straps of the pouch and to the front of the pouch where the straps overlap.
You should now be able to slip the pouch onto the right strap of the holster itself.
Step 14:
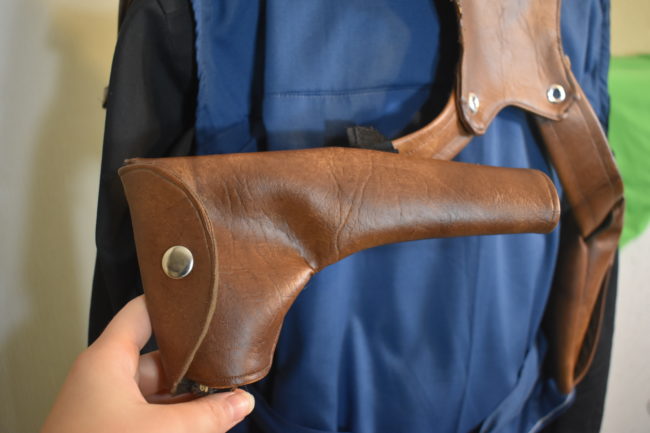
To make the gun holster itself, start by making a pattern. If you’re using a prop weapon for your costume, you’ll want to make the gun holster to the dimensions of your prop, otherwise you can just make the pattern to the general size you think the holster would be.
Draw out this pattern onto your fake leather/vinyl.
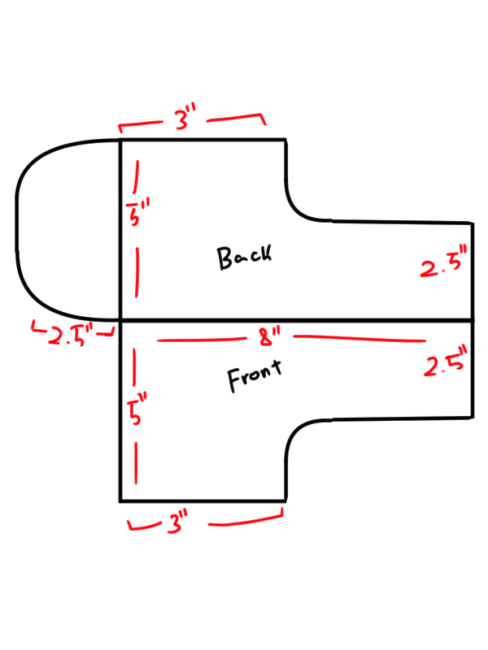
Add seam allowance and then cut it out. Use the piece you just cut out to make an identical piece out of the brown cotton. Stack the two pieces together, good sides together, and sew as indicated below:
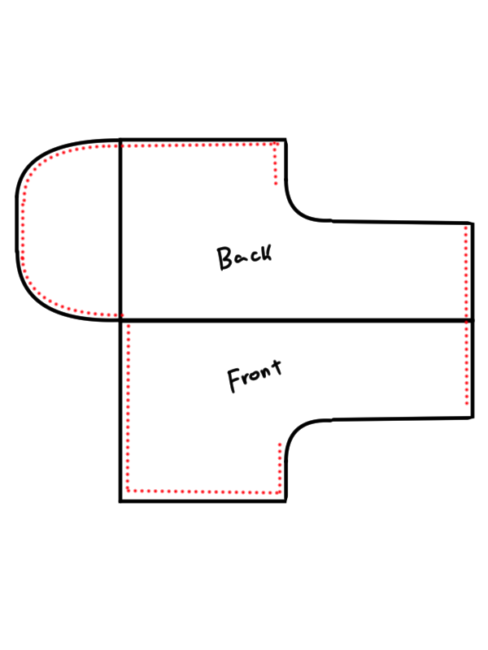
Fold the whole thing right sides out and then fold it together again so the good sides are together again. Sew along the raw edges and then fold the whole thing right side out again.
Finally, add a heavy duty snap to the flap at the back and where it would connect to on the front. Cut out two strips of elastic, just slightly wider than the width of the holster straps and sew these elastic strips onto the back of the holster. Now you should be able to slide the whole thing onto the left strap of the holster.
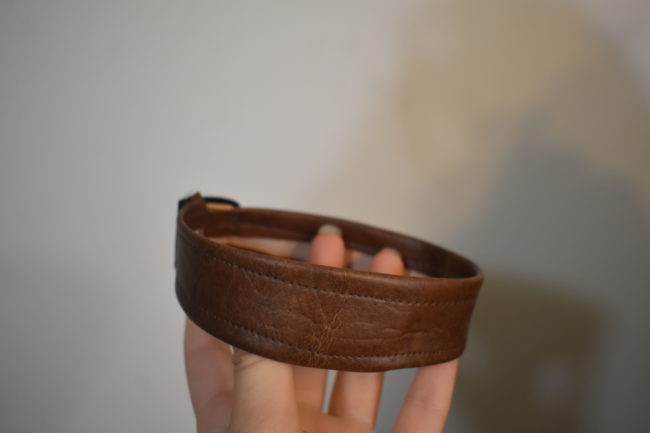
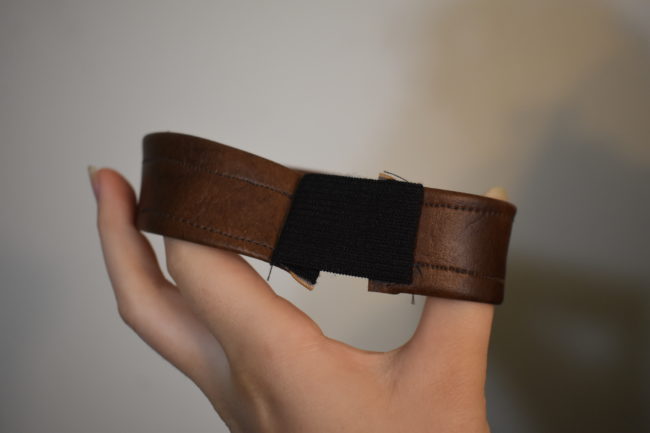
Step 15:
To make the arm bands that Booker wears around his sleeves, take a measuring tape and measure around your arm just slightly above your elbow. Take that measurement, take off about half an inch, and draw two rectangles on your fake leather/vinyl that are 1″ x your arm measurement . Add seam allowance and cut them out out. Fold over the lengthwise edges and sew them down. Then take about an inch of elastic and attach it to the back of the strips you just made. And you’re done.
To finish the outfit, Booker wears brown pinstripe trousers with his outfit, but really any brown or black trousers, solid or pinstriped, should work just fine. For my cosplay, black jeans worked well enough. Wear whatever you think looks right with your cosplay.
I hope you found this tutorial helpful, and that it helps you to create your own Booker DeWitt cosplay.
About the Author
Becky
Hello, my name is Becky. I started doing cosplay in 2016, but I've been sewing and making costumes since before then. Besides cosplay, I like music, art, and writing.


There are no comments yet, add one below.
Stay connected. Don't miss out!
Get new costume guides in your inbox once a month.


Leave a Comment