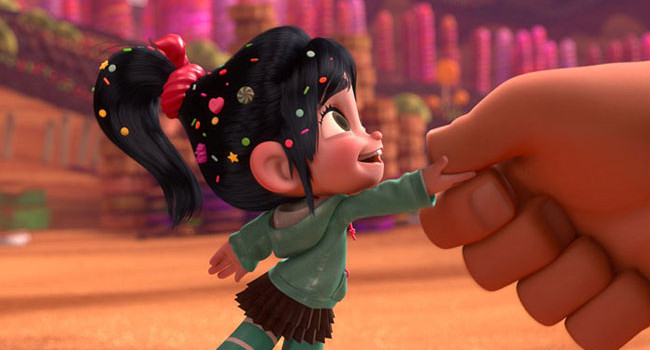
Make Your Own: Vanellope Von Schweetz from Wreck-It Ralph
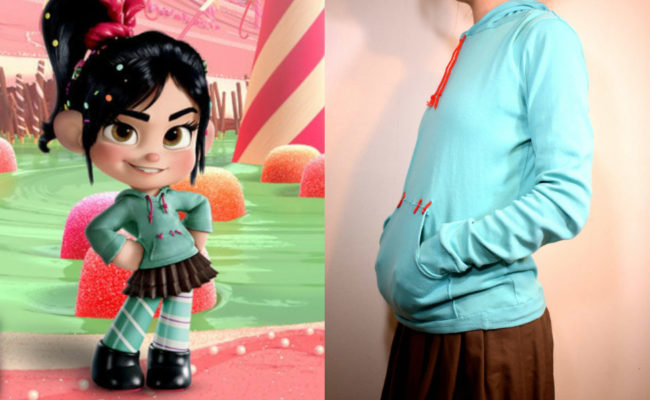
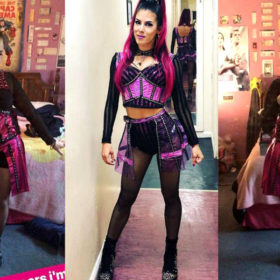
Best friend to Wreck-It Ralph and one of the many players in the arcade game Sugar Rush, Vanellope von Schweetz is one of the main characters in Disney’s 2012 animated film, Wreck-It Ralph, and the 2018 sequel Ralph Breaks the Internet. She’s a young girl with a mischievous personality, but very determined and has a good heart.
As Vanellope is from a candy-themed game, her outfit goes with the theme. She wears a mint green colored hoodie with red details, a Reese’s Peanut Butter Cup wrapper skirt, mismatched, striped leggings, a red Twizzlers hair tie, and various candies and sweets sprinkle throughout her hair.
She also wears a simple pair of black shoes with red details on the bottom, however for my cosplay, I didn’t bother to make those. Any pair of black shoes will do.
For this tutorial, I will be showing you how to make the hoodie, skirt, leggings, and a few hair accessories. If you’re in a rush, check out our simple guides for Vanellope and the rest of the Wreck-It Ralph cast.
Materials
Hoodie:
Skirt:
Leggings:
- 2-3 yards stretchy mint-colored fabric or mint-green leggings
- 0.5-1 yard stretchy white fabric or white fabric paint
- Red fabric pen or red fabric paint
Hair accessories:
- Bobby pins
- Assorted Craft Foam
- Markers (Sharpies or Fabric Markers will be fine)
- Red Pipe Cleaners
- Hot Glue Gun (and Glue Sticks)
You will also need:
- Chalk pencils (for light and dark fabric)
- Thread that matches your fabric (White, mint, brown)
- A sewing machine
- Sewing needle for hand stitching
- Sewing shears
- Measuring tape
- An iron
- Pins
- Pattern making paper
- Masking tape
- Mod Podge
Step 1:
You will be using one of the 2 mint-colored shirts as a base for the hoodie, and the other for the details, like the cuffs, hood, and front pocket.
Measure the neckline of one of the shirts using a measuring tape. Take this measurement, divide it in half, and use this measurement to draw a horizontal line at the bottom edge of the shirt that you’ll be using for details, starting from one of the side seams, creating a fold. Next, measure from your shoulder all the way to the top of your head. Add an inch or two to that measurement, and then draw a vertical line next to the horizontal line using this measurement. Draw another horizontal line above the vertical line, completing the rectangle. Now draw a curve on the side of the rectangle that’s on the fold.
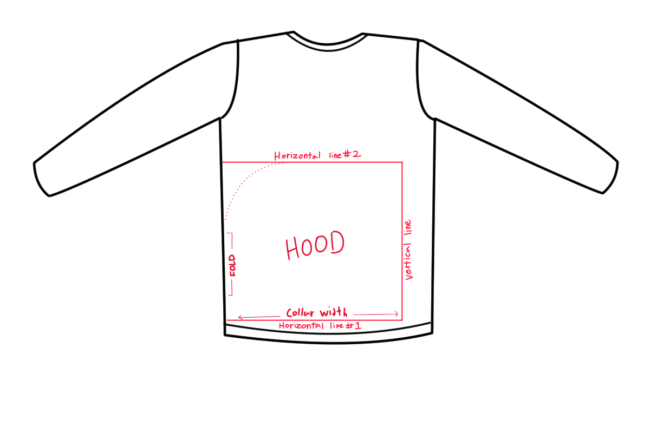
(Drawing is not drawn to scale.)
Step 2:
Trace out a pocket shape just above the hood by drawing a 13″ x 8.5″ rectangle. You can adjust the rectangle however big or small you’d like, but these are the measurements that I used. Make a small mark about 5″ up from the bottom on both sides of the rectangle. Next, on the top of the rectangle, find the center and draw a small mark 2.5″ from the center on each side. Then draw out a curve on each side of the rectangle.

You can also draw horizontal a line about 2″ up from each sleeve to use as cuffs for the hoodie.
Step 3:
Before cutting out all the pieces, make sure there’s enough room for seam allowance. On the non-folded edge of the hood, you’ll also want to add a little extra for a hem. Now you can cut out all the pieces.
Step 4:
To assemble the hood, fold the hood inside out and start sewing along the top edge and down the curve. Stop at the fold.
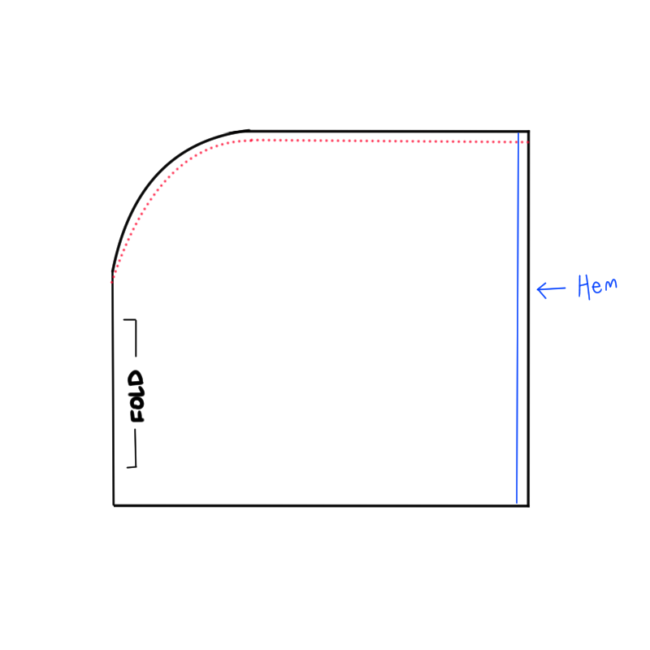 Use an iron to press open the seam you just sewed, then press down the hem along the long edge. When sewing down the hem, make sure to leave enough room for a piece of yarn to go through.
Step 5:
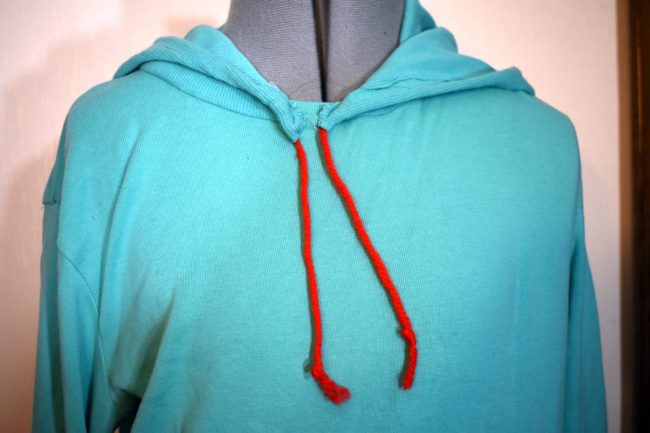
Sew the non-hemmed edge of the hood to the collar of the shirt that you’re using for the base of the hoodie, lining up the fold of the hood with the center back of the collar. It helps to the hood in place before sewing. Make sure to start sewing just after the folded over hem and stop just before the hem on the other side so that you’ll be able to add in the yarn later.
Step 6:
After sewing on the hood, cut a long piece of red yarn that is about 10″ longer than the length of the opening of the hood. Thread the yarn through the opening in the hem by tying one end of the yarn to a paper clip or safety pin and guiding it through the hem until it comes out the other end. Pull the yarn until both tails of the yarn are the same length, then tie off the ends.
Step 7:
For the pocket, fold over all the edges and press down with an iron to get a neat edge. Folding and ironing curves can be a little tricky, but if you fold over and press a little bit at a time, it should go smoothly. After all the edges have been pressed down neatly, you will want to sew over the curved edges. After that has been done, you can pin the pocket in place just above the bottom hem of the shirt. Attach the pocket by top-stitching on all sides except for the curved edges.

Step 8:
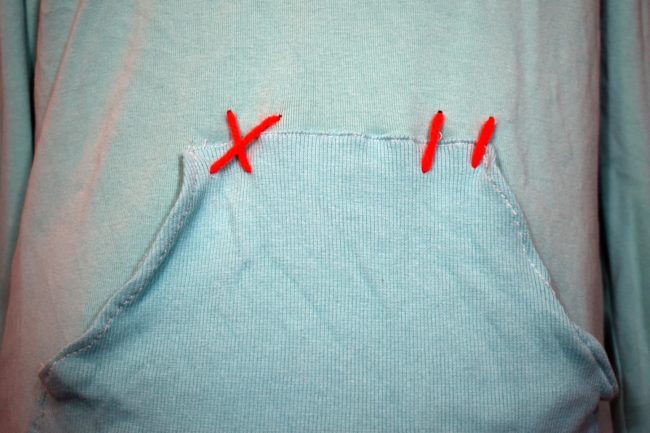
Thread a big needle with another piece of red yarn. I find the easiest way to thread the yarn through the needle is to put scotch tape over one end of the yarn to flatten it, cut it to fit through the eye of the needle, and then pull it through. Now use the yarn to sew on the top edge of the pocket an X and two lines.
Step 9:
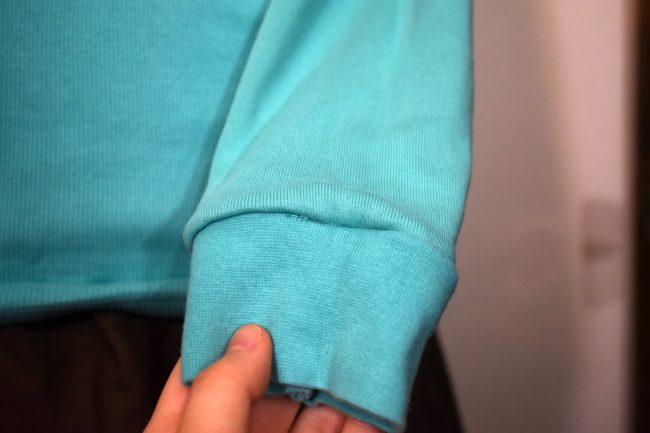
Take the 2″ cuffs that you cut out from the “details” shirt, fold them inside out, and sew along the seams to make the cuffs just a tiny bit smaller. Then sew them onto the sleeves of the hoodie. If you want, before sewing on the cuffs, you can cut off the existing hems on the sleeves of the hoodie, or seam rip them using a seam ripper. When sewing on the cuffs, you’ll want to pull the cuffs to stretch them to the size of the sleeves. Because of how small the sleeves are, you’ll want to take your time and sew carefully. The end result should look something like this:
Step 10:
To make the skirt, you will need to first make a pattern. Start by measuring your natural waist. Because we’ll be adding an elastic waistband to the skirt, you’ll want to add a couple of inches to the waist measurement. Now is the time to determine how many pleats we’ll be wanting. My skirt has a total of 8 large pleats on each side, and each pleat’s width is 4 cm. Since each pleat gets folded over, you’ll want to double the width of the pleat when drafting out the pattern. So the total width of the skirt pattern’s waist measurement will be (Pleat width x 2) * the number of pleats you’ll want + your waist measurement. Divide that number in half, and use that measurement to draw out half of a skirt pattern, that should look something like this:
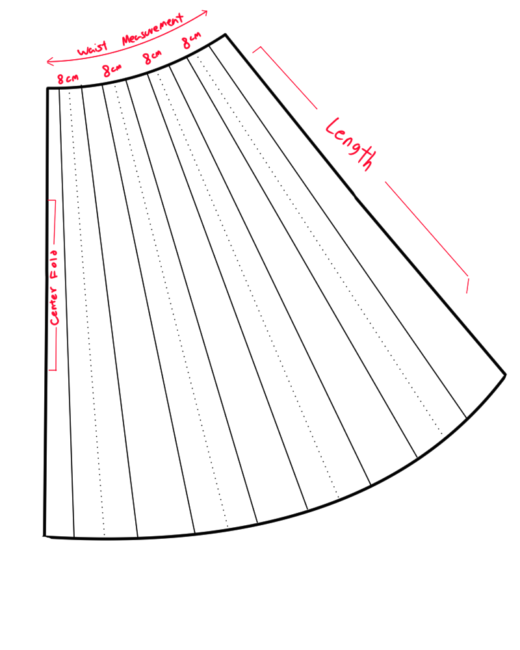
For the length of the skirt, measure from your waist down to however long you want your skirt to be. Even though Vanellope wears a mini-skirt, I chose to make my skirt quite long, just below knee-length. Whatever length you decide will be the length of the skirt.
Draw your skirt pattern on any pattern making paper. If you don’t have pattern making paper, you can tape together sheets of printer paper with scotch tape until you get paper big enough to draw out your pattern. After you have the pattern drawn out on the paper, cut it out.
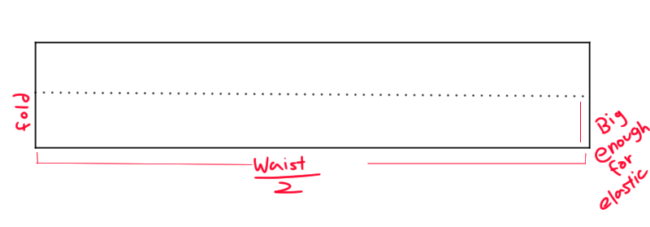
For the waistband, take the waist measurement from earlier (your natural waist + a couple of inches), divide it in half, and use that measurement to draw a long horizontal line. You’ll want the waistband to be big enough to hold your elastic, so take the width of the elastic you’ll be using, add half an inch or so, and double that measurement. Your pattern should look something like this:
Step 11:
Fold your fabric in half, and place your pattern down and line up the edge marked “Center Fold” with the fold of the fabric. Cut it out, and then repeat to get the two pieces for your skirt. Then cut out your waistband on the fold. Don’t forget to add seam allowance when cutting out all your pieces.
Now you can either sew the skirt pieces together before or after doing the pleats. I personally find it easier to iron the pleats in before sewing the sides, but it’s up to you. To do the pleats, you’ll want to use an iron to fold and press all your pleats into place. Once they’re all ironed flat, pin them down and sew over the tops with a long, loose stitch to baste them.
Once the pleats are basted and the skirt is sewn together, you’ll want to attach the waistband. Now that the pleats are folded into place, the width of the skirt should be the same as the waistband. Remember when sewing on the waistband to leave a small opening so you can put in the elastic. To get the elastic to be the right size, wrap it around your waist, and cut off an inch or two so it will stay in place. Using a safety pin, thread the elastic through one side of the waistband and out the other. Make sure the elastic didn’t twist at all when going through the waistband and stayed flat before sewing the two ends together. Now you can sew the opening shut with the sewing machine or by hand if it would be easier.
Finally, sew the hem at bottom edge of the skirt.
Step 12:
For Vanellope’s leggings, you can buy a pair of mint-colored leggings, or you can make a pair yourself like I did. To make the leggings, I traced a pair of leggings I already had and used it as a pattern. To add the stripes to Vanellope’s leggings, you can either paint them with fabric paint, or sew them on.
To paint the stripes onto the leggings, first stick a large piece of cardboard between the legs so that the paint doesn’t leak through to the other side. Then use masking tape to tape off the sections: three angled stripes on the right leg, and three straight stripes with a red stripe in the middle of each on the left.
To sew on the stripes, if you are sewing the leggings yourself, you’ll want to attach the stripes to the legs before sewing them together. Cut the stripes out of white stretchy fabric and sew them onto the leg of the leggings similar to how we did the pocket of the hoodie: fold down the edges, iron them flat, and top-stitch them into place.
This is how I cut out the shapes for the angled stripes. The width of each stripe is 1.5″.
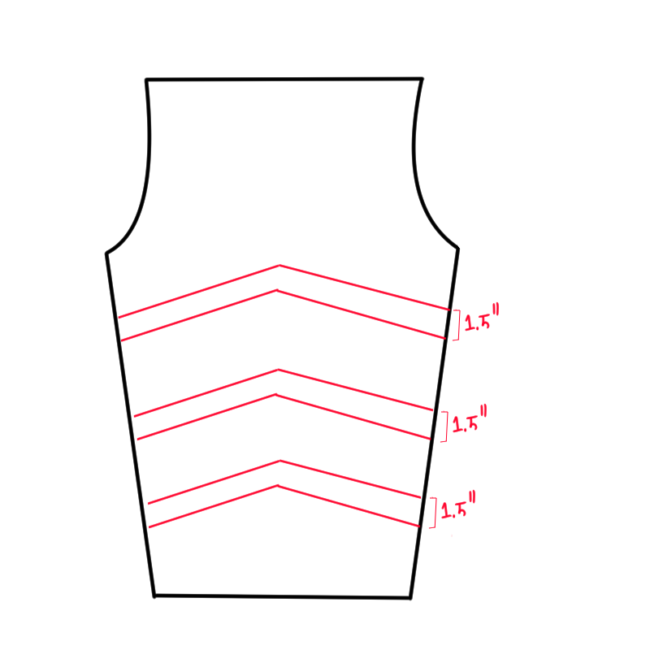
(Drawing is not drawn to scale.)
As for the straight stripes, I just cut rectangles that were 2 and a quarter inches. For the red stripe that is in the middle, I used a red fabric pen, but you can also use red fabric paint.
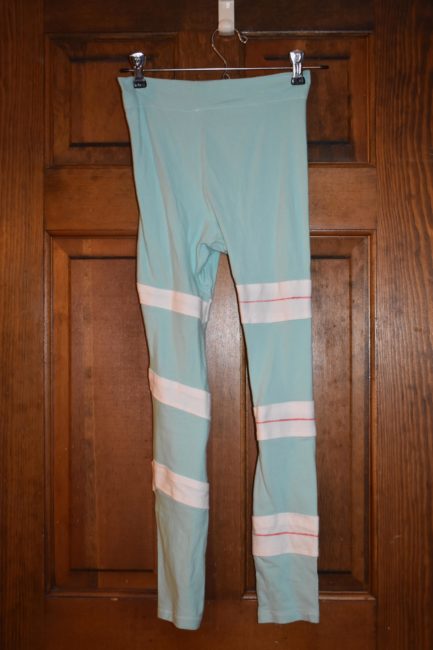
And this is what the final result should look like:
Step 13:
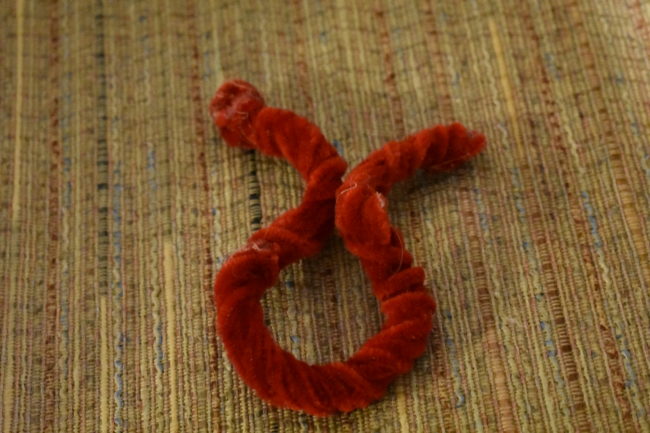
To make the Twizzler hair tie that sits in Vanellope’s hair, take out a good amount of pipe cleaners and start twisting them around each other tightly. You don’t want the Twizzler to be too thick, but you also don’t want it to be too thin. I don’t remember how many pipe cleaners I used for mine, but I probably used just over half of the pipe cleaners that were in the pack I got.
Once you have the pipe cleaners twisted together, use hot glue to secure the ends, as well as seal in any wire that’s sticking out. Finally, bend the entire thing into a horseshoe-like shape. This shape makes it really easy to go around the ponytail and the two ends can wrap around each other, securing it in place.
Step 14:
To make the candies that are sprinkled throughout Vanellope’s hair, cut a few stars, hearts, and circles out of craft foam in various sizes. These can be cut out of any color, like blue, pink, yellow, green, orange, and white. For some, you might want to use two layers of foam glued together to add some dimension. You can also use a marker of any kind to add some details, like the spiral on a peppermint. I used fabric markers for this, but any marker like a Sharpie could work just as well.
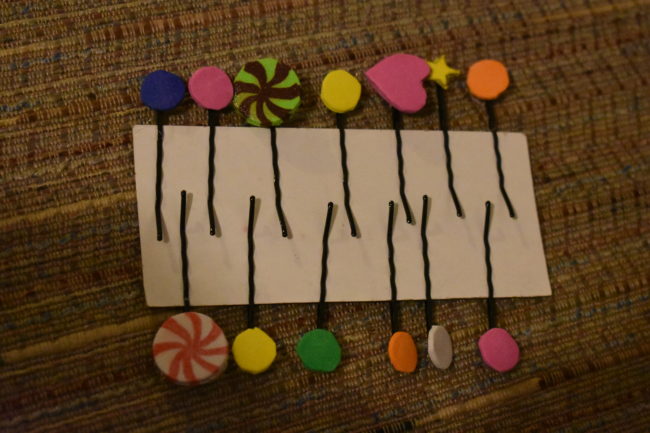
If you’re using a wig for your costume, you could probably glue these foam candies directly into the hair, but if you’re using your real hair or don’t want to glue the foam onto the wig, you can glue them onto bobby pins. You will want to use a generous amount of hot glue to keep the foam from falling off the bobby pins.
Finally, seal in the foam using some gloss finish Mod Podge.

And that is all! I hope you found this tutorial helpful, and that it will help you to create your own Vanellope von Schweetz costume.
About the Author
Becky
Hello, my name is Becky. I started doing cosplay in 2016, but I've been sewing and making costumes since before then. Besides cosplay, I like music, art, and writing.


There are no comments yet, add one below.
Stay connected. Don't miss out!
Get new costume guides in your inbox once a month.


Leave a Comment