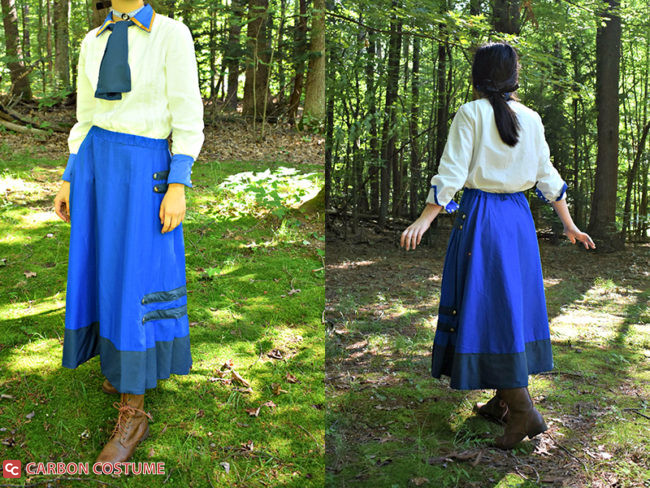
Make Your Own: Elizabeth from Bioshock Infinite
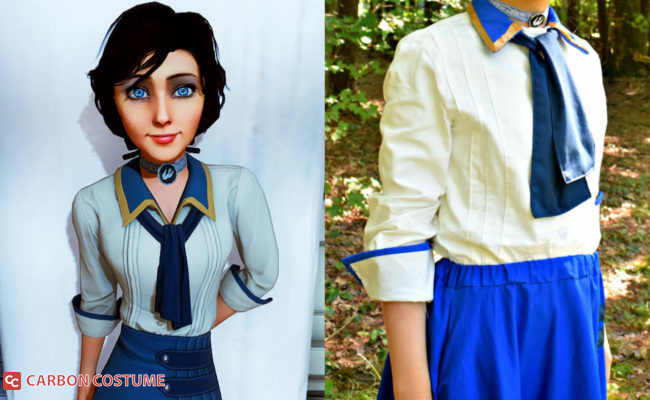
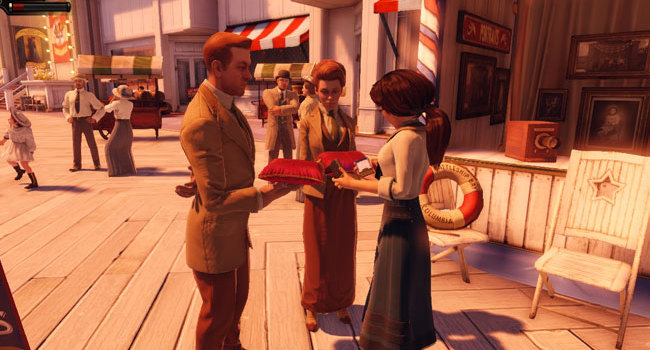
Bioshock Infinite is a first person shooter game from 2013, taking place in the year 1912 and centering around the flying city of Columbia. The game is played through the eyes of Private Investigator and former Pinkerton agent Booker DeWitt who is sent to Columbia to “find the girl”: Elizabeth, a young woman who has been locked away in a tower her whole life.
Elizabeth has a very courageous and determined personality, and has a knack for finding things, from coins lying around the streets to medical kits and ammo. From all the books she read while kept in her tower, Elizabeth has absorbed a lot of information and knows how to pick locks as well as break codes. She also has the ability to open Tears, doorways to other dimensions.
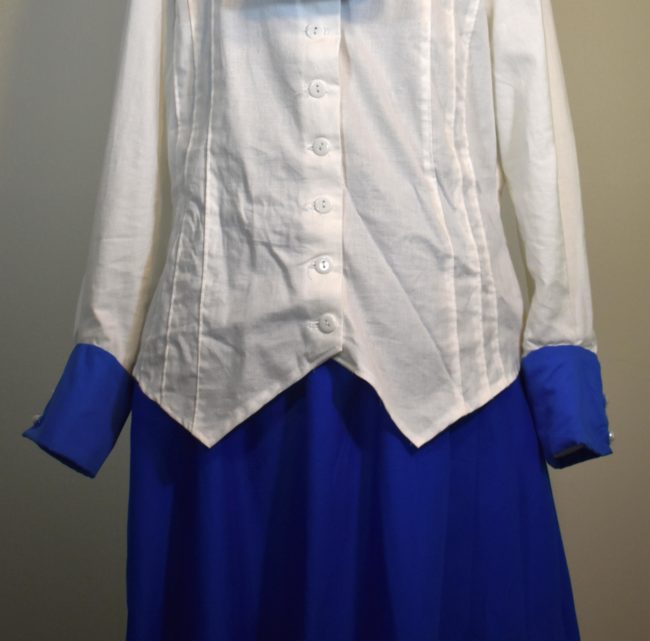
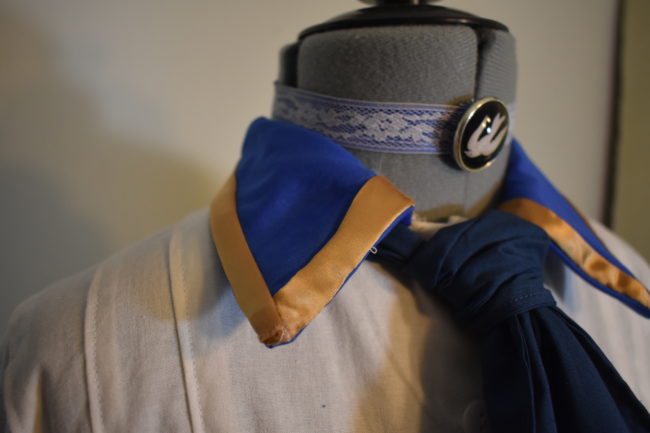
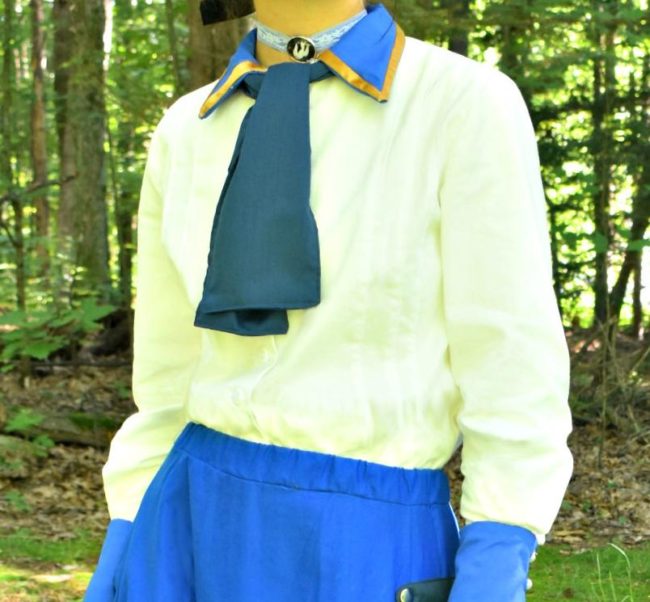
In the first half the game, Elizabeth wears a simple outfit in 1912 style: a white blouse, long blue skirt, a matching scarf, and a choker. She also wears a pair of knee-high boots. In this tutorial, I hope to show you how to make her outfit.
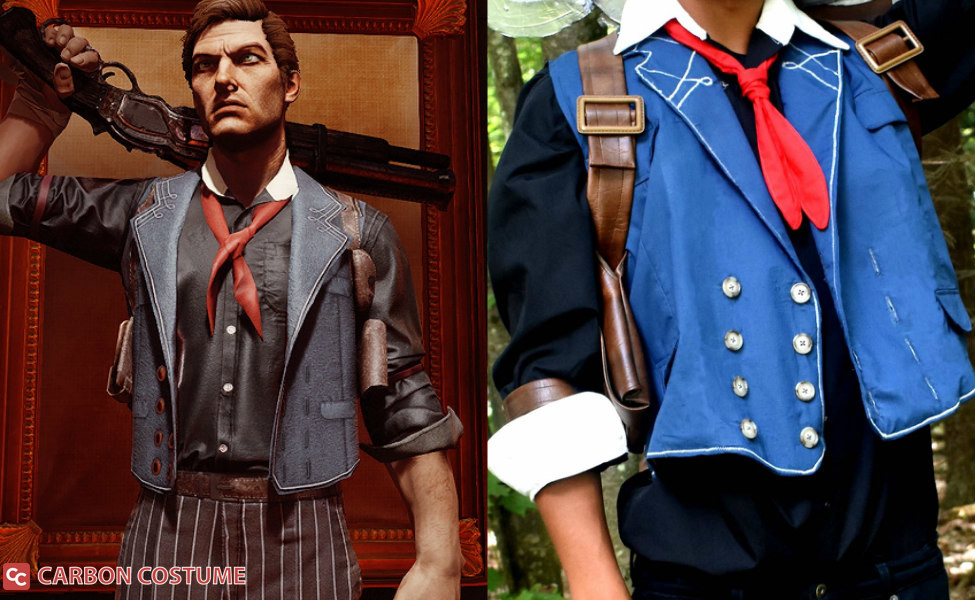
If you’re short on time, check out our closet cosplay for Elizabeth. And don’t miss our cosplay guides for the rest of the Bioshock cast.
Materials
Blouse:
- 2-3 yards White Cotton Fabric
- 1 yard or less Blue Cotton Fabric
- White Buttons
- 6 Pearl Buttons
- Gold Ribbon (1.5″)
Skirt:
Scarf:
Choker:
You will also need:
- Thimble
- Hot Glue Gun and Glue Sticks
- E6000 Glue
- Jewelry Pliers Kit
- Chalk pencils
- Sewing Machine
- Matching thread
- Sewing needles for hand stitching
- Sewing shears
- Fusible Interfacing
- Measuring tape
- Pins
- An iron
- Pattern making paper
Step 1:
To make the blouse, you’ll want to start by drafting out a pattern on pattern making paper. Start by drafting out a regular front bodice pattern using your measurements like you normally would. The pattern should look something like this:
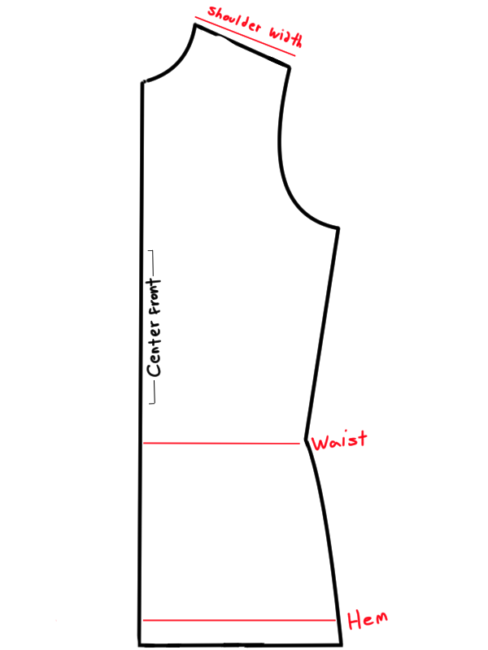
The pattern is not ready yet, so do not cut it out now.
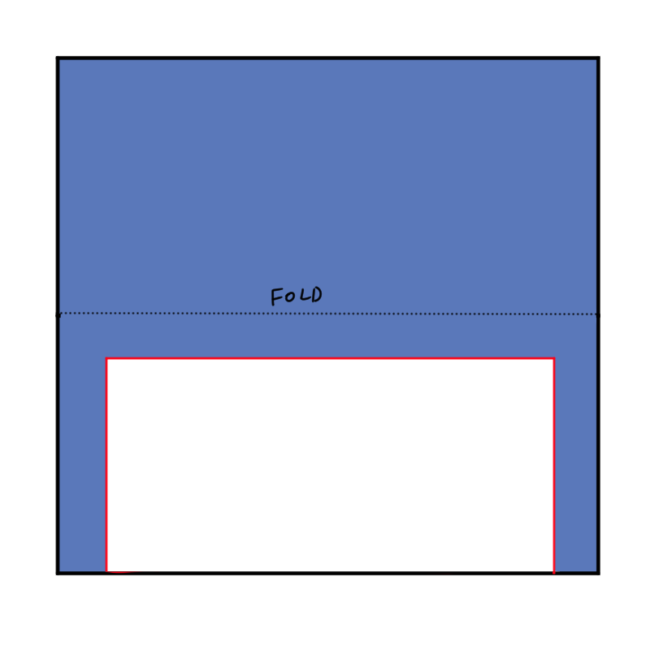
Elizabeth’s shirt is a button shirt, so you’ll want to add on a button stand. To do that, measure the width of the buttons you’ll be using, multiply that measurement by two. I used buttons with a width of 5/8″, so you’ll want to double that, giving you 1.25″, and then add that measurement to the center front of the shirt. Add another 1.25″ inches next to the one you just drew on so you’ll be able to have a neat, folded edge for the front of the shirt.
Elizabeth’s shirt also has 3 tucks down the front on each side, so you’ll want to measure how wide you want your tucks to be. I made the tucks on my shirt 2 cm wide. Since the tuck has to be folded over, you’ll want to double the width, making it 4 cm wide. This is how much room you’ll want to add for each tuck, and you’ll want three in total, making the total width to add 12 cm. Now you want to extend the shoulder seam on your pattern by 12 cm. Draw two vertical lines 4 centimeters apart for each tuck, spacing them evenly on the shoulder seam. Your pattern should now look something like this:

Step 2:
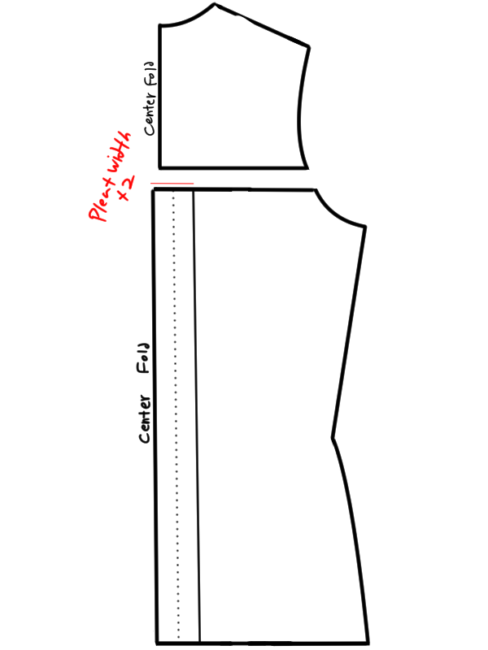
For the back of the shirt, you want to divide it into two sections. For the top of the bodice, you want to draw it normally, but at around 2/3 of the way through the arm hole, you want to stop and end the section there. For the remaining section of the back bodice, we’ll be adding a box pleat. Find out how big you want your pleat to be, double it, and then add that to the width of the rest of the bodice. Your pattern pieces should look something like this:
Step 3:
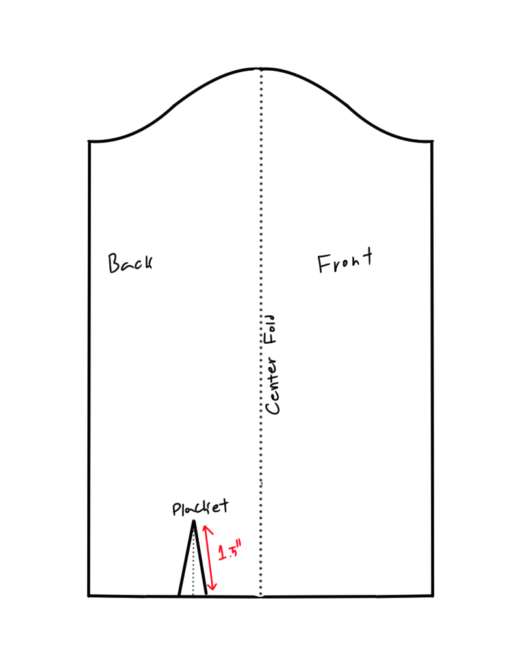
For the sleeves, you want to draw the sleeve as normal, however you want the sleeve to look more like a rectangle than a normal sleeve would. However, before drawing the sleeve pattern, you’ll want to fold your pattern making paper in half so you’ll be drawing on a fold and you’ll end up with a complete sleeve pattern instead of a half. It should look something like this:
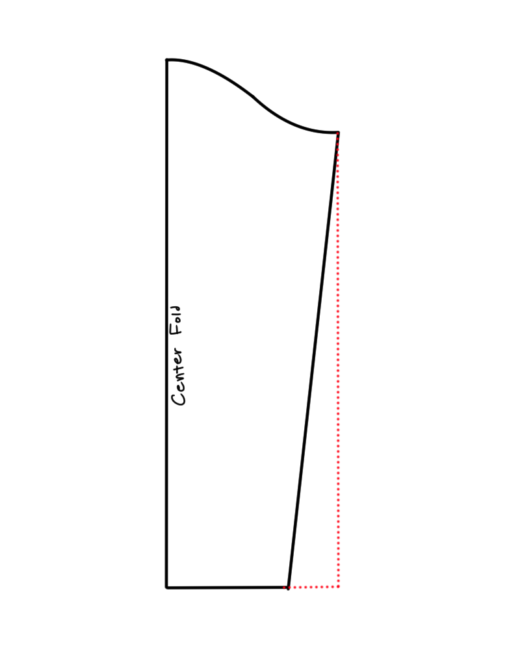
Now that you have the complete sleeve, you’ll want to mark one half the front of the sleeve and the other the back. On the half labeled back, you’ll want to add a small placket, maybe around 1.5″ inches.
(drawing not drawn to scale)
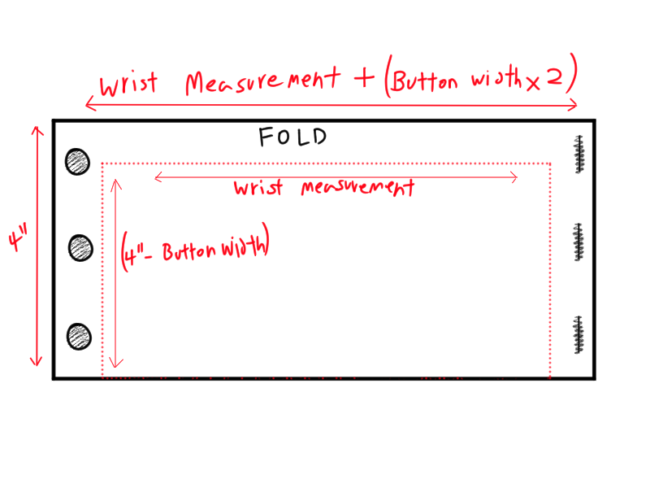
Next we want to make the cuff. First measure around your wrist. Add a half inch or so to that measurement so it’s not too tight on your wrist. Measure the width of the pearl buttons you’re using, double it, and add that to your wrist measurement. Use that total measurement to draw a horizontal line, and then draw 4″ vertical lines on each end. Draw another horizontal line on top to complete the rectangle. This will be the pattern for your cuff.
You’ll want to make another rectangle that is slightly smaller than the first one, the dimensions being (4″ – Button Width) x Original Wrist Measurement (without the button width x 2). This will be for the white panel that is on the inside of Elizabeth’s cuffs.
Step 4:
Now you want to start cutting out the patterns and then the fabric pieces. For the back bodice pieces, you’ll want to cut them out on a fold, and for the rest you just want to cut 2 of each. You want to cut out the bodice pieces and the sleeves, as well as the smaller rectangle out of your white cotton, and the cuffs out of your blue fabric. Remember to add seam allowance to all your pieces before cutting them out.
Before you can start sewing, you’ll want to fold and press the tucks with an iron. After ironing them, pin them in place and then use your sewing machine to stitch them down into place. Now you can sew the shoulder seams of the front bodice pieces and the back bodice piece together.
This is what the tucks should like like once they’re sewed down:

Step 5:
For the collar, you want to measure around the neckline of your front and back bodice pieces, not including the button stand we added to the front of the bodice. Now take this neckline measurement, divide it by two, and use it to draw a collar piece like this:
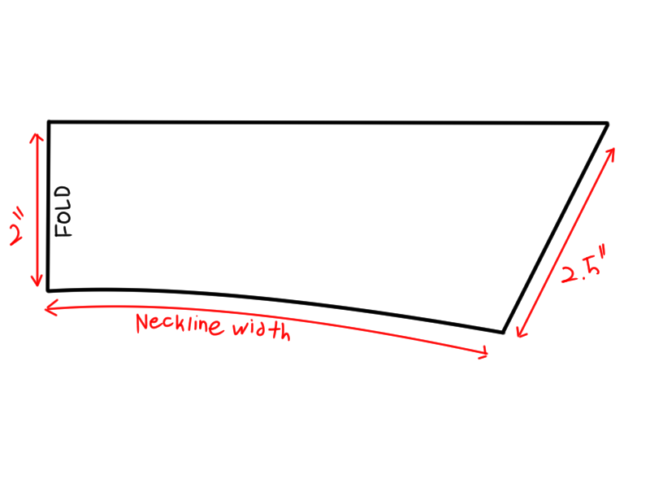
For the width of the collar, I used 2.5″ for the front and 2″ for the back, but you can make the collar bigger if you want. You’ll want to cut 2 of these out on a fold out of blue cotton, and don’t forget to add seam allowance.
Step 6:
Getting back to the bodice, now that the shoulder seams are sewn, we can attach the bottom half of the back bodice. Before sewing it on, you’ll want to iron the box pleat into place. Once the box pleat has been ironed, pin it in place and baste it using a long, loose stitch on your sewing machine. Now that the box pleat is held in place, you can attach it to the top part of the back bodice. And it should look something like this:

Step 7:
Now, you can either attach the sleeves before sewing up the side seams or after. You’ll want to position the sleeves so that the side with the placket is always in the back.
Once the sleeves are attached, we can start working on the cuffs. First we want to address the placket. There are a few ways to sew a placket, one way is to cut out a facing: a small rectangle that is a little bit bigger than the height of the placket (in this case, 1.5″) and maybe 2-3″ wide. Draw a 2.5″ line down the center of the small rectangle, line it up with the placket line on the sleeve, right side to right side, and then slowly sew around the line.
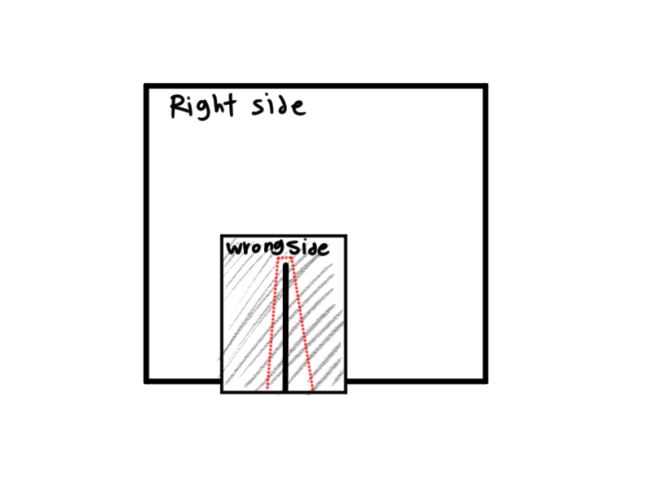
Carefully cut down the 1.5″ line, and flip the facing over so that the wrong side is now to the inside of the sleeve. Now you can top stitch around the edge to keep the facing in place.
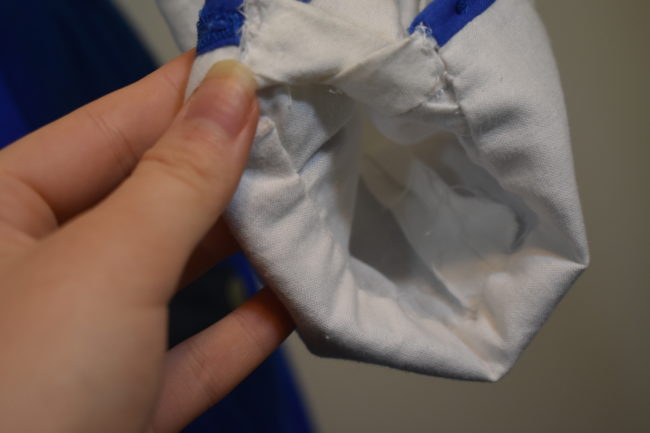
Now we can work on the cuffs. Elizabeth’s cuffs are blue on the outside, and mostly white on the inside, but they have a blue border around the edge. One way to recreate this is to take blue cuffs that were cut out on a fold and unfold it so that the right sides are facing up. Next you’ll want to take the smaller white rectangle, fold down and press the edges to get a clean edge, center the white rectangle on the half of the blue cuff that will be to the inside, and then using a needle and thread, slip stitch the rectangle in place.
If your white fabric is a little thin and you can see the blue through it, it might help to cut out a rectangle the same size out of iron-on interfacing. Press that onto the inside of the white rectangle before slip stitching it in place. Now you can fold the blue rectangle over, right sides together, and sew the sides, leaving the bottom edge open.
Once sewn, flip the cuff right side out and before attaching it to the sleeve, we will want to gather the bottom of the sleeve. You can do that by hand or with the machine. Once the sleeve is gathered to the same size as the cuff, line the edge of the cuff with the the placket and sew the cuff in place.

We want this cuff to have a neat edge when it connects to the sleeve, hiding the raw edges. To do this, you’ll want to line the cuff up to the sleeve, right sides to right sides, and then only sew on the solid blue half to the sleeve, leaving the side with the white rectangle not connected. Now you can fold and press the bottom edge with an iron and slip stitch the cuff into place.
Step 8:
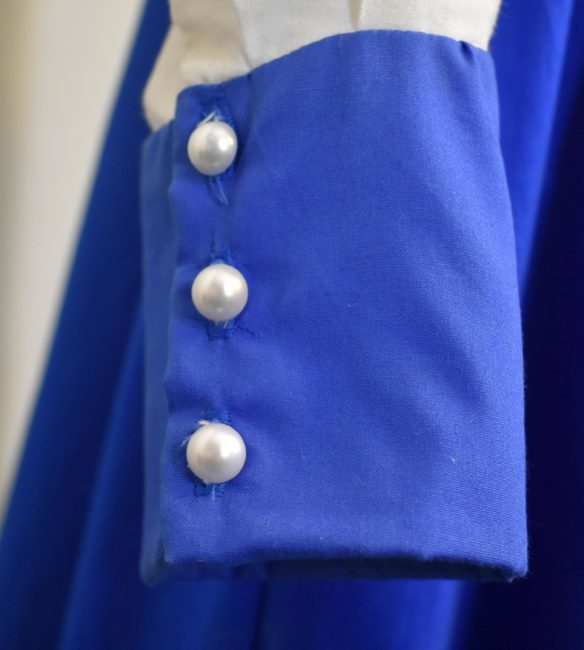
Next we want to work on the buttons and buttonholes for both the front of the shirt and the cuffs. Elizabeth has three buttons on each cuff, so you’ll want to space them evenly. When sewing on the buttonholes, it can be a little tricky to get it right because we don’t want the button holes to end up going past the blue border and overlap onto the white section that’s on the inside of the sleeve.
For the shirt, first we have to take care of the button stand. If you want, you can iron on a strip if iron-on interfacing to the button stand, but it isn’t necessary because the two layers of fabric should be stiff enough for the buttons and button holes.
To get a clean edge, fold the button stand so that the right sides are facing. At the top edge where the two pieces overlap, sew them together, and then fold the button stand right side out. Now you can start marking out how many buttons you want and spacing them evenly, and sew them on as you normally would.
Now that the button stand is held in place, you can now start hemming the bottom of the shirt. If you want, you can cut the bottom of the front of the shirt to have more of a triangular shape, but it is not necessary.
Step 9:
To make the collar, before sewing the edges together, you’ll want to attach the gold ribbon one one of the collar pieces. To do that, cut a strip of gold ribbon for each outer edge of the collar, 3 strips of ribbon in total. About 1/2″ from the edge of the collar (not including seam allowance), lay one strip of ribbon down onto the collar with the right sides together. Sew a small stitch along the edge of the ribbon, and once it’s sewn in place, flip it over and iron flat.
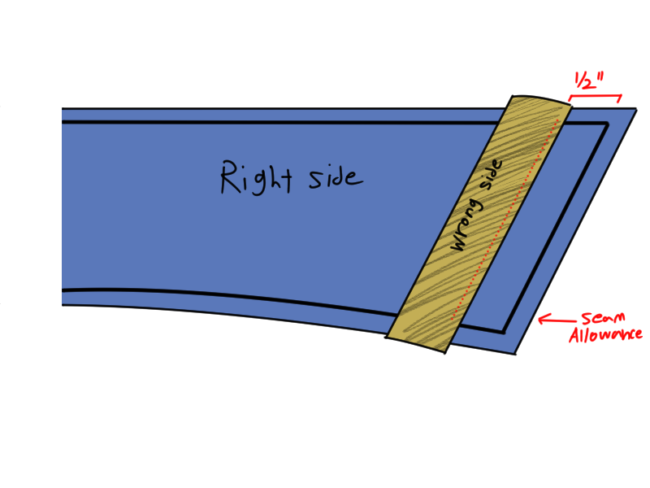
Repeat to the other two sides. Once the ribbons are pressed flat, you can sew the collar together, leaving the curved edge that doesn’t have any ribbon on it open. Flip it inside out, and now you should have a collar with clean, gold edges.
To attach the collar to the shirt, sew it on the same way you did the cuffs by sewing on only one side of the collar and then slip stitching the other side by hand, hiding the raw edges.
Step 10:
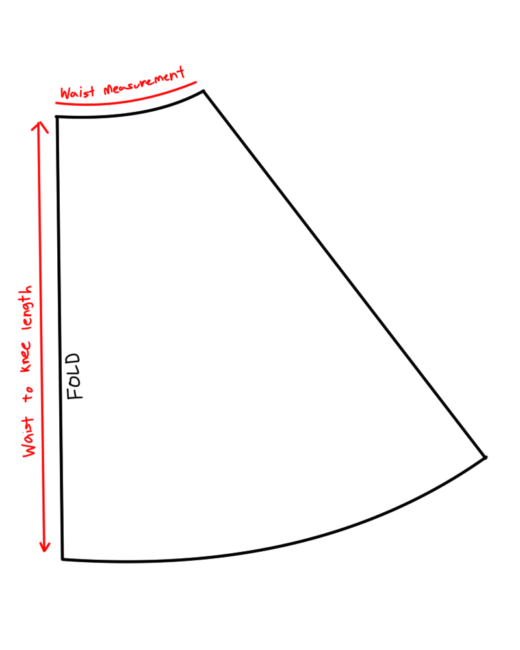
Now that the shirt is done, we can start on the skirt. First you’ll want to start with a pattern. Start by making a regular skirt pattern, by measuring your natural waist. Because we’ll be adding elastic to the skirt, you’ll want to add a few inches to that measurement. Divide that total measurement in half, and then half again.
Elizabeth’s skirt extends to just below knee-length, so measure from your waist to just below your knees. To add a bit of flare to the skirt, you’ll want to angle out the line that connects the waist to the bottom of the skirt by quite a bit. Your pattern should look something like this:
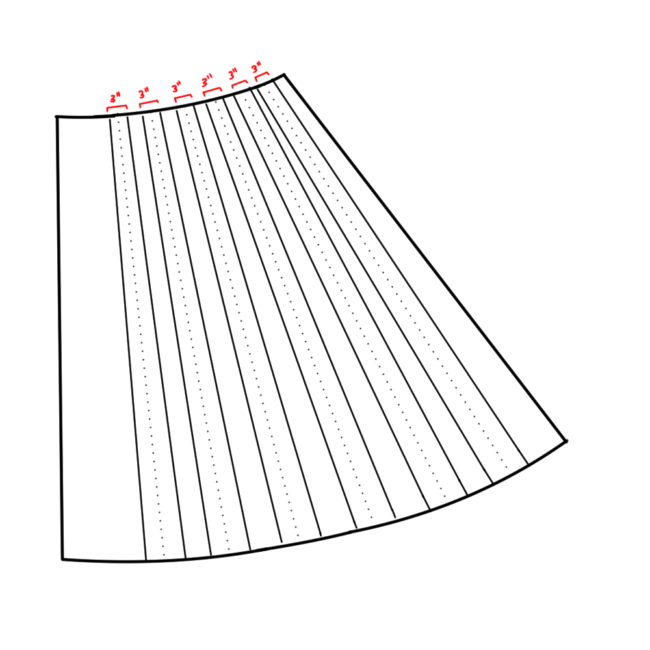
Elizabeth’s skirt also has a few pleats on the front left, so you’ll want to draw out another pattern. To do that, you want to first determine how many pleats you’ll want and how wide they’ll be. I had about 6 pleats on my skirt, and each pleat had a width of 1.5″. Since each pleat gets folded over, you’ll want to double the width, so you’ll have 3″. Multiply that by the number of pleats you want, and then add that to the waist measurement. Draw out the pattern and mark out the pleats. The pleats on Elizabeth’s skirt don’t start right in the middle, so you should start drawing them a bit off center. Your pattern should look something like this:
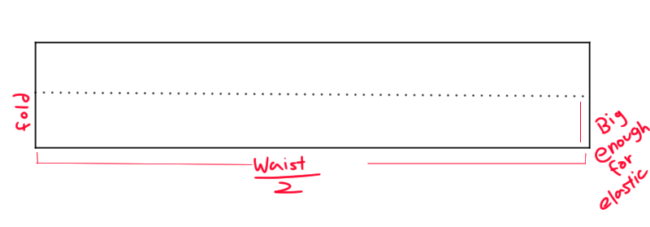
For the elastic waistband, take the same waist measurement from earlier (your natural waist + a couple of inches), divide that measurement in half, and use that number to draw out a long horizontal line. For the height of the waistband, take the width of the elastic that you’ll be using and add about a half an inch or so. Double that total number, and draw a vertical line up from the end of the horizontal line. Complete the rectangle, and your pattern should look like this:
Now you can start cutting out your fabric pieces. Remember to add seam allowance to all the pieces. For the back of the skirt, using the regular skirt pattern (not the one with the pleats,) you’ll want to fold the fabric in half and cut out the piece on a fold.
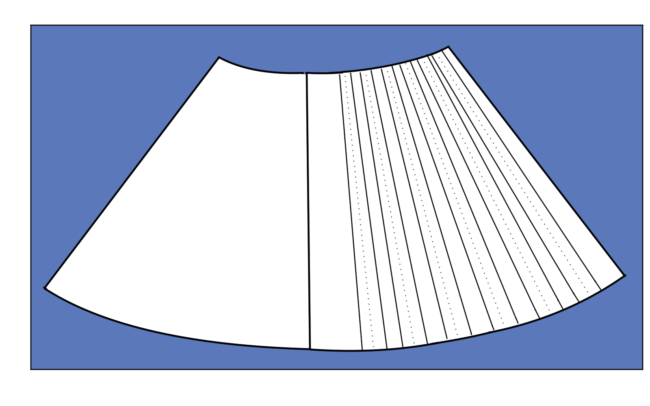
For the front of the skirt, you don’t want to cut out the pieces on a fold, rather you want to place the two skirt patterns (the one with the pleats and the one without) next to each other and cut them out as one big piece.
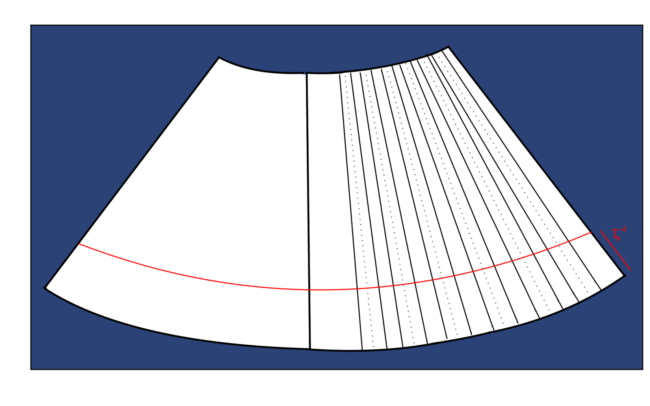
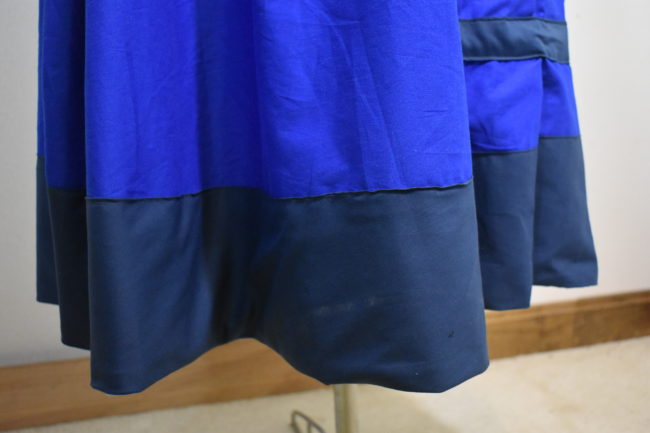
Next you’ll want to repeat the same process for both the front and back of the skirt out of the navy blue fabric, just you only want to cut about 5″ up from the bottom of the skirt.
Now you’ll want to sew on these navy blue strips to the bottom of the full skirt pieces. I found the easiest way to attach the navy blue strips is to line the pieces up with the skirt pieces, wrong sides together, and join them together at the bottom. Then flip the dark blue up and over, now with the right sides together. This hides the bottom seam neatly. Now you can fold in and press a little bit at the top of the blue strip and then top stitch the navy blue strip into place. It should now look something like this:
Now, you can start assembling the skirt first or start working on the pleats. I personally find it easier to iron the pleats in before sewing the skirt together, but it’s up to you.
For the pleats, start folding over and ironing flat each pleat. Once they’re all pressed, hold them in place with pins and sew over the tops with a long, loose stitch to baste them. You might want to baste them not only at the top but in a few places because we will also be adding some straps over the pleats in a few places and we don’t want the pleats to move around as we’re doing this.
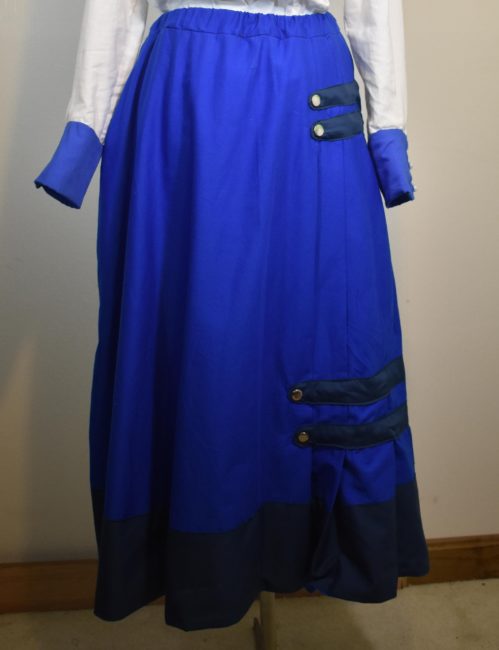
Step 11:
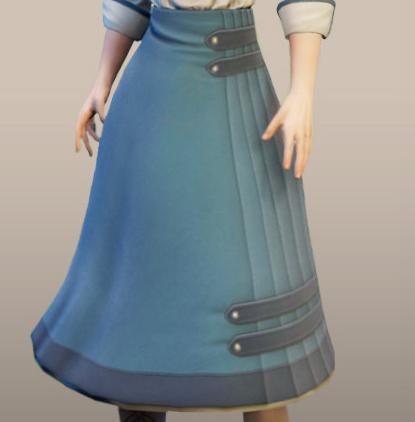
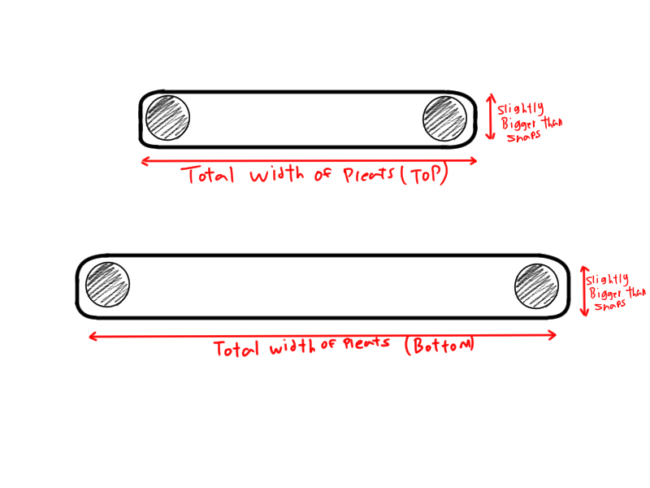
Elizabeth has a total of 4 straps over the pleats that are on her skirt, two at the top and two at the bottom. To make these, first measure the total width of all the pleats on the skirt. Because skirts are more narrow at the top than they are at the bottom, the straps at the bottom of the skirt will be a lot wider than the ones at the top. So measure the width of the pleats at the top of the skirt, and also at the bottom.
Cut strips of navy blue fabric where the width is the width of the pleats + an extra inch or so, and the height is just slightly bigger than the width of the heavy duty snaps we’ll be using.
For each strap, you’ll want to cut 2 pieces out of fabric. Make sure to add seam allowance before cutting them out. Now you want to sew around the two strap pieces, but leaving a small opening so you can flip it inside out. Once it’s turned inside out, you can hand sew the opening shut if you want, but it’s not necessary because we’ll be top stitching the straps in place and that should keep the opening in place. Repeat to make 3 more straps.
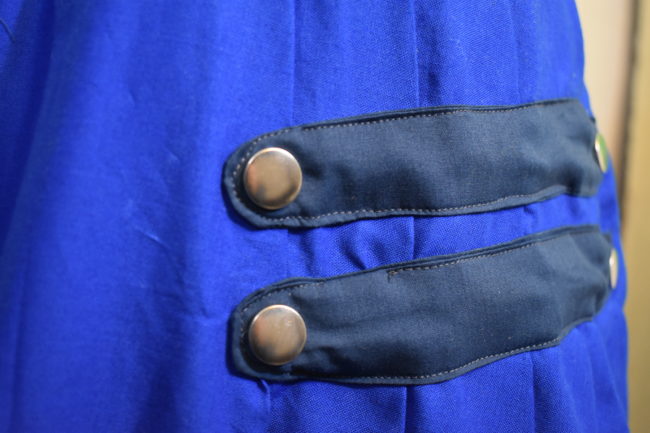
Once you have all the straps made, you want to pin them into place across the pleats: the 2 shorter straps at the top of the skirt and the 2 longer ones close to the bottom. Make sure all the pleats stay flat before top stitching the straps to attach them.
Now that the straps are attached, you now want to attach the heavy duty snaps. We’ll only be needing the upper, smooth part of the snap, and a total of 8 snap tops. Follow the packages instructions to attach them, one snap for each end of each strap.
Step 12:
Now to finish the skirt, all we need is to attach the waistband. When sewing on the waistband, remember to leave a small opening so you can insert the elastic. To cut a piece of elastic that is the right size, wrap the elastic around your waist and cut off about an inch or two shorter. Using a safety pin, thread the elastic through one side of the waistband and out the other. Before sewing the ends of the elastic together, make sure the elastic didn’t twist at all when going through the waistband and stayed flat. Now you can sew the opening shut with the sewing machine or by hand, and the skirt is done.
Step 13:
To make Elizabeth’s scarf, you want take a measuring tape and measure around your neck how long you want the scarf to be. I made the length of mine 39″. For the width, you want it to be about 4.5″. Cut out 2 rectangles using these dimensions out of the navy blue fabric, but before sewing them together, you’ll want to have the rectangles taper in just a little bit from each end all the way to the center.
Sew the scarf together the same way we did the straps on the skirt: sewing around the edges, leaving an opening so it can be flipped right side out, and then top stitch all around. And that’s all for the scarf.
Step 14:
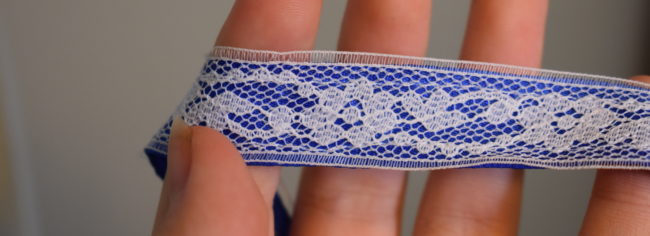
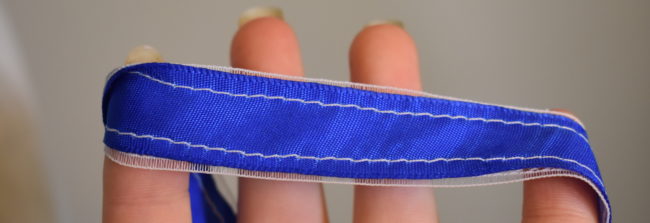
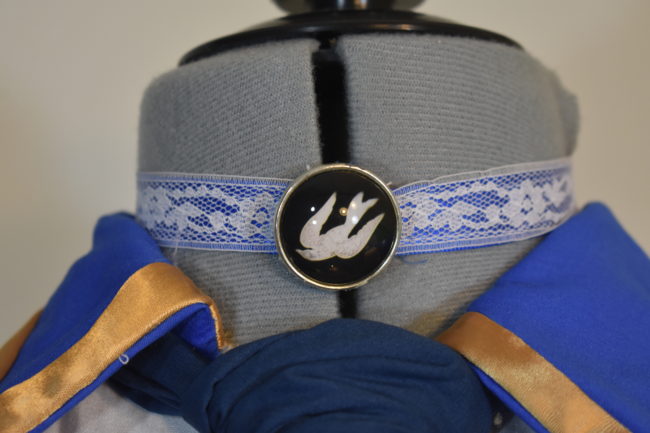
To make the choker, start by measuring around your neck. Add about an inch to that measurement and cut out a strip of blue ribbon to that length. Now cut out a strip of lace hem tape to that same length, top stitch it into place, and fold over and hem the ends.
Take the pendant that you’ll be using, and if it has a loop at the top for a necklace chain, you’ll want to cut it off and smooth off any rough edges with a nail file.
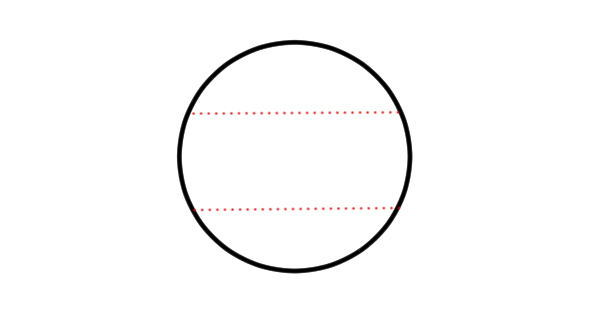
Use the pendant to trace out two circles out of fabric and stack them together. Measure the width of the ribbon, which should be 5/8″. Draw two horizontal lines across the circles, spaced 5/8″ apart. Sew down the lines, attaching the two circles together.
Using the E6000 glue, you want to glue the circle into place behind the pendant. We want to the 5/8″ gap to stay open, so to keep it from getting stuck to the glue, slide a small piece of cardboard in between the layers while the glue dries.
Once the glue is all dried, you should be able to slide the ribbon for the choker through the opening at the back of the pendant.
Finally, use pliers to attach the choker clasps, and the choker is done.
Step 15:
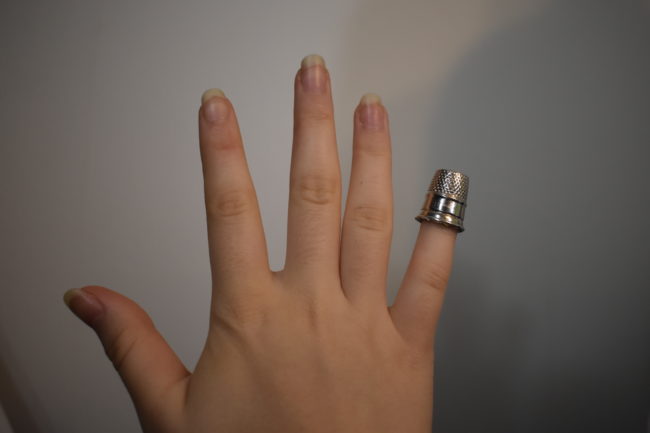
Finally, to complete the look, you want to get a thimble to put over your right pinky finger. If the thimble you’re using is too big for your pinky, you can use hot glue around the inside to make it a little tighter and fit better.
To finish off the outfit, you can pair it with any knee-high brown boots.
I hope this tutorial was informative and useful, and that it will help you to create an Elizabeth cosplay of your own.
About the Author
Becky
Hello, my name is Becky. I started doing cosplay in 2016, but I've been sewing and making costumes since before then. Besides cosplay, I like music, art, and writing.


There are no comments yet, add one below.
Stay connected. Don't miss out!
Get new costume guides in your inbox once a month.


Leave a Comment