Make Your Own: Rosalind Lutece from Bioshock Infinite
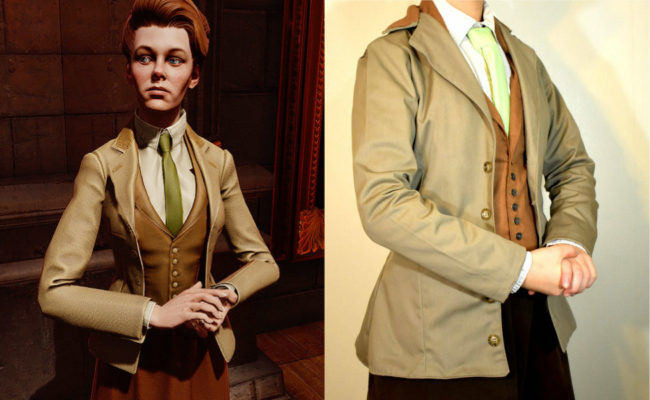
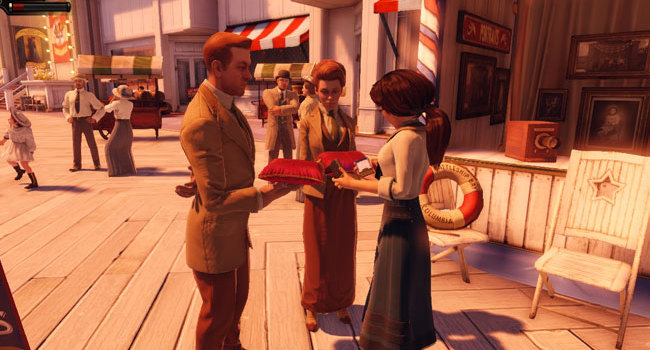
Rosalind Lutece is one of the many characters from 2013’s Bioshock Infinite. She is a quantum physicist and together with her “twin brother” Robert, helps to guide Booker DeWitt throughout the floating city of Columbia.
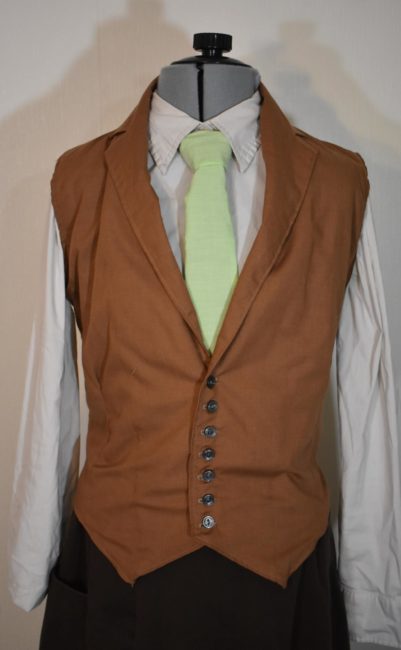
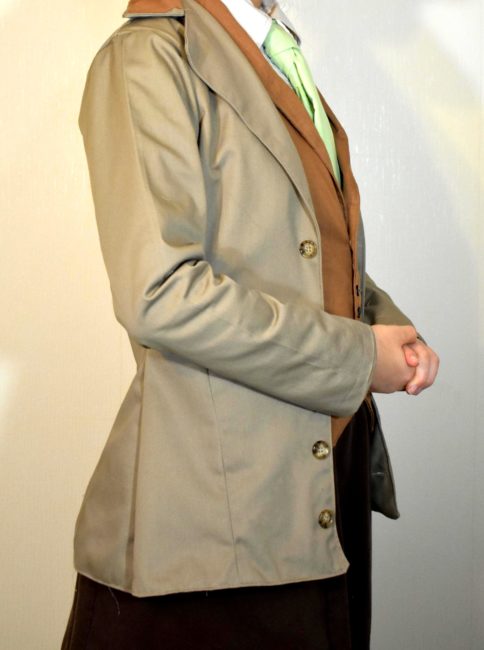
Throughout the game, Rosalind and her twin brother Robert can be seen wearing matching attire: A tan suit jacket over a vest, a green tie, and a white button-down shirt as well as brown bottoms. There are some differences to their outfits as well, and in this tutorial, I hope to show you how to make Rosalind’s outfit.
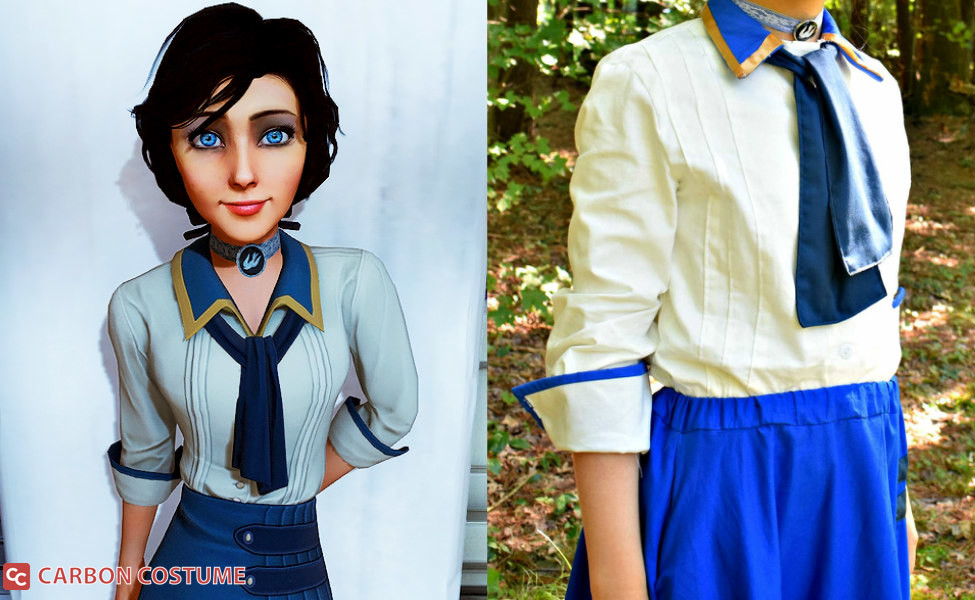
This is the advanced costume-making guide for Rosalind. Don’t miss our beginner’s Rosalind guide here, as well as the advanced guide for Elizabeth.
Materials:
Tie:
- 1/2 yard olive green or light green fabric
Vest:
Jacket:
You will also need:
- Chalk Pencils
- Sewing Machine
- Matching thread
- Sewing needles for hand stitching
- Sewing shears
- Fusible Interfacing
- Measuring tape
- Pins
- An iron
- Pattern making paper
Step 1:
To make Rosalind’s tie, you’ll first want to make a pattern. One easy way to make a tie would be to take an existing tie and trace it, but you can easily make a pattern from scratch.
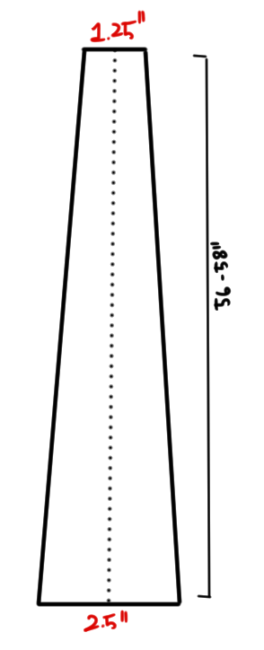
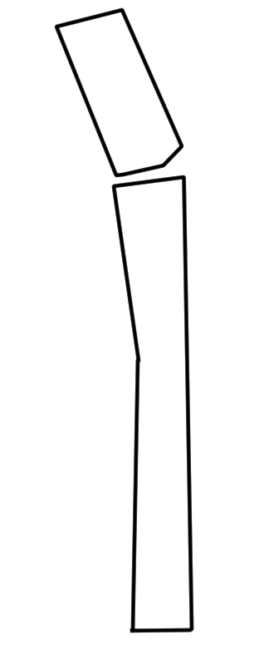
The length of a regular tie is around 56-58 inches long. Start by drawing a long line that is around that length. At one end, you want to draw a line that is 2.5″ wide through the center of the line. On the opposite end, draw another line that is 1.25″ wide. You can make the tie as wide or thin as you’d like, but these are the measurements I used. Now draw a long line on each side that connects the two ends. You should end up with a long rectangle that tapers in on one end.
Now you’ll want to add a small triangle to each end.
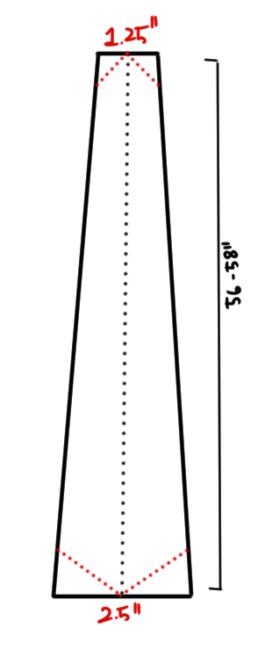
Now extend the triangle on both sides so that the triangles are now double in width. Connect each end with more lines, and your pattern is now complete.
Depending on the photo, Rosalind’s tie looks to be either a light green or an olive green. Use whichever fabric you’d like. (My tie turned out a little too light, so I’d suggest opting for something slightly darker than in my photos.)
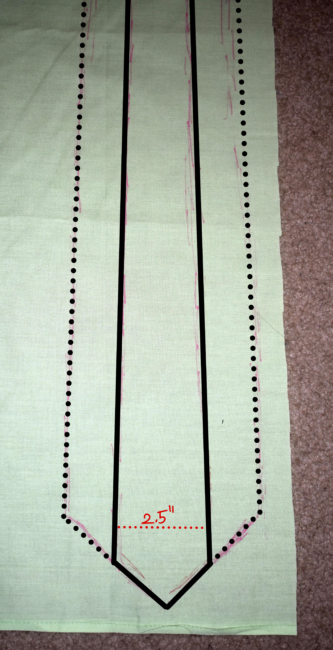
Using the your pattern as a guide, cut out two pieces. Don’t forget to add seam allowance. If you want, you can cut the second piece out of a lining fabric, and if your green fabric is a little too thin, you can add a layer of fusible interfacing to make it more opaque.
Line the two pieces up, good sides together, and sew them together along both triangular ends.

Now flip the tie right sides out and fold it in half lengthwise, good sides together, lining up the long edges.
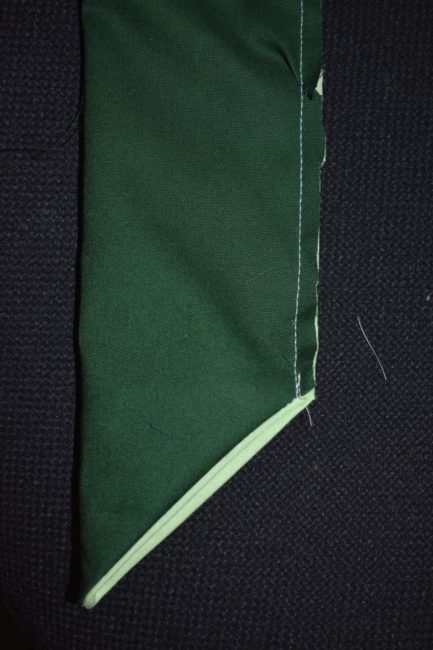
Sew along the raw edges. Once that’s done, flip the entire tie inside out again, and adjust the tie so that the seam is in the center back and the front of the tie looks like a neat triangle. Use an iron to press the tie flat, and it’s now complete.

Step 2:
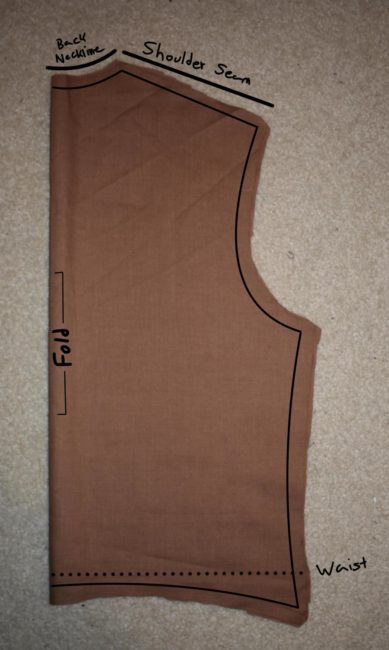
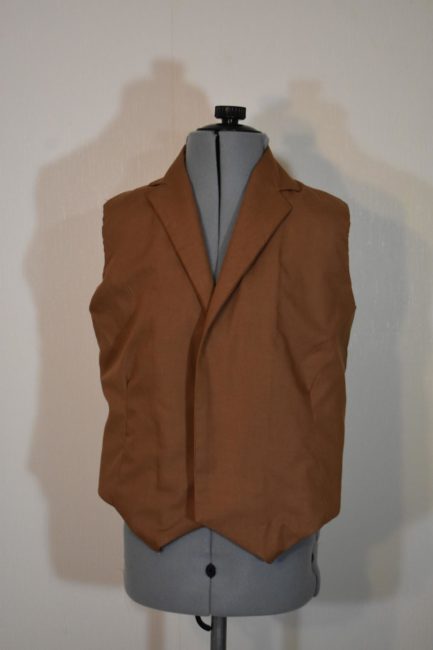
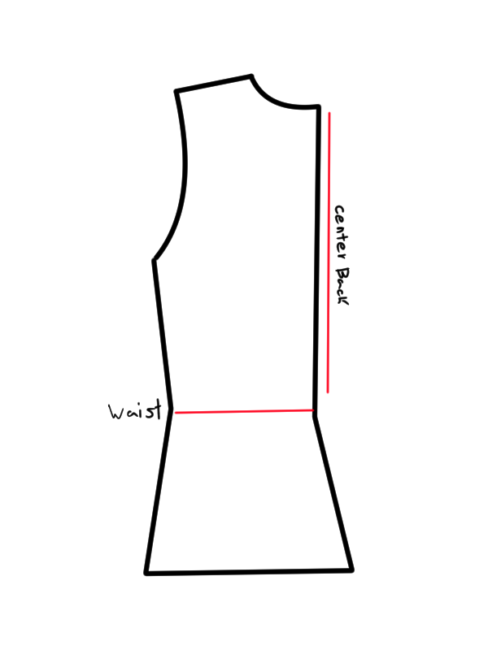
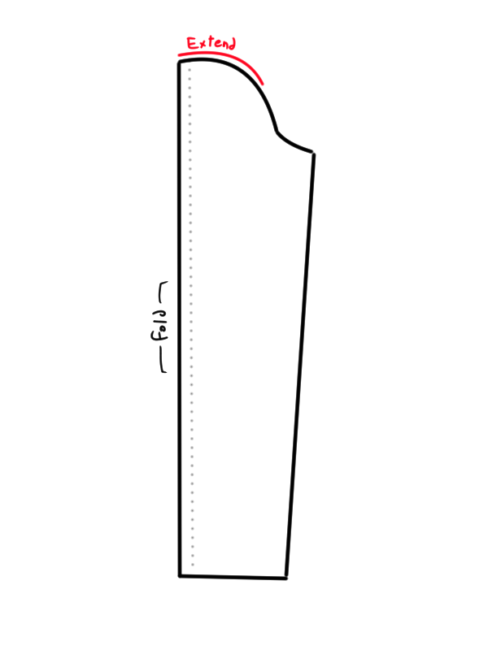
For the vest, you want to start by drawing a pattern, first for the back of the vest. Start by drafting out a regular bodice pattern using your measurements, however the vest should extend to just below the waist. You want to draw a small curve from the side seam all the way to the center back, so that the vest is shorter in the center than it is at the sides. You can make the vest as loose or fitted as you’d like.
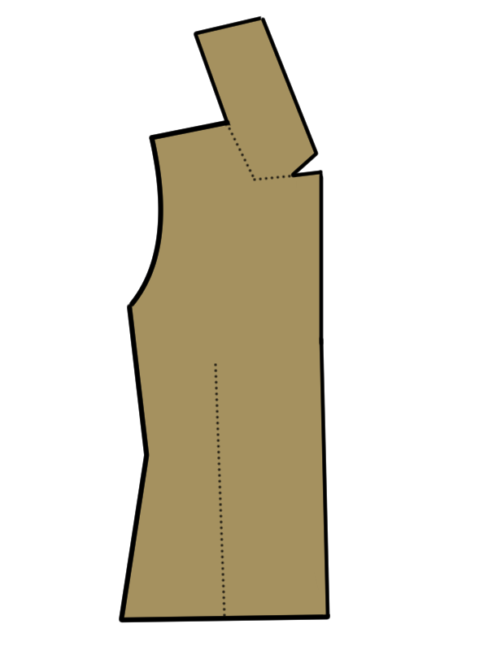
Next, use this same pattern to trace out the front of the vest. You want to add a panel to the center front of the pattern that is roughly the same width as the width of your buttons, and in this case, that will be 5/8″. Because Rosalind’s vest has a dart in the lower half of her vest, you want to widen the side of the vest just a little bit to make room for it.
Now you want to draw a down angled line from the center front of the vest to about 1/3 of the way. From there, you then want to draw an up angled line all the way towards the side seam, forming a small V shape at the bottom of the vest.
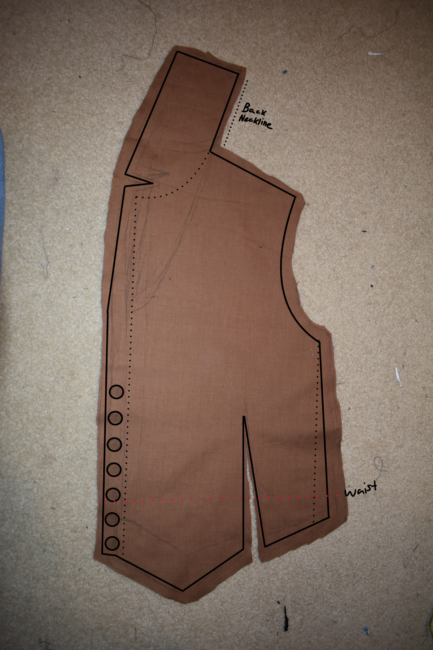
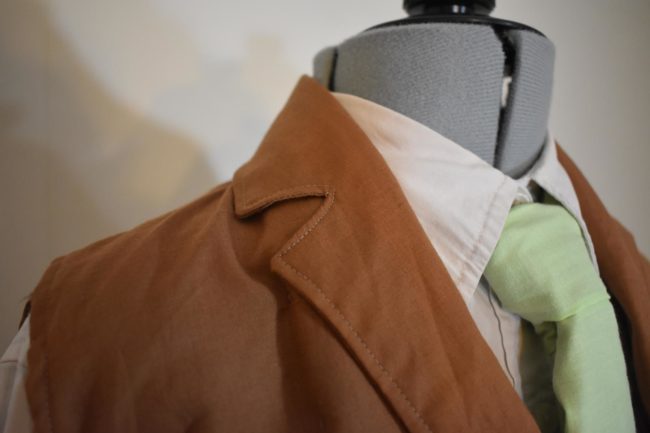
About 1/3 of the way from the side seam, you’ll now want to add a dart by creating two tapered lines that meet just below the bust. I’m not sure if this is the correct way to add a dart, but this is how I did it for my vest. Finally, you’ll want to add a section for the lapels, by drawing a line above where the shoulder seam meets the neckline. The extended line should be the same length as the measurement for the back neckline. Now you want to draw the shape of your lapels, and your pattern should now look something like this:
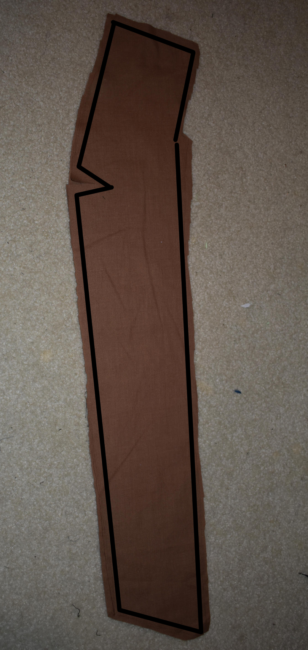
The final pattern you have to make for the vest is a piece for the lapels. To make this, you just need to trace the front piece, but it only needs to be the width of the lapels.
Step 3:
Now that the patterns are complete, you’ll want to trace them out onto your caramel colored fabric. You’ll want to cut out the back vest piece on a fold, and cut out two front pieces and lapel pieces. Remember to add seam allowance to all your pieces before cutting them out.
For the lapel pieces, you’ll want to cut out a layer of interfacing to go on the inside of the lapels to stiffen them.

Before you can start assembling the vest, you’ll first want to sew the darts together on the front vest pieces together.
Now take the two front pieces and stack them, good sides together. Sew them together at the tops as indicated in the picture below.
Now that the front pieces are joined, you want to now line up the seam joining the two pieces together with the center of the back neckline. The next step is to sew them onto the neckline, which can be a little difficult because we’re trying to line up a straight edge with the curve of the neckline. It can help to pin the pieces in place and sew really slowly, adjusting the fabric as you go along, and once it’s sewn, it can help to add some notches along the seam to release some of the tension.
Next you want to do the same for the two lapel pieces, stacking them, good sides together, and sewing them together at the tops. Once that’s done, you want to lay the joint lapel pieces on top of the joint fabric and sew along the outer edge, joining the lapel piece to the front pieces. Once they’re attached , you can flip the lapels to the inside, giving a nice, clean edge.
Finally, sew the vest together at the shoulder seams as well as down the side seams.
Step 4:
Next you want to cut out your lining pieces using the same pattern pieces for the front and back of the vest. However for the front of the vest, you’ll want to leave off the section for the lapels. Remember to add seam allowance before cutting them out.
Sew the pieces together the same way you did the vest, by first sewing the dart together and then joining the front and back pieces together at the shoulders and at the sides. Once that’s done, stack the vest and lining, good sides together, and sew around the arm holes and bottom edge. Flip the vest right side out, and then, using a needle and thread, slip stitch all the raw edges together.
Now the basic construction of the vest is done.
Next you’ll want to top stitch around all the edges of the vest.
Step 5:
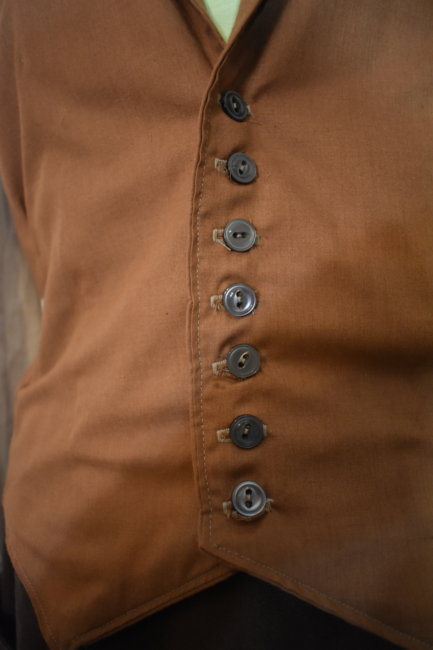
Finally, you want to add the buttons and buttonholes. Rosalind has 7 buttons going down the front of her vest, and they’re positioned pretty low on her vest and quite close together. Space them evenly on your vest, and once the buttons and buttonholes are all sewn, the vest is now complete.
Step 5:
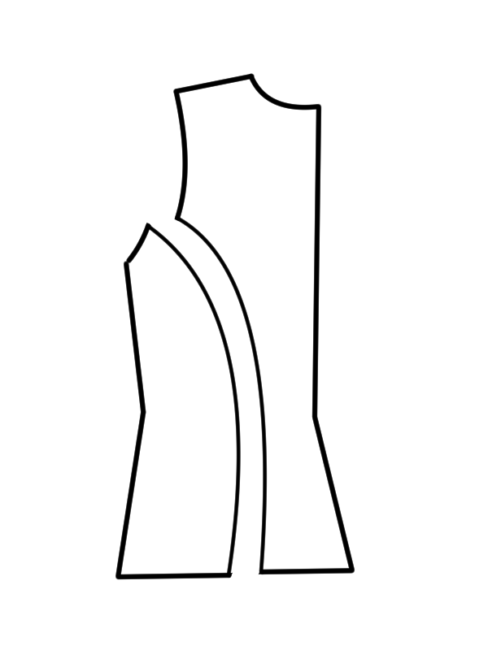
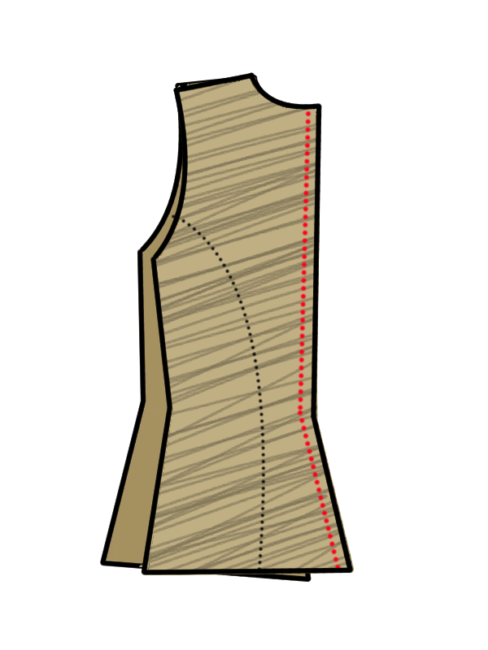
The final piece to be made is Rosalind’s jacket. To make the pattern, you first want to draw out a basic pattern for a bodice using your correct measurements, however you want the bodice to extend all the way to the top of your thighs. Once that’s been drawn, you then want to start making adjustments. First you want to add some flare to the bodice by adding an angled line to the pattern just below the waist at both the center back and side of the pattern. Your pattern should look something like this:
Next you want to separate the pattern into two panels as shown in the image below:
Next you want to use the same pattern to trace out the front piece for the jacket. You want to make it similar to the way you made the front piece for the vest, by adding a section to the center front that is the same width as the buttons you’ll be using, as well as a section for the lapels.
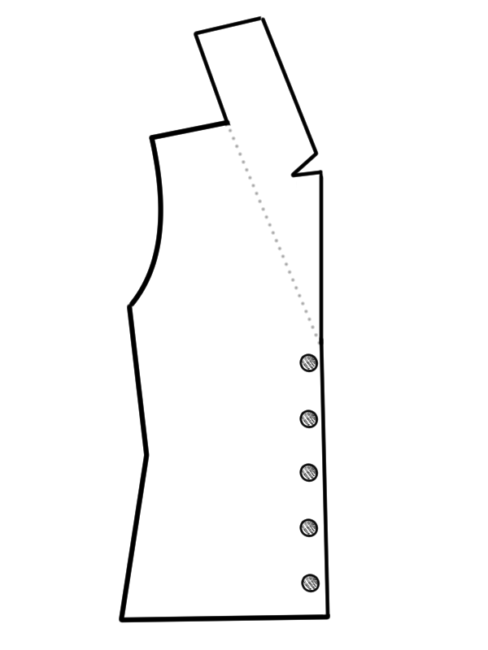
Before the pattern is finished, you want to add a dart the same way we did for the front of the vest. You also want to divide the lapel section into two pieces, as shown below:
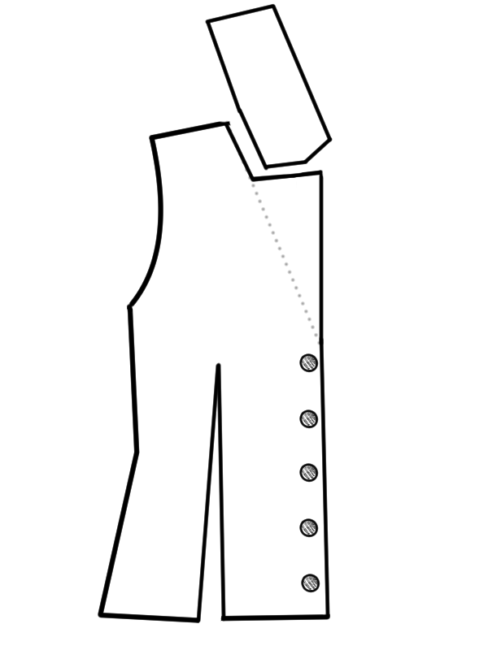
You also want to draw out a pattern for the lapels. They should also be split into two sections like the lapels on the jacket:
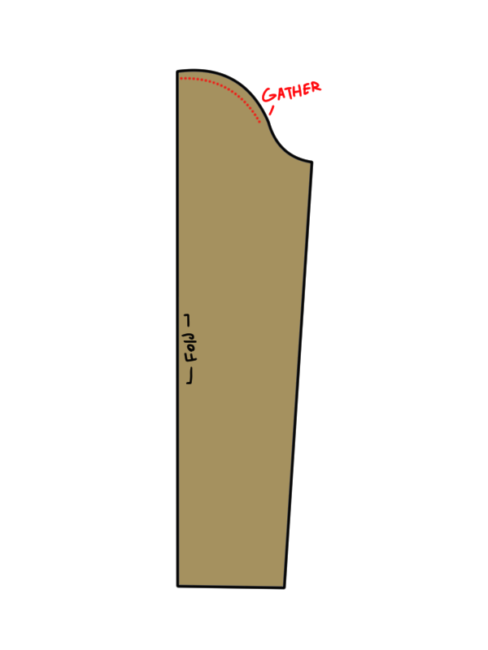
Finally, for the sleeves, you want to draw them as you normally would, however you want to make it a little wider at the top of the sleeve so that we’ll be able to gather the top of the sleeve later.
Step 6:
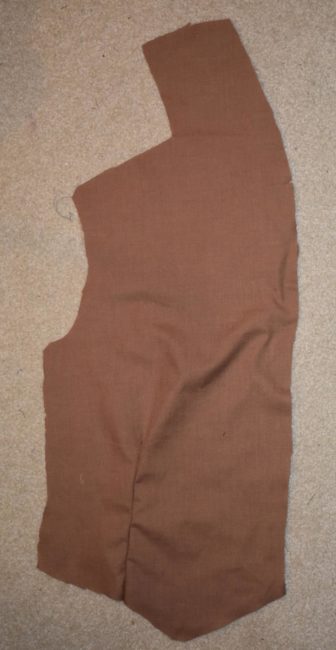
Now that you have the pattern pieces all drawn out, you want to trace them all out onto your tan fabric and cut them out. For the back jacket piece, normally I draw them to be cut out on a fold, but because of the extra flare we added to it, you’ll need to cut out two separate pieces. Don’t forget to add seam allowance to all your pieces before cutting them out.
To start assembling the jacket, you’ll first want to join all the different panels that we initially cut apart back together.


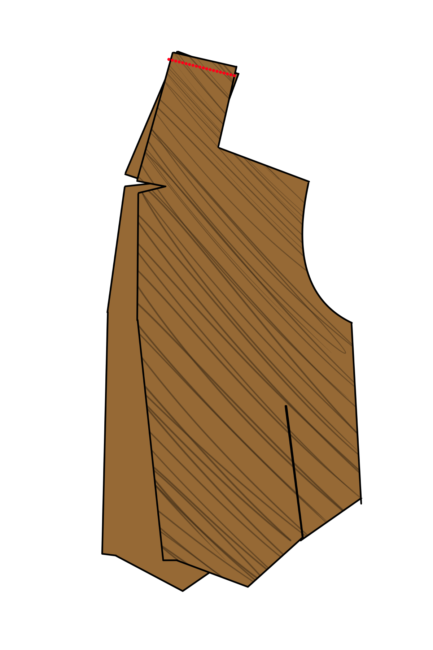
Now, you want to stack the two pieces for the back, good sides together, and sew along the center back seam.
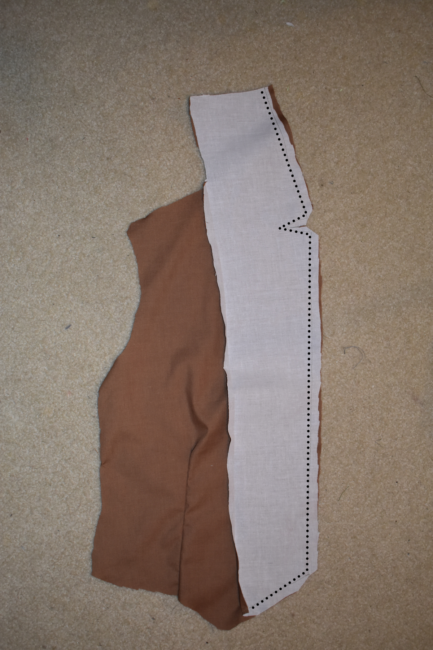
You then want to open up the jacket, press all the seams open using an iron, and then cut out a long piece of fusible interfacing to cover the bottom half of the jacket to make the flared out section slightly stiffer.
Next you want to take the two pieces for the front of the jacket, stack them good sides together, and join them together at the top of the lapels.
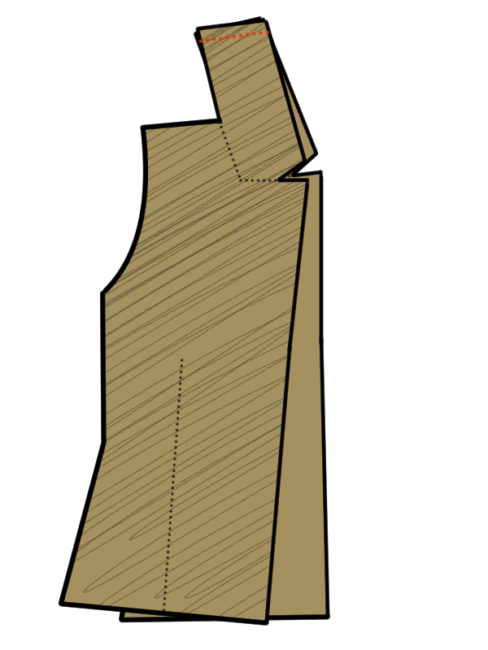
Next, you want to line up the seam you just sewed with the center of the neckline for the back of the jacket, good sides together. Sew the lapels to the neckline, taking your time to sew it because sewing a straight edge to a curve can be a little difficult sometimes. Once they’re attached, it’ll help to cut notches along the seam to release some of the tension.
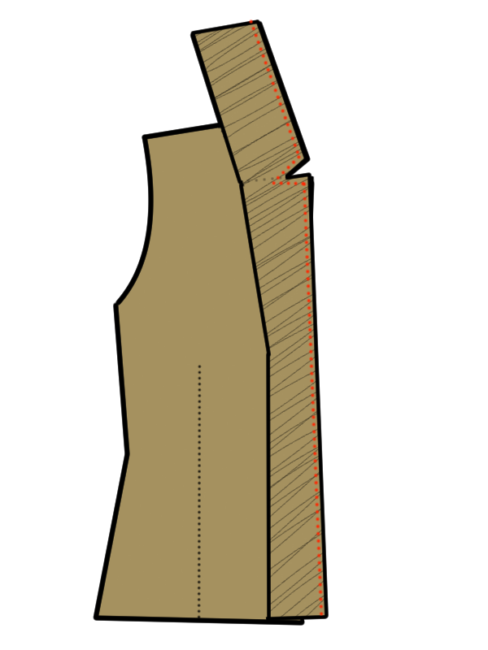
Now you want to join the lapel pieces together the same way you did the lapel section of the front pieces, stacking them together and sewing along the top. Before you do that, you’ll want to add some fusible interfacing to the inside of the lapel pieces to stiffen them.
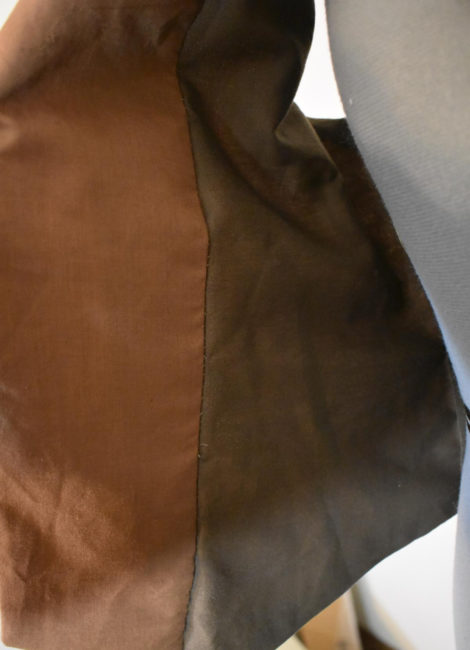
Once the interfacing is attached and the lapels are sewn together, you want to lay the joint lapel pieces on top of the front pieces, good sides together, and sew along the outer edge, joining the lapels to the jacket.
Flip the lapels right side out, and iron flat.
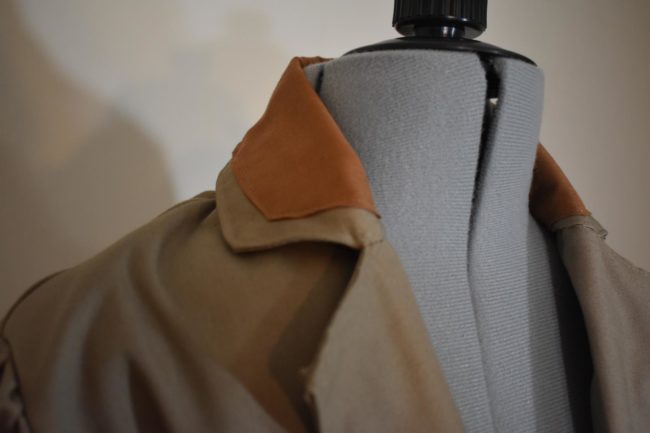
Next, draw out a pattern for a small panel that sits on at the top of the lapels It should be slightly shorter in length and width as the top section of the lapels and look something like this:
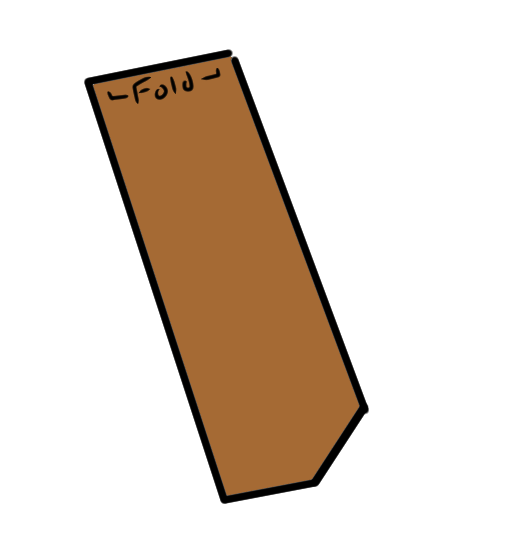
Cut this piece out of your caramel colored fabric on a fold, remembering to add seam allowance before cutting it out. To attach the piece, you want to use an iron to fold over and press down all the edges except for the longest edge to get a neat look.
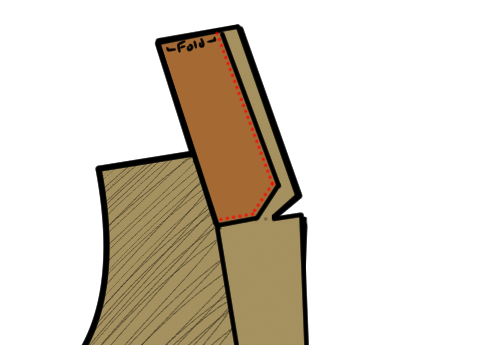
Lay this piece on top of the lapels as indicated below, and top stitch along the outer edges to sew it in place.
Finally, attach the rest of the front pieces to the back by sewing along the shoulder seam.
Step 7:
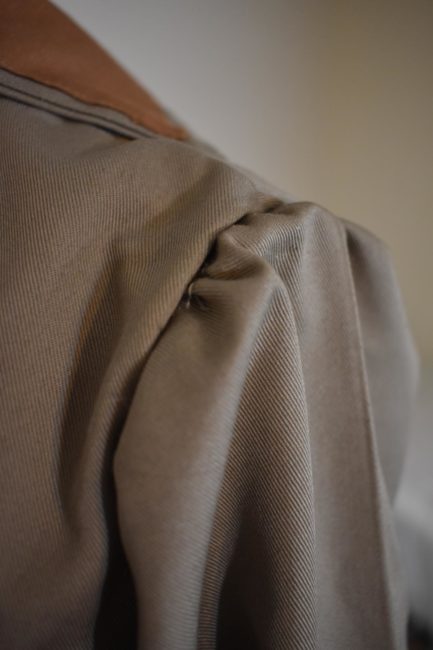
For the sleeves, cut them out of your tan fabric, adding seam allowance before cutting them out. Once they’ve been cut out, you want to gather around the sleeve cap. When gathering it, you don’t need it to be super puffy and only need the sleeve to be gathered enough so it’ll be the correct width when attaching it to the bodice.
 Now you can either attach the sleeves first and them sew the side seams of the jacket, or sew the side seams first and then attach the sleeves.
Once the sleeves and side seams have been sewn, it’s time to move onto the lining.
Step 8:
For the lining, you want to cut the pieces out of your lining material using the same pattern pieces for the front and back of the vest, except for the front of the vest, you’ll want to leave off the section for the lapels. For my jacket, I didn’t add lining to the sleeves, but you can add that if you’d like. Remember to add seam allowance before cutting out all the pieces.
Sew the all pieces together the same way you did for the jacket, joining all the separated pieces, and then joining the pieces together at the shoulders. If you’re adding lining to the sleeves, you’ll add the lining sleeves to the lining bodice here as well. Once the lining is all joined together, stack the lining and the jacket, good sides together, and sew along the bottom edge, giving a clean edge. Once that’s been done, flip the jacket right side out and proceed to slip stitch all the raw edges together with a hand needle and thread.
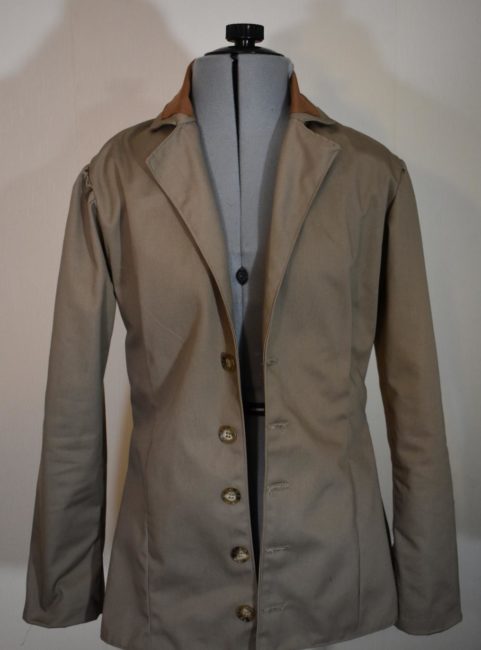
Finally, hem the sleeves and then top stitch around all the edges of the jacket. Now the jacket is pretty much complete. All that’s left is to attach the buttons and button holes.
Rosalind has about 5 buttons going down the front of her jacket, however depending on the size of the buttons you’re using, you might need more or less. Space the buttons evenly on the jacket, and after sewing on the button holes, the jacket is now complete.
To finish the look outfit, wear a brown maxi length skirt with the outfit. While Rosalind wears specific 1910s era brown and white boots, any wing tip boots or oxford-style brown shoes will work.
I hope this tutorial was helpful for your own Rosalind Lutece cosplay.
About the Author
Becky
Hello, my name is Becky. I started doing cosplay in 2016, but I've been sewing and making costumes since before then. Besides cosplay, I like music, art, and writing.


There are no comments yet, add one below.
Stay connected. Don't miss out!
Get new costume guides in your inbox once a month.


Leave a Comment