Make Your Own: Withers from Baldur’s Gate 3
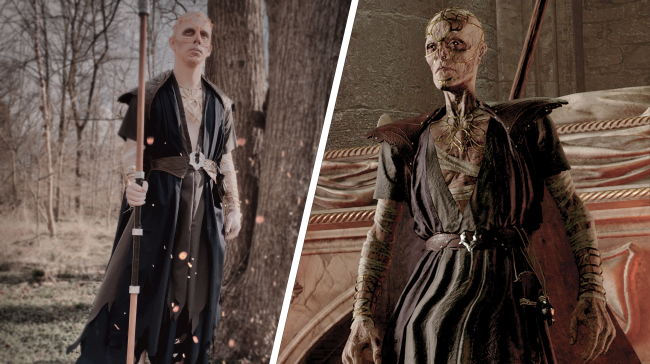
What is the worth of a single mortal’s life?
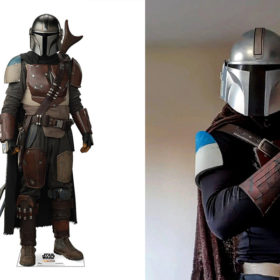
No matter how you answer, Withers will faithfully find a way to get your party back together, one way or another. After exploring the ruins of a long-abandoned chapel, you will come upon Withers in a Richly Adorned Sarcophagus and, after waking him up, he will join up with your party and keep things in check at camp for the duration of your adventure. Nice!
In this tutorial, we will be putting together Withers’ one and only outfit, complete with staff. Although the technical aspects of this cosplay are rather simple, this tutorial requires a lot of patternmaking, especially for the shoulder armor, and is intended for intermediate costume makers.
Make sure you also check out our Alfira cosplay tutorial!
You will need:
- 5 yards 60 inch broadcloth in Navy Blue
- 3 yards broadcloth in Grey (either 60” or 45”)
- 2 yards broadcloth in Brown
- 1 yard unbleached muslin
- 1 yard faux leather fabric
- Wonder Under
- Thin EVA foam (1mm – 2mm)
- Thick EVA foam (5mm – 6mm)
- 12 gauge copper jewelry wire
- 22 gauge gold jewelry wire
- Angelus leather paint in Rich Brown
- Plasti Dip
- Silver spray paint and Gold spray paint
- Heavy thread in Brown
- All-purpose thread in Stone
- All-purpose thread in Navy
- 2 ⅝” dowel rods (or thicker)
- Hot glue kit
- E6000 glue
- Paper fasteners
- ¼ inch black elastic
- ¾ inch black elastic
- Sew-in Velcro
- Small grommet kit
- Acrylic paint in Nutmeg Brown
- Gorilla tape
- Masking tape
- Exacto knife
- Mehron bald cap kit
- Bruise wheel makeup kit and Scar wax FX makeup
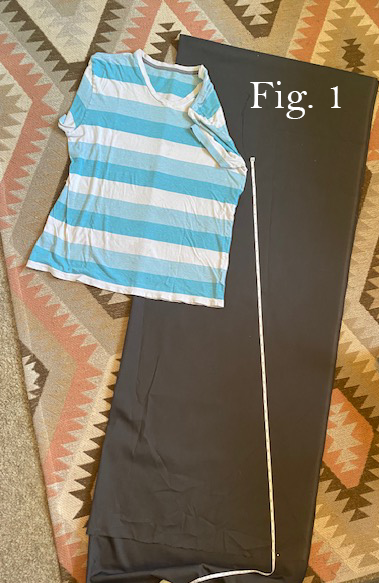
Step 1: Robe
Grab an old T-shirt, preferably one that is loose fitting, and cut it apart at each of the seams to use as a pattern for your robe. Lay out your pattern pieces on your grey broadcloth and cut your sleeve pieces out normally. For your front and back pieces, lay a tape measure out starting from the underarm and moving outwards at an angle and downwards to the bottom of the fabric to create the length and width of your robe. Cut and sew.
Next, cut a slit down the center front of your robe, down to the lower chest area. Fold the edges of the slit under and out so that the top edges align with the shoulder seam. Sew down your folds and trim the excess underneath. Your robe should now have a plunging “V” neck.
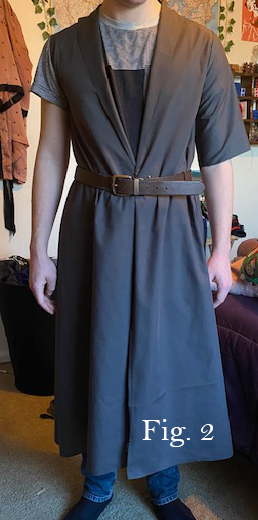
Cut a strip from your remaining grey cloth and use it to create a length of double-folded bias tape, about ½” – 1” wide after folding. Sew the bias tape around your neck line.
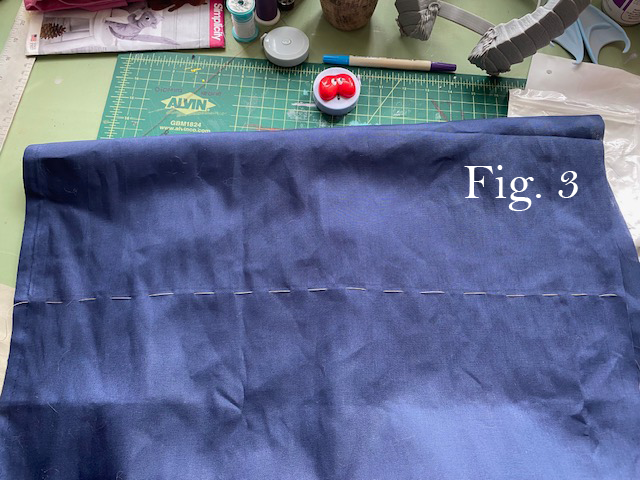
Step 2: Underskirt
Create a circle skirt from your 60” navy broadcloth using the By Hand London Circle Skirt App. I used the “quarter” style and dropped the hem as far as the fabric would allow to create a skirt that stopped just slightly above the ankles. For your waist measurement, add a few inches to allow for an easy slip-on skirt.
After sewing your skirt together, cut a strip of fabric that is the length of your augmented waist measurement and about 2” inches in width. Fold over and sew. Attach it to the waist of your skirt, leaving the ends open. Run a strip of ¾” elastic through your waist band and sew your waist band shut.
Step 3: Cape
For your cape, simply fold your remaining navy broadcloth in half so that your fabric is longer than it is wide. Cut along this fold so that you have 2 long, even strips. These strips will lay over each shoulder, attached at the middle to the shoulder seam of your grey robe. At the middle of each blue strip, hand sew your heavy duty thread across the width.
Next, pinch your strip inwards so that it makes an accordion fold along your stitch. Tie up the ends of your thread and reinforce with some hot glue on the knot. Hand sew your blue strips to the shoulder seam of your grey robe, once again using your heavy duty thread and reinforcing knots of your thread with hot glue after you’ve finished tying your seams shut.
Now that your robe, underskirt, and cape are completed, cut some jagged edges along the bottom of each garment so that each piece looks ripped and worn at the bottom edge.
Step 4: Belt
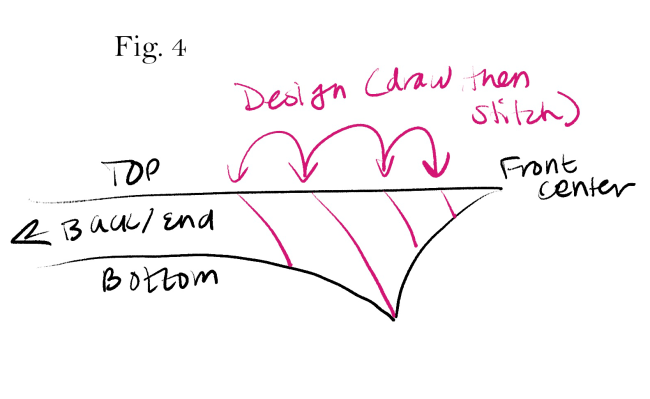
On the back of your faux leather material, draw a straight line that is about 2” longer than the length of your waist. Find the middle of that line and mark it off. (You can use any type of marker for this as it won’t be seen.) Fold your fabric over at the middle marking. Draw your belt design according to Fig. 4, then cut it from your folded piece so that you are left with 2 mirrored pieces.
On the back of your belt pieces, draw a few downward lines to create a simple design. Sew along those lines to create a textured look to your belt pieces.
Next, cut a small rectangular strip from your faux leather fabric. This will be attached to the middle of your belt and offer a place to hold your belt buckle. Paint all of your belt pieces with your Angelus paint. Attach a strip of bias tape made from your brown broadcloth all around the edges of each piece. Sew your belt pieces down to your connecting rectangle piece. Sew a strip of Velcro to each end of the back of your belt.
Step 5: Belt Buckle
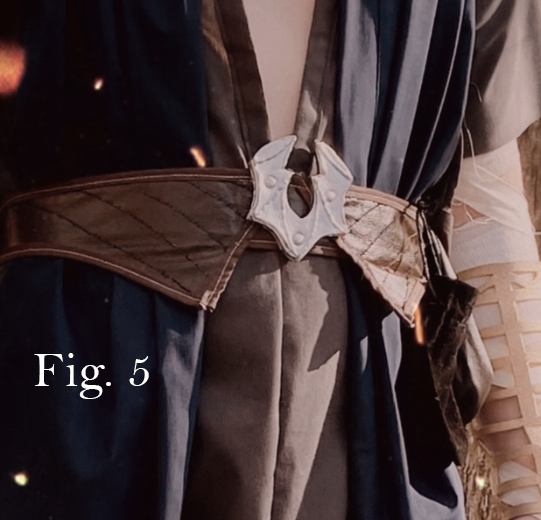
Use a piece of sketchbook paper or something similar to sketch out your belt buckle design. Fold your paper in half down the middle of your design and cut it out to make sure your design is symmetrical. Lay your pattern piece flat on your thick EVA foam. Trace and cut. For some added detail, draw out a simple design on your buckle using your hot glue gun. Spray your buckle with Plasti Dip, then go in with your silver spray paint. Attach your buckle by punching your paper fasteners through the top and bottom of your buckle, then through your belt, and then opening the wings of your fastener behind the back of your belt. For added security you can also add some hot glue to the back of your buckle once you have it situated in the front center of your belt.
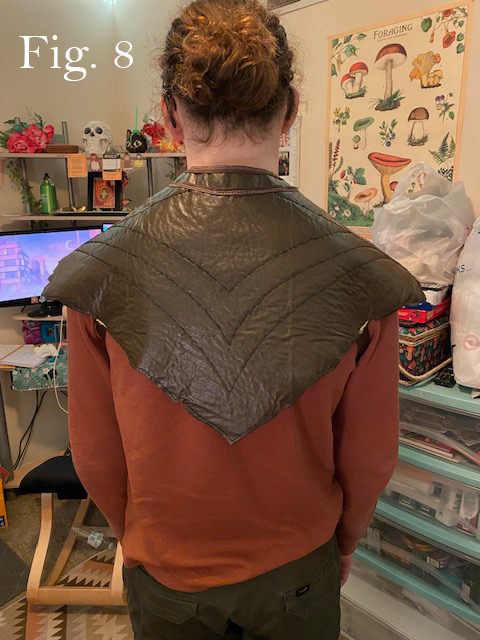
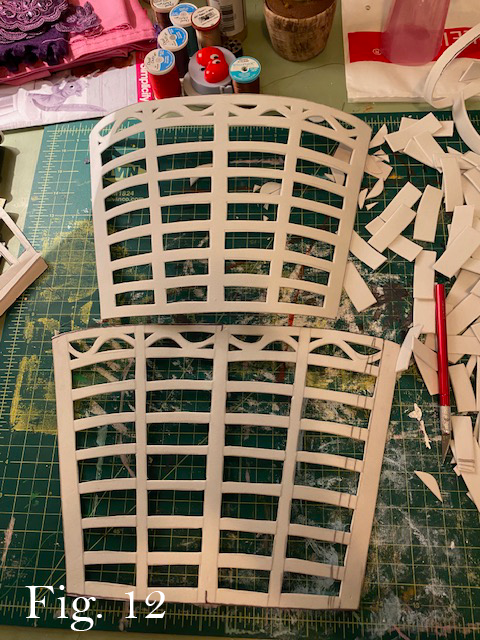
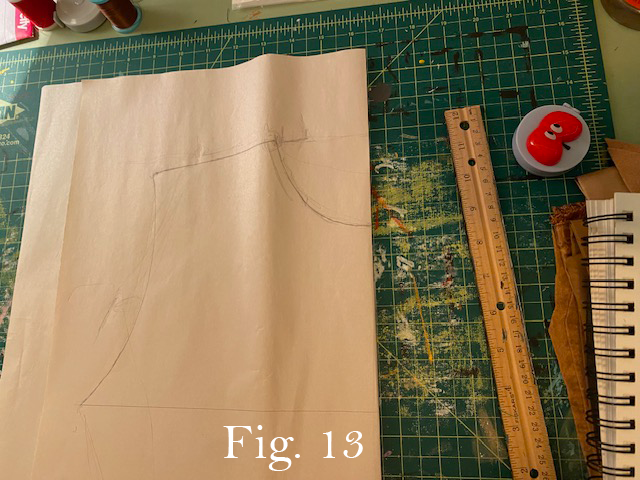
Step 6: Shoulder Armor
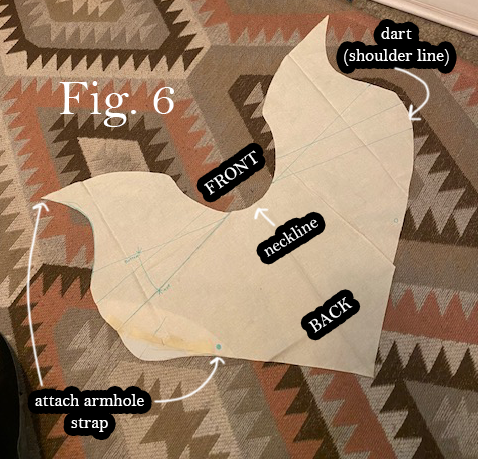
For my shoulder armor, I created a muslin mock-up, as seen in Fig. 6. This pattern offers a 1 piece design that benefits from being pinned to your robe using a safety pin on each front-facing side to keep everything in place. If you prefer to have shoulder armor that sits properly without safety pins, I would suggest creating a pattern that is similar to this version, but has a shoulder seam in place of the darts (as marked in Fig. 6 with blue marker for your reference). Either way, I definitely suggest making a mock-up of your own to ensure that your shoulder armor fits well according to your own measurements.
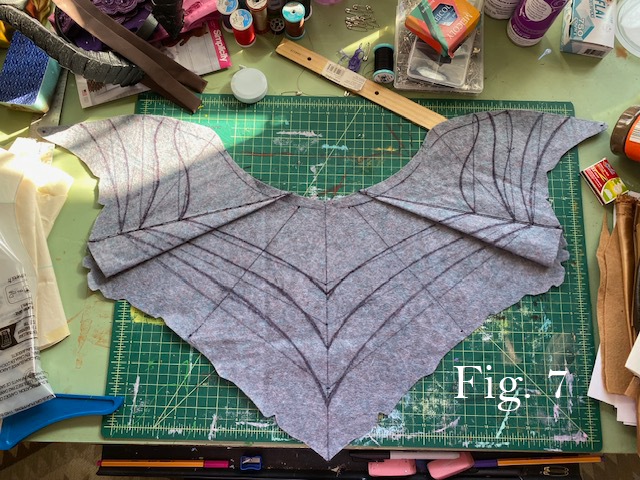
After creating the mockup, cut your armor piece (or pieces) from your faux leather fabric. As we did with the belt, create a design on the back of your leather fabric using a marker, then go over your design with machine stitching.
To create the collar piece, I traced the edge of my neck opening to serve as the bottom of my collar, then followed the same shape along the top. After painting each piece with my Angelus paint, I ironed on my Wonder Under adhesive to the back of each piece, removed the backing, then ironed my brown broadcloth onto my leather pieces and cut the excess broadcloth away.
Once you’ve done this, sew a strip of bias tape to the top edge of your armor piece and your collar piece, but leave the bottom sides raw. Sew your collar piece to the neck opening of your armor.
To create arm holes for your shoulder armor, cut 2 strips of leather about 1” wide and paint them to match the rest of the armor with your leather paint. The length of your strips will vary depending on your size, but they should attach to the bottom corners of your front piece and to the upper middle of each side of your back piece, as shown back in Fig. 6.
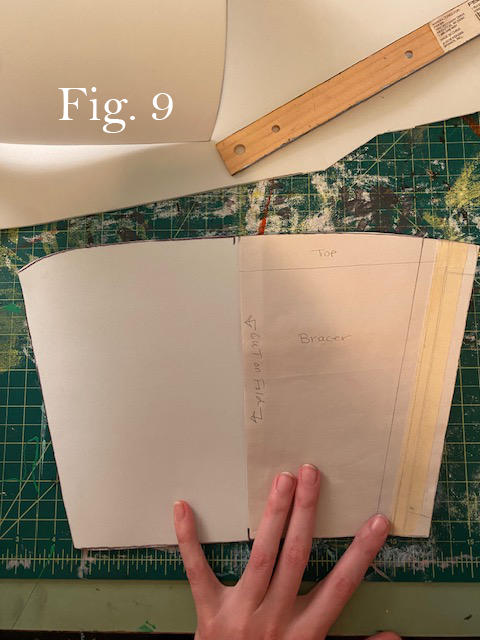
Step 7: Wrist Bracers
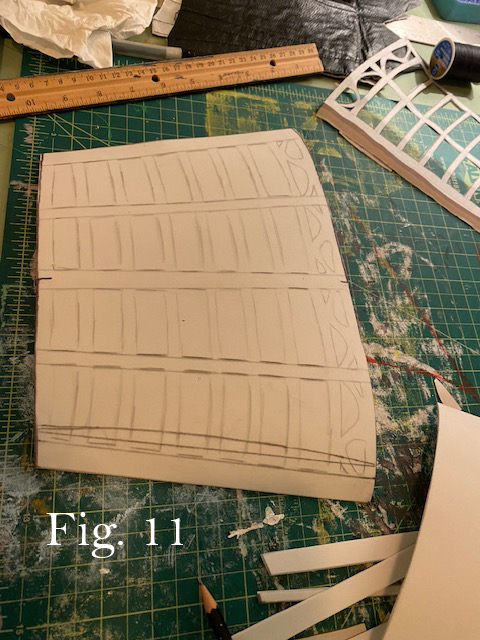
Create a pattern for your bracers as seen in Fig. 9 from a piece of newsprint. (The width of the bracer should be about ½” longer than the circumference of your forearm at the top, and about ½” longer than the circumference of your wrist at the bottom.) Draw your design on your pattern and cut out the pieces of your design.
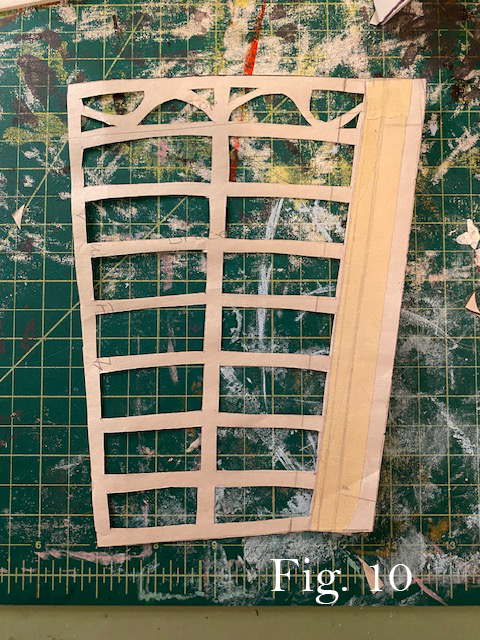
Trace your design onto your thin EVA foam pieces and cut your design out using an Exacto knife.
Spray with Plasti Dip, then finish with gold spray paint. Attach a strip of Velcro to each open side by gluing with hot glue, machine sewing, or a combination of both.
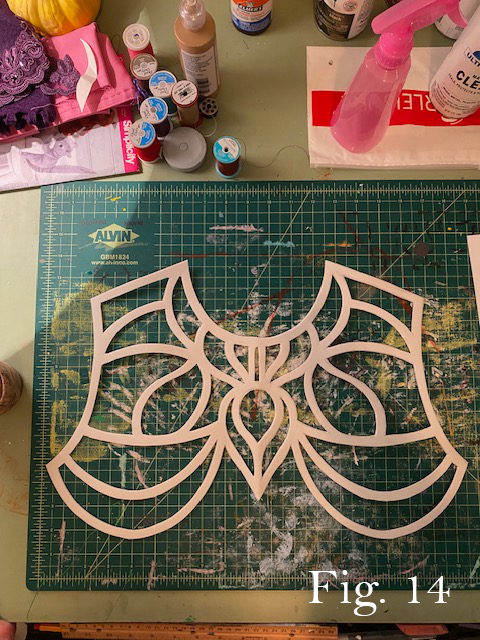
Step 8: Chest Piece
Trace the front piece of your old t-shirt used in Step one to a piece of newsprint to create your chest piece pattern, stopping just below the underarm.
Fold your pattern piece in half and sketch out your design, then cut it out with an Exacto knife. You can use basting spray to fold your thin EVA foam in half and ensure that it doesn’t slide around while you trace and cut out your design. Spray your piece with Plasti Dip, then gold spray paint, as we did with the bracers.
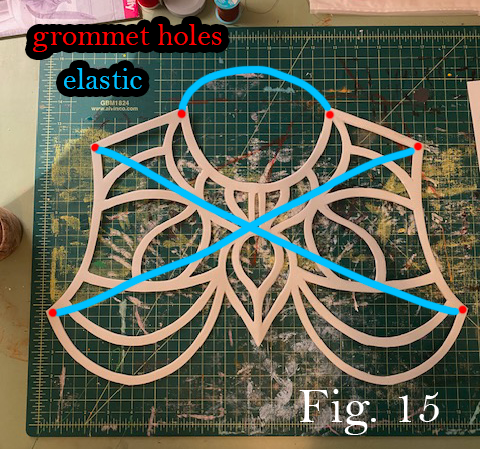
Next, at each corner of your chest piece, install a small grommet that is a safe distance away from the edge. Reinforce your grommet with hot glue. Run a strip of elastic from the grommet at one neck corner to the other neck corner and tie a knot through each grommet. Run another strip of elastic from the shoulder corner to the opposite underarm corner, and do the same for the other side, so that there is a crisscross of elastic on the back and a loop around the neck opening. The chest piece will be delicate, but you can seal it with some clear spray sealer to help strengthen it a bit.
Step 9: Head Piece
Have a friend wrap up your head in cellophane, avoiding most parts of the face, and then tape over the cellophane with masking tape. You or your friend can then go in with a sharpie marker and mark the design for your head piece.
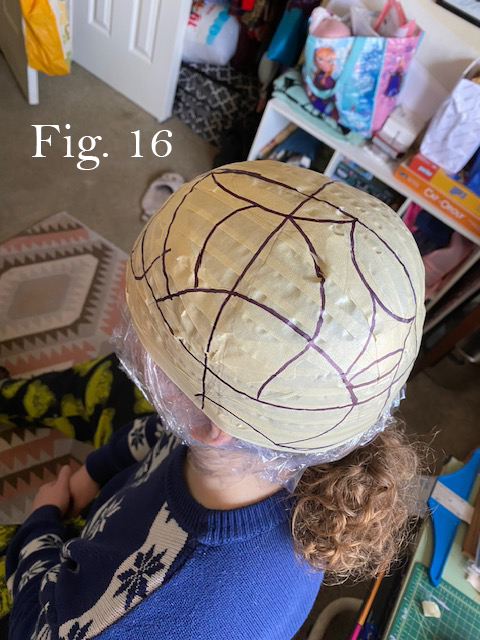
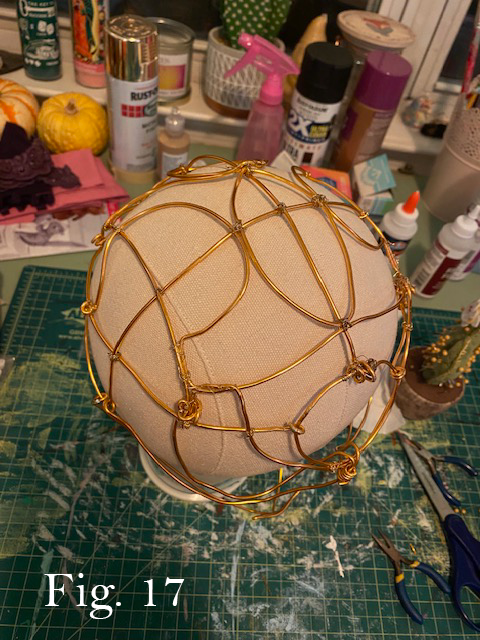
Gently cut the masking tape pattern so that you can freely remove it from your head and place it on a wig stand or something with a similar shape. Run your copper jewelry wire along the shape that you’ve mapped out, securing it in pivotal areas by wrapping your thinner jewelry wire around your connecting pieces. In order to get a proper jaw and eye piece, shape and attach those pieces while wearing the head piece so that everything will fit comfortably.
Step 10: Staff
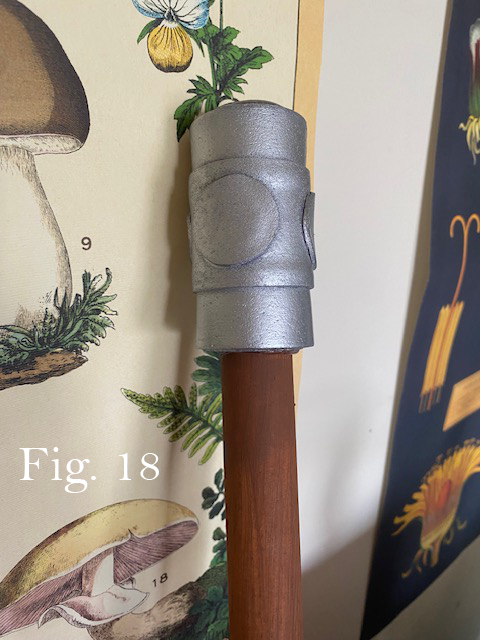
Drill a hole through each end of your 2 dowel rods and glue a metal nail into the hole of one end. Place the other dowel rod on top of the nail where the hole has been drilled out, and use your E6000 glue to secure the dowel rods together. Reinforce with gorilla tape. Paint your staff brown using your acrylic paint.
Cut 3 small strips (about 1” wide) from your thick EVA foam and wrap each piece around your dowel rods, just loosely enough so that you can slide them on and off with little work, and so that the ends of your pieces are kissing and not overlapping. Cut a strip of gorilla tape and tape your rings shut with the tape running lengthwise around your ring. Remove your rings, and hot glue the ends of your rings shut. Spray with Plasti Dip and then silver spray paint.
Next, wrap the center of your dowel rods about 10” up from the center and 10” down from the center (20” total). Place your rings in the center of your rods and at each end of your tape and glue them in place with hot glue.
Create 2 wider rings (about 2” wide) using the same method for the top and bottom of your staff. For some added detail, hot glue a strip of thin EVA foam in the middle of your strips and some small circles to look similar to bolts.
Step 11: Arm and Foot Wraps
Cut a few long strips from your muslin fabric and attach them end-to-end to use as one long wrap that starts at one hand, wraps around your torso, and down to the other hand. Secure in place at each hand using safety pins. Create foot wraps from your brown broadcloth and secure them in place with safety pins as well.
And with that, you’re now ready to keep an ever watchful eye over the many threads of life.
About the Author
Diomira Keane
Cosplayer, artist, cat-lover, party princess extraordinaire.


There are no comments yet, add one below.
Stay connected. Don't miss out!
Get new costume guides in your inbox once a month.


Leave a Comment