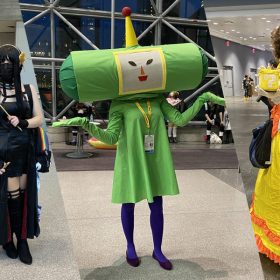
Make Your Own: Pyramid Head
Silent Hill, a classic horror game that is as psychological as it is gory, made its debut in 1999. Since then, we’ve been able to revisit Silent Hill in several of its iterations, both in game and movie form. Interestingly enough, the game was originally based off of Centralia, a real-life borough in Pennsylvania that has become somewhat of a ghost town due to the coal fire that has been burning beneath its surface since 1962.
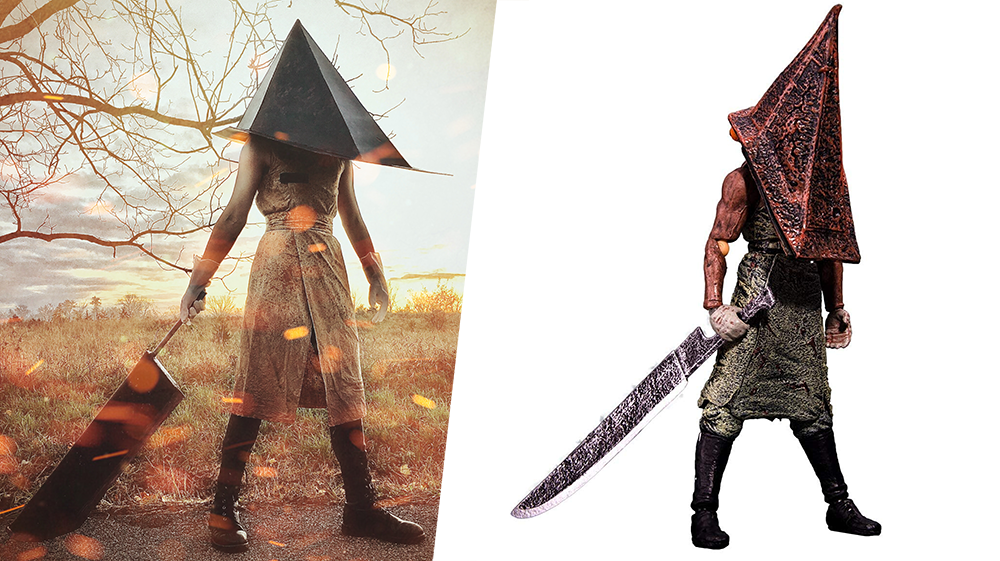
This tutorial features Pyramid Head, one of the most iconic characters of the series, who, in Silent Hill 2, represents the manifestation of James Sunderland’s guilt and anguish. This is a fairly easy build for both intermediate and newbie cosplayers. For a closet cosplay, check out this Pyramid Head guide.
Trying to figure things like measurements, lengths, and angles, has certainly caused ME a fair bit of anguish, and tears may or may not have been shed in the process of designing this costume, but don’t worry! I’ve done all the heavy lifting here so that all YOU have to do follow along. No math or tears required! (An honorable mention to my Pyramid Head cosplayer himself for making scale models for me and letting me cry it out.) So, without further ado, let’s begin!
You will need:
- Cardboard
- Box cutter
- ⅜ inch dowel rod
- Masking tape
- Roll of thin craft foam
- Hot glue and glue gun
- Spray adhesive
- E6000 glue
- 1 yard of 108” natural muslin
- 6 inches black vinyl
- Velcro
- Spray bottle
- Black Plasti-Dip
- Black spray paint
- Red spray paint
- Black, red, white, and brown acrylic paint
- Translucent rubber gloves
- White thread
- Black thread
- Black boots
- Black jeans
- Hacksaw
- Safety helmet (optional)
- Removable Glue Dots (optional)
Step One:
To begin the pyramid helmet, cut the following pieces from your cardboard slabs using your box cutter, as seen in Fig 1 below:
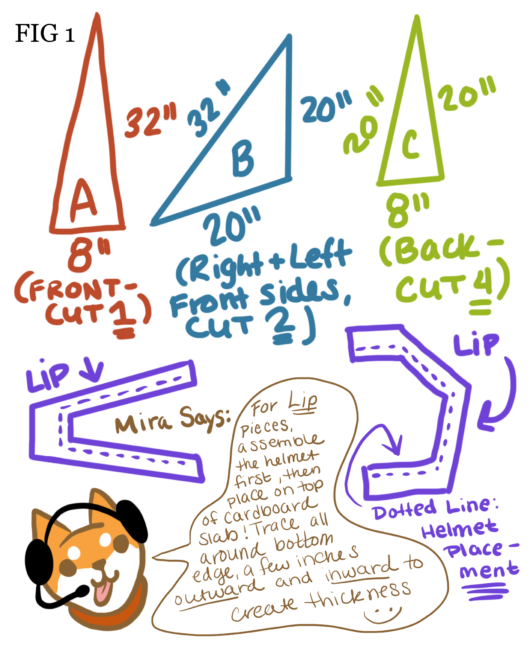
Please note that this helmet was constructed to fit a person about 5”11 tall. Of course, there is a significant amount of wiggle room, but if need be you can shave a few inches off these measurements as required, though I wouldn’t suggest adding any extra on, should the helmet become unwieldy.
Step Two:
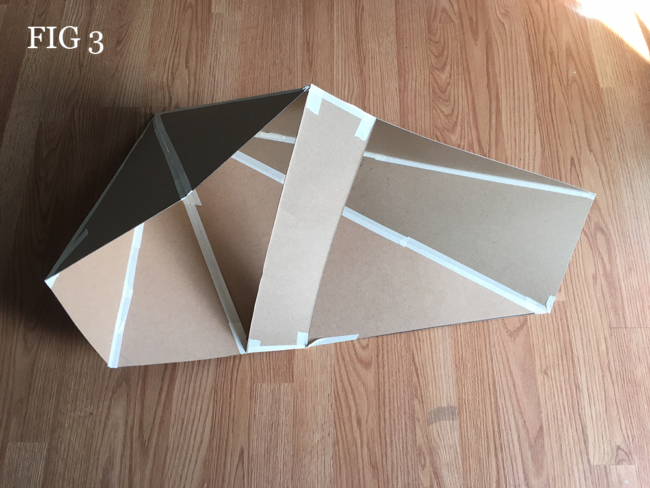
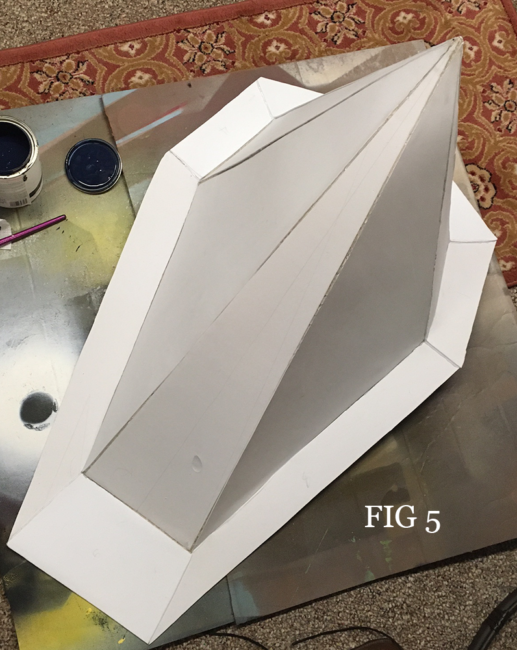
Construct the helmet from your cardboard pieces by attaching them together with masking tape.
Use the figure below as a reference guide:

Step Three:
As an optional but beneficial step, you may choose to cut a thin strip from your cardboard and attach it to the underside of the helmet, right beneath where your chin will be. This will keep your helmet steady and stable on your shoulders. (It will also help keep your helmet’s shape as you’re attaching it to the lip in the next step, so make sure the helmet sits appropriately on the lip. To do this, you may want to do Steps Three and Four simultaneously to make sure everything sits properly.) Otherwise, you may choose to attach the helmet to a safety hat using removable dots.
Step Four:
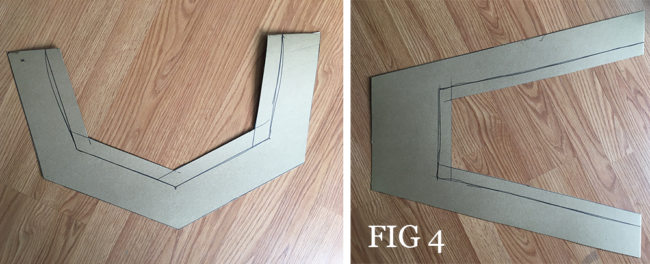
When it comes to attaching the lip to the bottom of the helmet, make a mark all along the lip pieces where your helmet will be placed. (For reference, this will coincide with the dotted lines on the lip pieces in Fig 1.)
Step Five:
Place your helmet on the lip pieces where this line has been marked. Holding your helmet in place, tape it to the lip. Do NOT tape the lips together until both lip pieces have been attached to the bottom of the helmet. For added security, try your best to seal the lip to the helmet by hot gluing the lip all the way around the inside of your helmet. Don’t worry if you can’t get every nook and cranny, this will just be for reinforcement.
Step Six:
Now for the foam. As you did with the cardboard, cut all your helmet pieces out of your foam. Using your spray adhesive, apply each foam piece to its corresponding piece on the cardboard helmet. Apply the lip pieces last. Reinforce every corner with hot glue, on the outside this time, and of course, around the edge where the lip meets the helmet.
Step Seven:
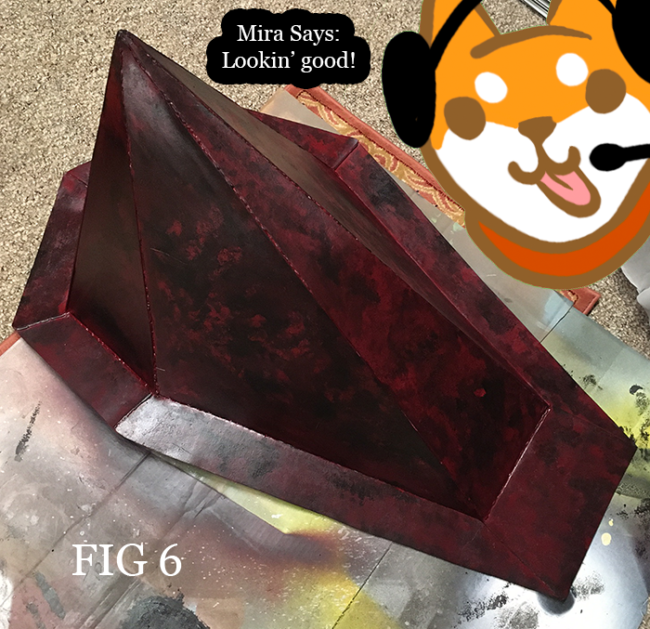
Prime your helmet with Plasti-Dip. Allow to dry fully before applying your black and red spray paints. You may use whatever method you prefer to paint your helmet, as for me, I started with a red coat, then blotched in some black over top of that. If you really want to make the helmet look rusty, grab a paper towel or a sponge and dab in some red and black acrylic paint as well, going layer by layer until you’ve achieved the look you desire.
Step Eight:
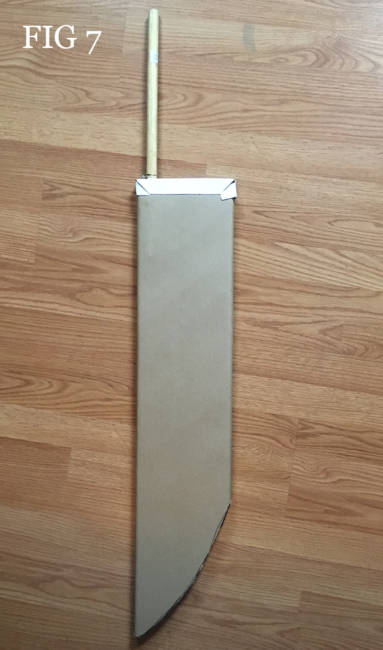
Next up is the sword. You can use whatever cardboard you have left to cut out the shape of your blade, but you will have to cut about 4 pieces to make it thick and sturdy. A great alternative to this is to hit up your local Joann’s or fabric store and ask if they have any empty cardboard bolts that are headed to the trash compactor. More than likely they’ll give you as many as you want, for free no less! For my sword, I used an empty felt bolt, as the bolts that carry felt are longer than the regular ones, but truly any bolt will do. Of course, cardboard is perfectly fine if you don’t want to make the trip or don’t have access to a fabric store near you.
Step Nine:
Using your hacksaw, cut your dowel rod down to the handle size you want, leaving a few extra inches at the bottom. If you are using a bolt like I did, you can cut a hole in the end of the top side and simply glue your dowel rod in like that. If you are using slabs of cardboard, you can wedge the dowel rod right in the middle of your slabs and glue it in place that way, using E6000 to make it sturdy and reinforcing with hot glue. Then, glue all your slabs together with your spray adhesive.
Step Ten:
Next, take your remaining foam and place your cardboard sword in the center, with your handle sticking out of the top. Simply spray the entire sword down with spray adhesive and fold your foam over it to make a big ol’ sword taco. Make sure you are folding around the TOP edge of the sword, so that the ends of the foam meet each other at the blade. Trim the excess foam away and reinforce all the edges with hot glue. Again, prime your sword with Plasti-Dip, then spray paint as you see fit. Add a greyish edge around the blade by mixing your white and black acrylic paints.
Step Eleven:
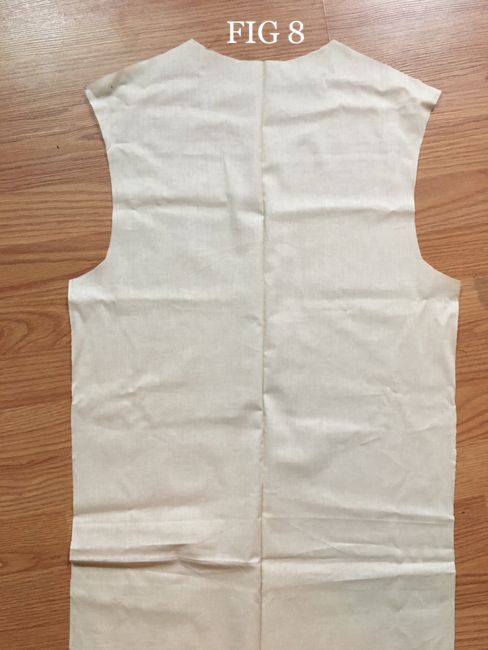
For Pyramid Head’s apron, take an old T-shirt, cut the sleeves off right at the seam, and place it on top of your muslin. Trace around the shirt, then at the bottom edge, drop the length of the “hem” line all the way down until it reaches about half-way across your shin. Cut. This will be your back piece.
Pro Tip: To make things easier, fold your muslin and your T-shirt in half down the middle, that way you get a perfectly symmetrical piece.
Step Twelve:
Repeat this step, except this time, Cut out a left and right piece separately from each other such that they crisscross each other at the front.
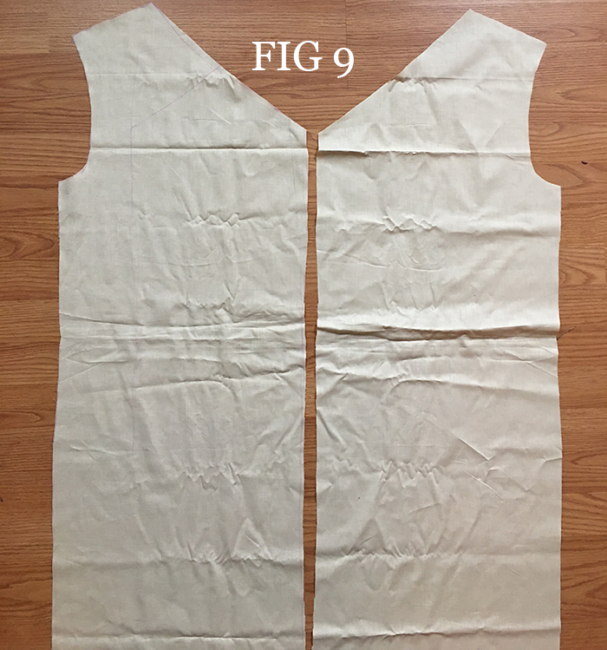
Sew all your pieces together except for the crisscross front opening. Hem all your edges (except for the very bottom edge, which you may choose to leave raw if you like.)
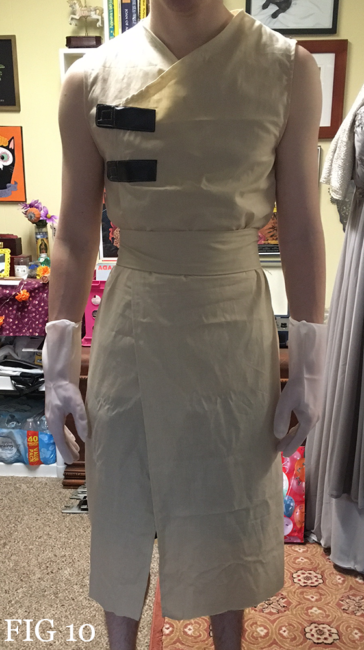
Cut 2 strips of your black vinyl to create straps. These strips should be roughly 5 inches long by 2 inches thick, but you may alter these dimensions as you see fit. Sew them to the edge of the right front piece of your apron, then sew in your Velcro accordingly, such that the straps open and close appropriately. Lastly, cut a strip of muslin that measures a few inches thick, with a length that matches the measurement of your waist, plus a few inches extra. Attach Velcro to either end of this strip, which will serve as your belt.
Step Thirteen:
Now the fun part! To distress your apron and make it look rotted and bloody, fill your spray bottle with a few cups of water. Pour in a few tablespoons of acrylic paint. You can choose whichever color you’d like to start with first. I started by doing a layer of brown, then a layer of red, then a layer of black mixed with brown.
After you’ve got your paint and your water in your bottle, shake generously until paint is completely mixed in. Take your apron outside and spray all over, as randomly as you can. Your paint will dry lighter than it appears when you first spray it on, so don’t be afraid to really go for it. However, let each layer dry completely before starting another round of spray coloring. Repeat this process as many times as you like until you are left with a result you’re satisfied with. After that, you’re all done and ready to terrorize some locals!
About the Author
Diomira Keane
Cosplayer, artist, cat-lover, party princess extraordinaire.


10 Comments
Leave a Comment
Stay connected. Don't miss out!
Get new costume guides in your inbox once a month.


This cosplay looks really good and I want to try making the apron but I’ve never done a cosplay where I’ve had to make clothes before and I’m bad at following written directions. Do you have more pictures for the steps or a video I could watch? Thanks :)
Hi Jude!
Thank you so much! As far as garment-making go, the apron for this costume is pretty simple, and also very forgiving if you make any mistakes along the way. :)
I will try to make a short video showing the apron in a bit more detail and upload it to my YouTube when I get a chance! :)
The link to my YouTube is below:
https://www.youtube.com/channel/UCpYOkjam_HE63hBHDOypKnw
Thank you again and best of luck in the meantime!
Hi do you have any measurements for the angles of each triangle? I’d like to make this but I’m not sure what measurements I’d need to do for the angles of each triangle piece
Hi Veronica!
Thank you for your question! Along with the detail of the apron I will also be uploading a video measuring each angle with a protractor to give a better visual reference. (There is also a mathematical way to figure out each angle given the lengths of each side, but that can be time-consuming.)
Here is the link to my YouTube where I will be uploading to:
https://www.youtube.com/channel/UCpYOkjam_HE63hBHDOypKnw
So, I’m having some issues here. I’ve been following this tutorial, and it went great for the bases of everything (especially getting cardboard bolts to use for the sword. super smart!), except for one problem. The Pyramid head will *not* stay on my head. I tried the chin strap, i tried reinforcing it, I’ve even built a whole head holder into it. It will Not. Stay. On. It wants to tip forward off my head and fall off. Maybe I used too much cardboard, maybe my cardboard was thicker than yours, I don’t know. Do you have any ideas to combat this?
Hi Eri!
Thank you for your question! I’m so sorry you’re having this problem.
Did you try using a plastic hard helmet secured underneath with glue dots?
If you have and that hasn’t helped, you can try padding the inside of the helmet in the back so that when slips forward, there’s less room for it to “slip”, if that makes sense.
I will say that the helmet itself is somewhat unwieldly due to it’s size, and padding the inside can help to redistribute the weight and give it less room to slip. :)
I hope this helps!
Hello!
I am currently in the middle of creating this cosplay and it’s turning out really well so far, but I just have one small issue. I don’t know how you’re supposed to see with the helmet on. Do you have a way specified or should I just wing it and do my own thing. Thanks!
Hi!!! I love this cosplay so much!!! How do you go about getting the right angles for the triangle?
Hello everyone and Happy Halloween!
For those asking, I’ve just uploaded a video explaining the angles of the helmet.
Here is the link:
https://youtu.be/98ihYk9tKog
Thank you all so much for your patience!
Happy crafting!!
I’m using this solely for the head section and so far it’s going great. I made one with the original measurements, but ended up making a second with everything taken down 1/4 inch on each piece and that worked out perfectly. I just added more detail using craft foam but the basic template is exactly what I needed and I am so grateful at how easy the directions and pattern were to follow. Thank you!