Make Your Own: ABBA Cat Dresses
ABBA is a Swedish pop group from the 70s and 80s, consisting of four members, Agnetha Fältskog, Björn Ulvaeus, Benny Andersson, and Anni-Frid “Frida” Lyngstad. Throughout their active yeas, the band members would wear many different intricate and unique outfits, many of which have become quite famous.
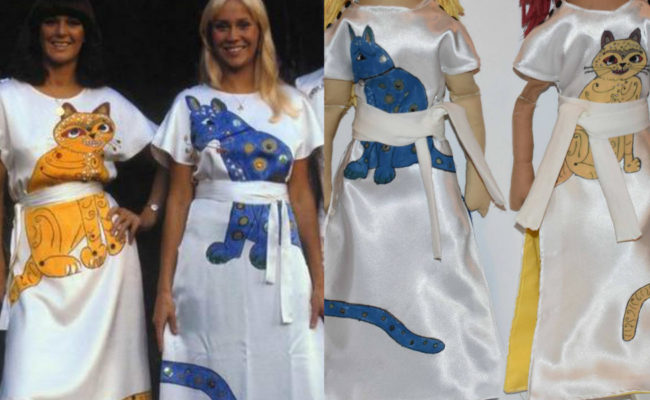
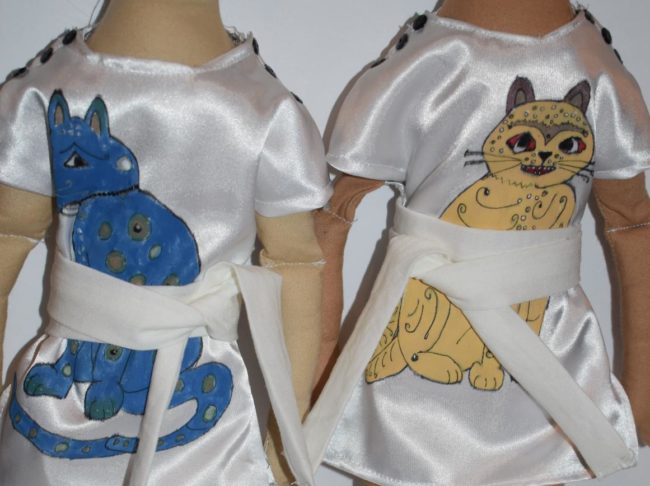
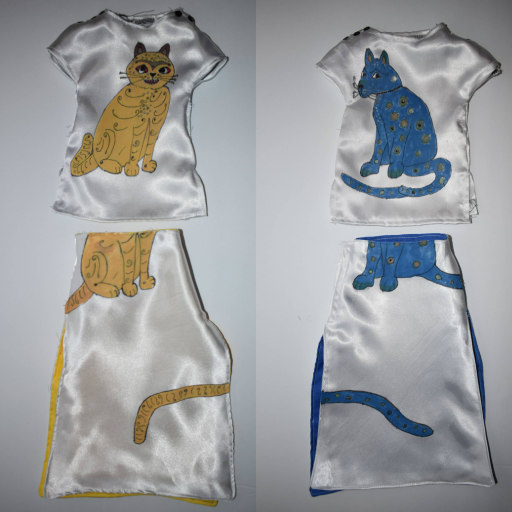
In this tutorial, I hope to show you how to make one of ABBA’s most iconic costumes: Agnetha and Frida’s “Cat Dresses.”
Before we start, I’d just like to mention that I originally made these cat dresses in miniature doll size, however the method that I used can most certainly be scaled up to fit a regular sized person.
Materials:
Top:
Skirt:
- 3 yards white satin
- Sew-on velcro
- 3 yards yellow or blue lining fabric
You will also need:
- Assorted Acrylic Paints
- Assorted paint brushes
- Fabric/textile medium
- Heat erasable fabric pens
- Fine tip Sharpie pen
- Fray Check
- Snap Fastener Pliers
- Chalk pencils
- Sewing Machine
- Matching thread
- Sewing needles for hand stitching
- Sewing shears
- Measuring tape
- Pins
- An iron
- Pattern making paper
- (optional) Serger machine & serger thread
Step 1:
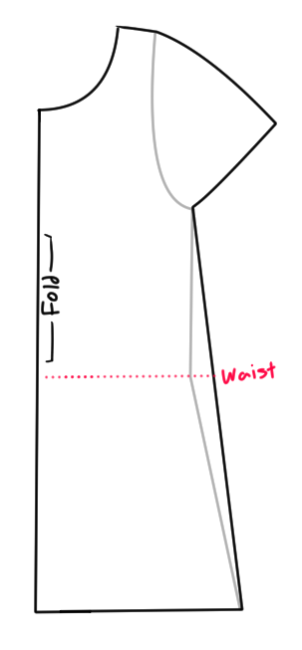
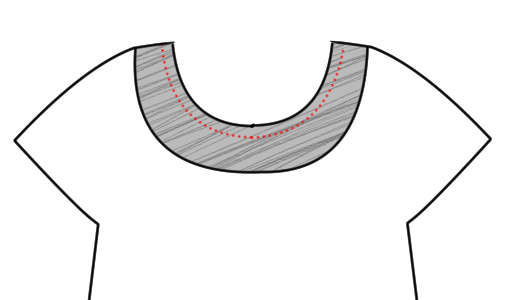
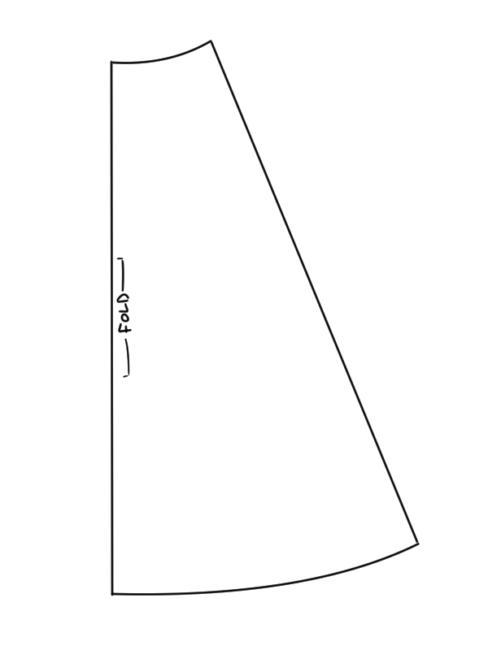
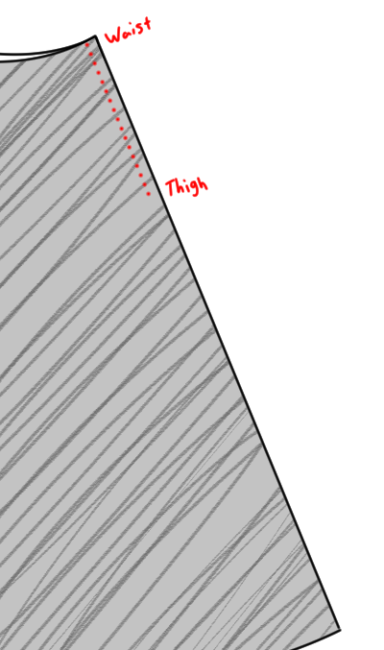
To start making the cat dresses, you want to start by drafting a pattern. Start by drawing out a regular bodice, and then make some adjustments. The bodice should extend to just below your thighs and should have an a-line shape, and the collar should be a bit wide. Normally when drawing a pattern, the sleeve is separate from the bodice, but for this pattern you want to draw on the sleeve. Your pattern should look something like this:
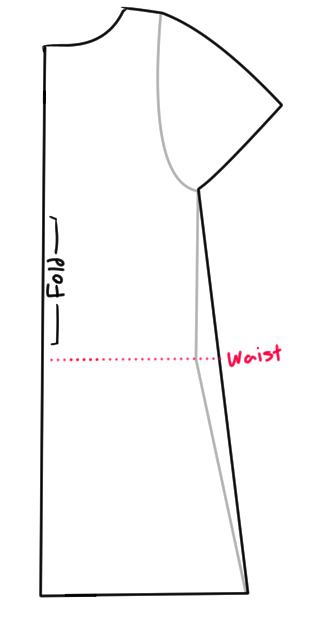
For the front dress piece, you want to the exact same thing, just make the collar a little lower.
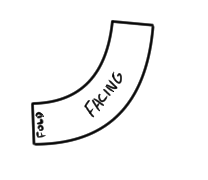
The final patterns you have to design are facings for the collars. Trace the collars out and add about 4-5″ to the inside edge. You want to make facings for both the front and back collars.
Step 2:
Now that the patterns are drawn out, you want to trace out your pieces out of your fabric and cut them out. Remember to add seam allowance to your pieces before cutting them out.
Satin is a very slippery fabric to work with, so cut out your pieces carefully. Satin also tends to fray a lot, so before you start assembling your pieces, you might want to use a zig-zag stitch on your sewing machine and go around all the edges of your pieces. Alternatively, if you have a Serger machine, it works best when going around the edges, but a zig-zag stitch should work just fine.

To start assembling your pieces, you want to take your facing piece, and line it up with the corresponding bodice piece, good sides together, and sew along the top like so:
Using a scissors, cut some notches along the curve to remove some of the tension. Flip it right side out and you should have a nice, clean edge. Press it flat using an iron and top stitch along the edge.
Repeat for both bodices.
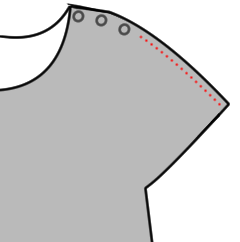
Now stack the bodices, good sides together. Before sewing them together at the shoulders, you want to pin the pieces together and mark out where you want your snaps to go- there are three snaps on each shoulder – and space them evenly. Once that’s done, sew the two pieces together as shown in the image below:
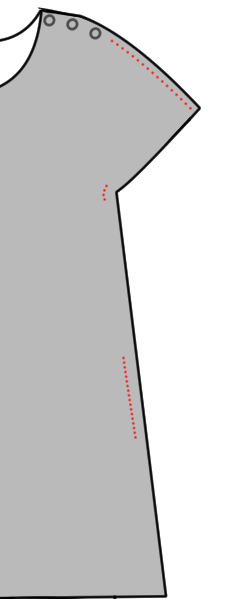
Next you want to join the pieces together at the sides. If you wanted to go for a more accurate look, you’ll want to sew the sides together at only a few spots and leave a few slits in the garment – one seam at the armpit, then another from around the waist to just above the thighs.
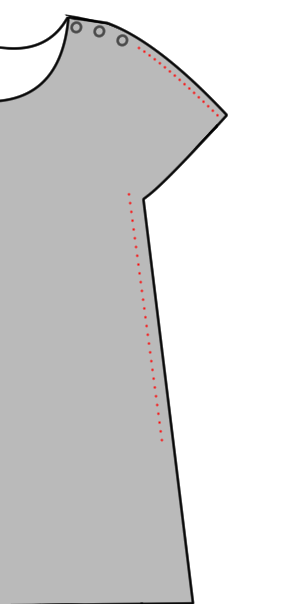
However if you wanted, you can just sew along the side seams from the armpit all the way to just above the thighs, leaving just a small slit at the bottom.
Finally, turn the outfit right sides out, and using an iron, fold up and flatten all the edges that need to be hemmed, all except for the back shoulder seams that we left open for the snaps. We’re leaving them un-hemmed so that we’ll be able to overlap the pieces for the snaps later. Finish all the edges that are to be hemmed, and the basic construction for the cat dress is done.
Step 3:
The next step is to draw on the cat at the front of the dress. Depending on which cat you want to have at the front of your cat dress, you want to choose your paints accordingly.
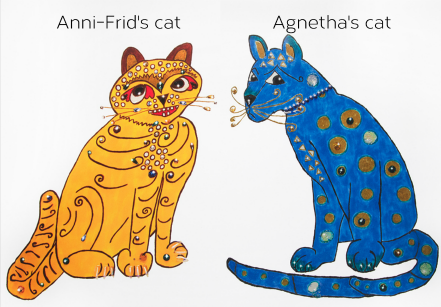
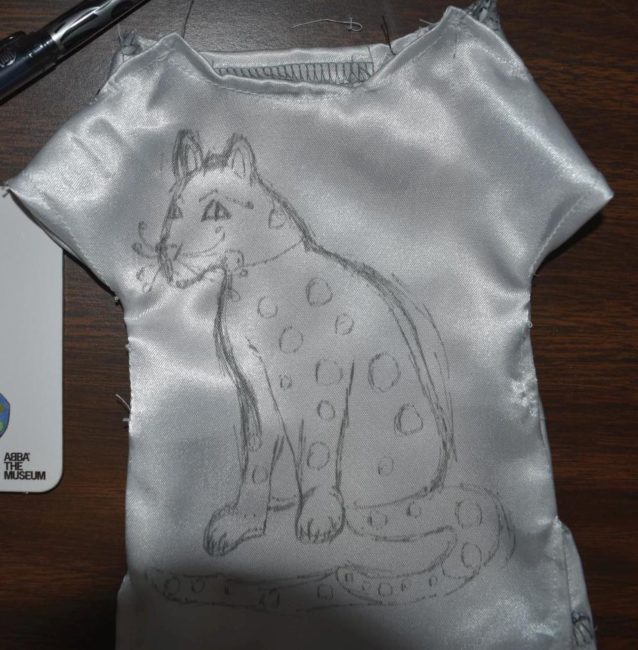
Using heat erasable fabric pens, you want to start sketching out your cat onto your dress. It’ll help to have as many reference pictures of the actual cat dresses as you can so you can get the right proportions.
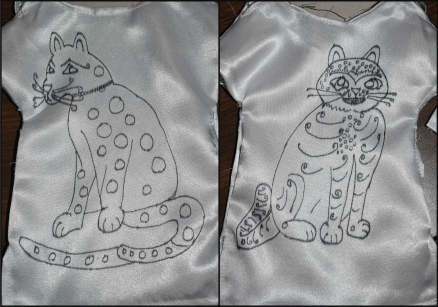
Once you have the cat sketched out and you like the way it looks, you want to take a fine-tip sharpie marker and draw over all the lines as neatly as possible. Once that’s been done, use an iron to remove the initial sketch lines, leaving a nice clean outline.
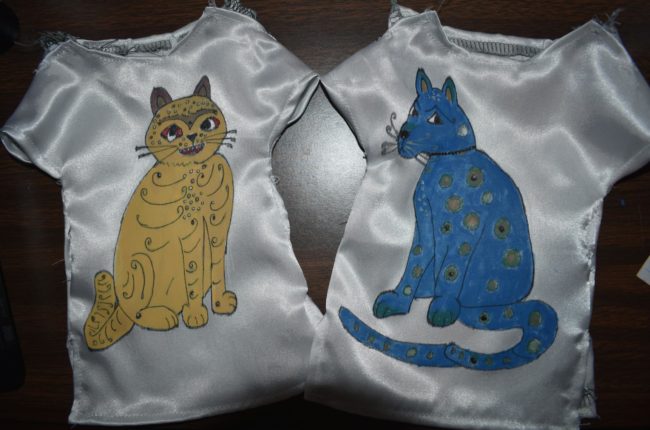
The next step is to paint the cat. Mix your paint with the fabric medium according to the instructions and paint carefully within the lines. While painting, it’ll help to cover up the areas outside the cat with extra paper as to not accidentally get paint on areas you don’t want to be painted, and also to stick a piece of cardboard between the layers of the dress to keep the paint from staining onto the other side.
It’s alright if the paint is a little patchy because the original cat dresses were hand painted as well. After the paint has dried, you might need to go over the lines again with the sharpie marker.
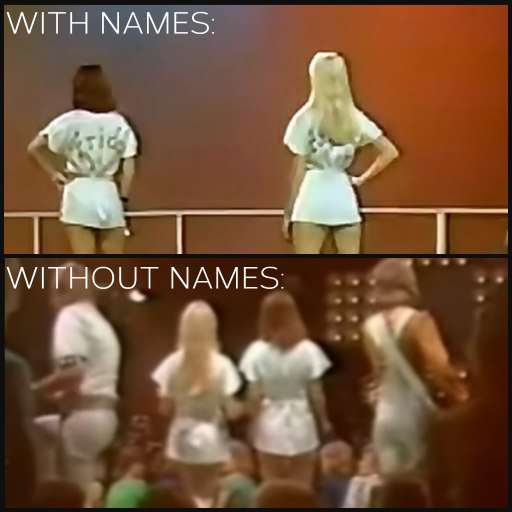
If you wanted, you could write Agnetha or Frida’s name on the back of the top, however it’s not necessary because they also wore cat dresses without their names printed on the back.
Finally, attach the snaps onto the shoulders, three snaps on each, spaced evenly, and the cat dress top is now complete.
Step 4:
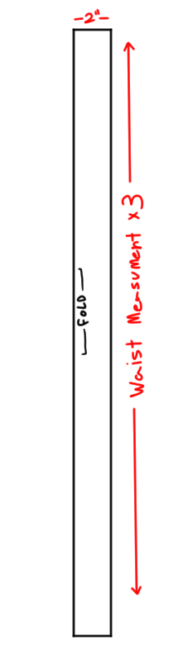
To make the belt, you want to start by measuring around your waist with a measuring tape. Take this measurement and multiply it by 3. This will be the length of your belt. Draw out a pattern that’s length is your waist measurement multiplied by 3 and the width is 2″. It should look something like this:
Trace this pattern onto your fabric on a fold, and add seam allowance to it before cutting it out. Once it’s been cut out, sew along the outer edge, creating a tube. Turn it right side out, and then iron it flat with the seam in the center back. Fold over the edges on each end and using a needle and thread, slip stitch each end together, closing the tube and finishing the belt.
Step 5:
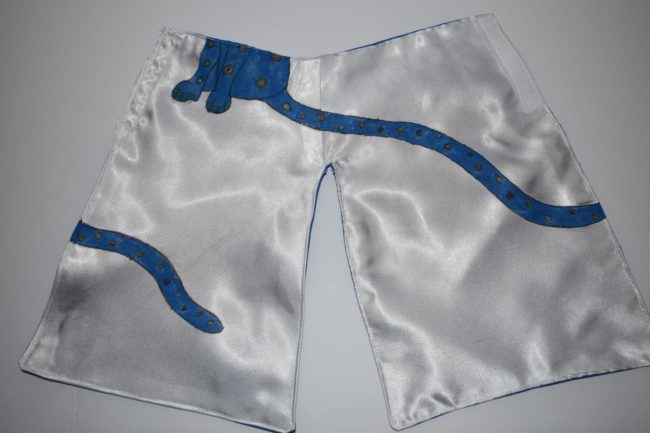
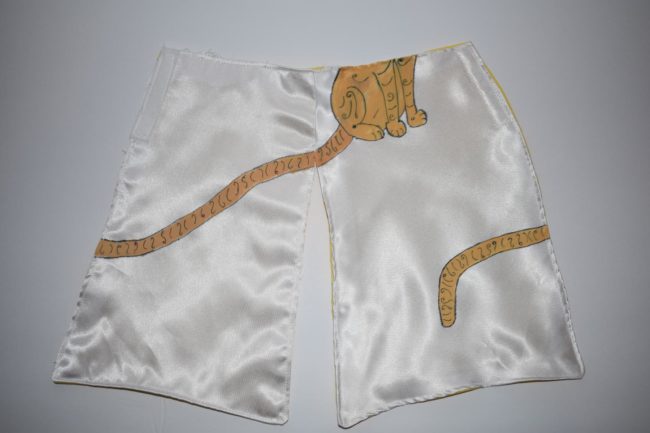
While the cat dresses are most notable for being the short tops that we just made, Agnetha and Frida would sometimes wear longer skirts with their dresses.
To make the skirt, you want to start drafting out a pattern for a regular A-line skirt (without much flare) that goes from the waist all the way down to the ankles.
Trace out this pattern onto your white satin, one piece for the front and one for the back, and then do the same thing with your lining fabric. Depending on which cat dress you’re making, you’ll cut it out either out of blue lining or yellow lining. Remember to add seam allowance to your pieces before cutting them out.
Stack the front and back satin pieces, good sides together, and sew along one side from the waist to just above your thighs, joining the two pieces together and leaving a large slit the rest of the way down.
Do the same for the lining material, then using an iron, press open the seams on both skirt pieces. Now stack the skirt and lining, good sides together, and sew along the edges, as indicated in the picture below:
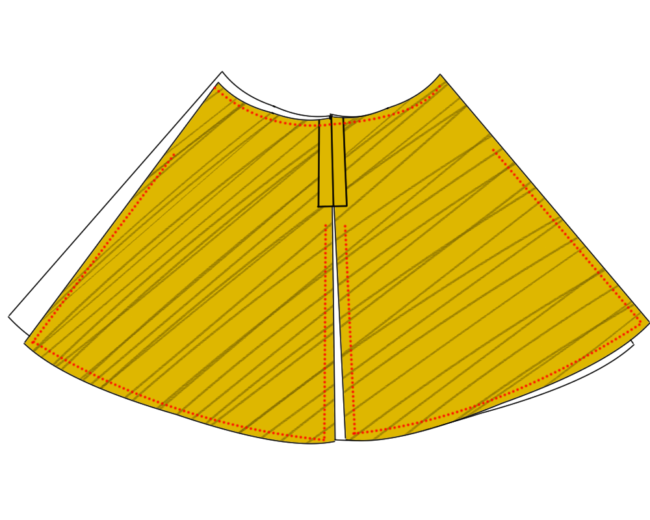
You want to leave an opening just below the join and also on each side. Once the skirt has been sewn, you might want to clip off the corners. Finally, turn the skirt right side out and use an iron to flatten the skirt as well as fold in the edges of all the openings. Using a needle and thread, slip stitch all the openings shut and finally top stitch over all the edges. Add velcro to the side of the skirt so it can open and close easily. The velcro should only cover from the top of the skirt to just above the thighs. For Frida’s skirt, you’ll want the skirt to be able to open from the left side, and for Agnetha’s, the skirt should be able to open from the right. Once the velcro is added, the basic construction for the skirt is done.
Step 6:
Now you want to paint the design onto the skirt. Follow the same steps for drawing on the details as we did for the top, by sketching first with the heat-erasable fabric pen, and then drawing over it with the sharpie pen. For the design on the skirt, you want to draw the bottom half of the cat (you want the cat on the skirt to line up with the cat on the top,) and then extend the tail to wrap around the back of the skirt and then to the front again.
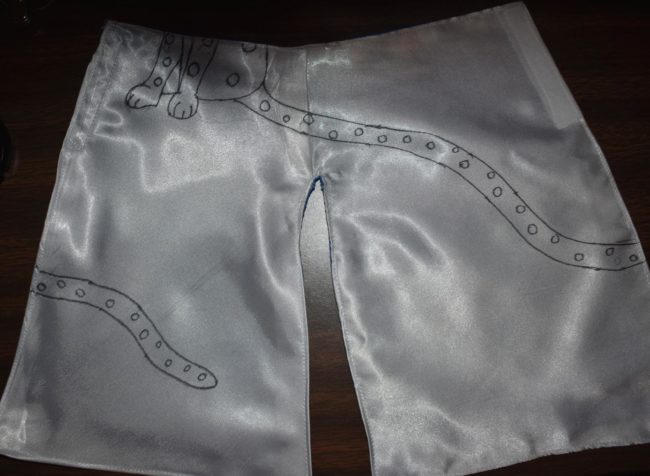
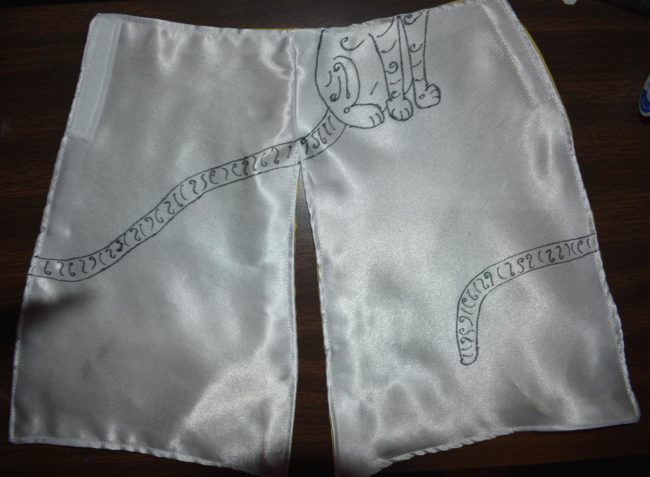
Paint within the lines, and once the paint is dry, you might need to go over the lines again with the sharpie. Once that’s been done, the skirt is now finished.
To finish the look, pair the outfit with any knee-high white boots. If you wanted, you could wrap the boots with white ribbon for a more accurate look, but it’s not necessary.
I hope this tutorial was informative and will help you to make an ABBA cat dress of your own.
About the Author
Becky
Hello, my name is Becky. I started doing cosplay in 2016, but I've been sewing and making costumes since before then. Besides cosplay, I like music, art, and writing.


One Comment
Leave a Comment
Stay connected. Don't miss out!
Get new costume guides in your inbox once a month.


Thank you! This helped me make some full sized ones for the Abba Voyage concert x