Make Your Own: Meowscarada
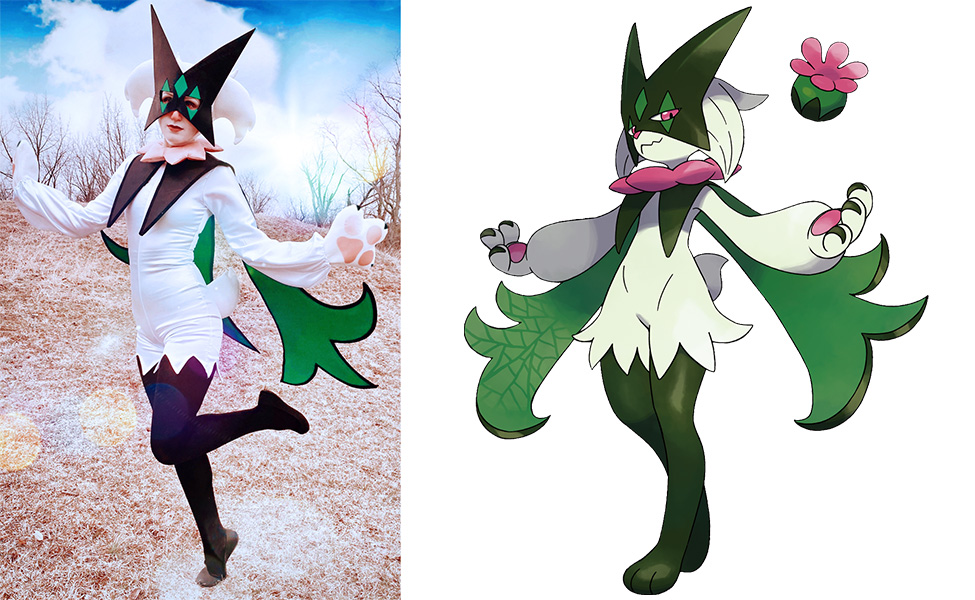
The Bulbapedia describes Meowscarada as “a humanoid feline Pokémon with light green fur covering most of its body — stopping just above its long, dark green legs — and a short, fluffy tail.” A dual-type Grass/Dark Pokemon, Meowscarada made its debut in Pokemon Scarlet and Violet as the final evolution of the Grass starter, Sprigatito.
In this tutorial, we will be learning how to make a cosplay that captures Meowscarada’s “proud” and “showy” personality, and all the charm that comes with it. This tutorial is best suited for intermediate cosplayers who already have pattern-making experience.
You Will Need:
- The Pilar Playsuit Pattern
- Pilgrim Collar Pattern
- Devil Hat Pattern
- Vintage Sleeves Simplicity Pattern S8695
- 1 yard satin in Pink (or Fuchsia)
- 1 yard fleece in White
- 2 yards satin fabric in Kelly Green
- 2 yards satin fabric in Black
- 2 yards stretch charmeuse satin in White
- 4 yards extra firm craft weight interfacing
- 2 packs of Wonder Under fusible webbing
- 3 packs of extra wide double fold bias tape in Black
- 20-22 inch invisible zipper in White
- 12 gauge jewelry wire
- Embroidery floss in White
- Embroidery needle
- White thread
- Pink thread
- Craft glue
- Poly-fil stuffing
- Black tights
- 1 sheet 5mm craft foam
- FX paint in Black and Green (Carbon and Smashing)
- Pack of snaps
- Elastic
- Paper fasteners
- Rubber cement
- Fray check
- Hot glue and hot glue gun
- Black acrylic paint
Step 1:
Print out all of your pieces for the Pilar Playsuit pattern and tape them together as instructed (Fig. 1). You will only need to cut out the Front, Back, and Sleeve pieces.
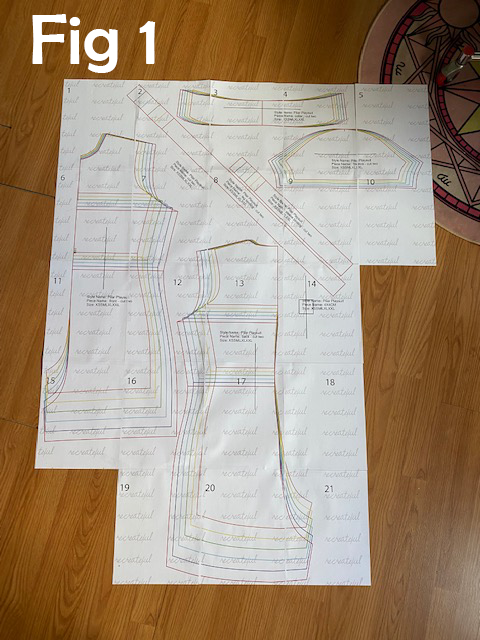
Next, securely tape some paper to the bottom of the Front and Back pieces and sketch out a zigzag pattern. This will create a leaf-like hem for the bottom of each pant leg. Refer to Fig. 2 for measurement suggestions.
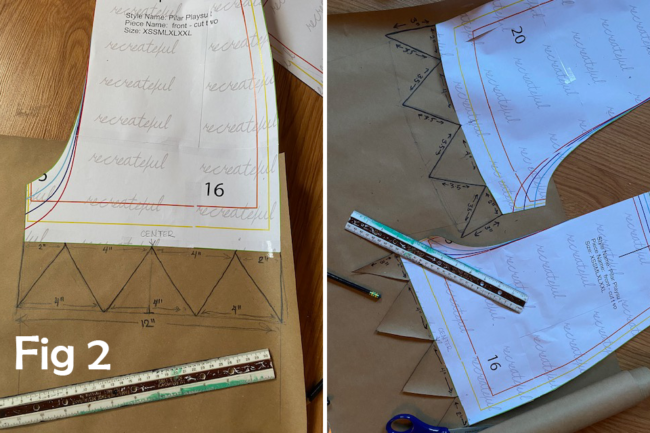
Once your leaf pattern is mapped and cut out for both the Front and the Back pieces, lay them flat on a folded piece of your white stretch charmeuse fabric. Make sure that the fabric is stretching horizontally and not vertically. Pin your pattern pieces down and cut them out so that you have 2 Front pieces and 2 back pieces. Sew your 2 Front pieces and your 2 Back pieces together at the inner seam, right sides together.
Step 2:
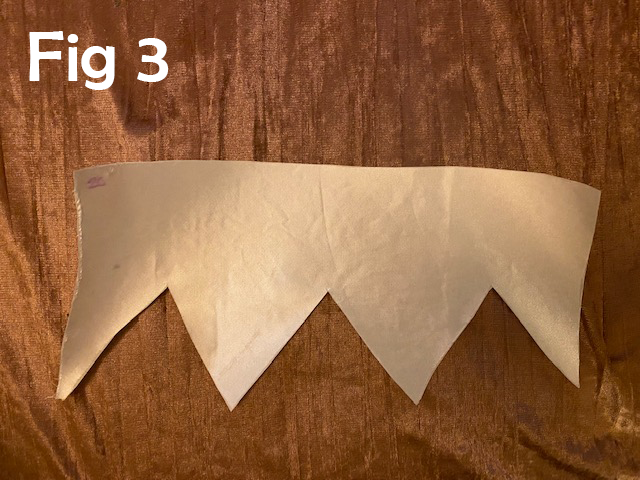
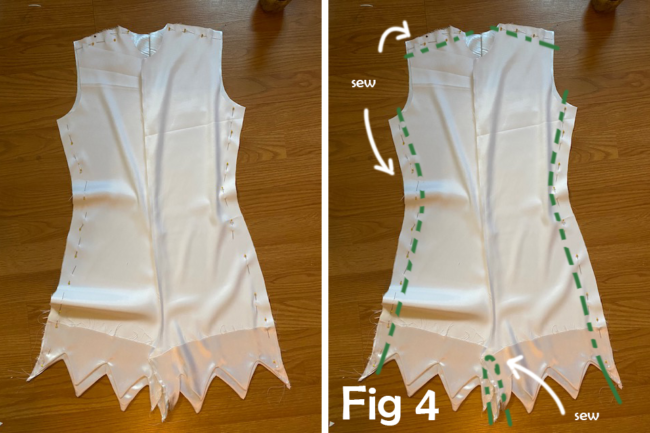
Next, cut the newly created leaf-shaped hem off of your Front and Back pattern pieces, leaving about 2 inches at the top. Use your Fray Check to seal those top edges (opposite the zigzag edge).
With right sides together, sew your hem pieces onto the bottom of each corresponding Front and Back piece, just along the zigzag edge. Flip the edges inside out and iron them down. Lay your Back piece on top of your Front piece and sew the outer edges down with right sides facing each other.
Step 3:
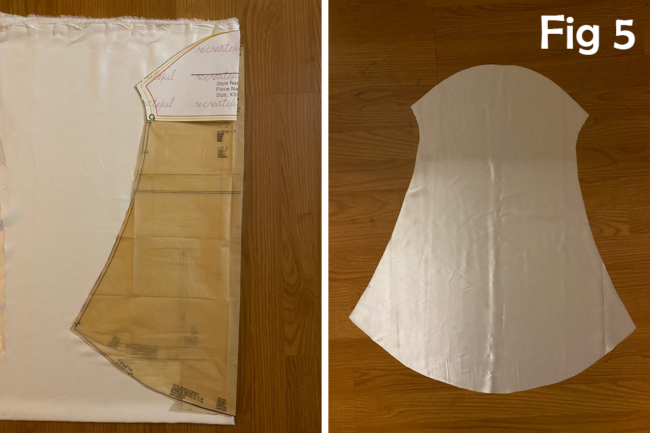
To make the sleeves you will be using a combination of the Sleeve pattern piece and the Simplicity Pattern S8695 pattern in Style D. Tape your Sleeve pattern piece to the top of your Style D pattern piece and fold your new sleeve pattern down the middle (ignore the side of your Style D pattern piece that has the cut-out). Lay your folded sleeve pattern against a folded edge of fabric. Once again, make sure that your fabric is stretching horizontally. Cut two.
Fold your sleeve piece down, right sides together, and stitch shut. Sew your sleeves into your suit, and hem the bottom edges of your sleeves with elastic encased inside so that the wrists of the costume are ruched and adjustable.
Step 4:
If you like, add a collar to the neckline of your suit that measures the circumference of the base of your neck, plus 2 inches on either end (for a total of 4 extra inches) in length and 5 inches in thickness. Fold your collar piece down, wrong sides together, so that it is 2.5 inches thick and iron it flat. Rip out the seam that runs down the center back of your suit and sew your collar piece into the neckline. Lastly, install your invisible zipper with the top reaching the upper edge of your collar.
Step 5:
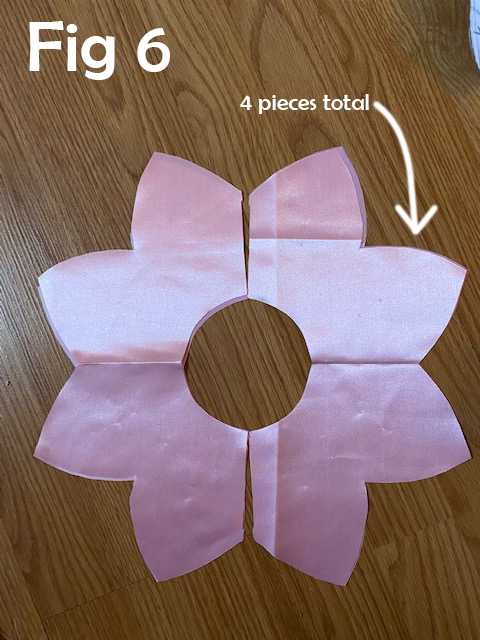
To create a pattern for your flower collar, measure the circumference of your neck once more. Using the Circle Skirt App, put your neck measurement in the “waist” field. Click the “full” and “mini” options. Use the radius measurement, rounded up to the nearest ¼ inch. Sketch this radius measurement into the bottom corner of a piece of paper. Fold your paper in half and sketch out a single “petal” design. While still folded down, cut your radius measurement out of the corner, and your petal design. Open up your pattern piece to reveal 2 perfectly symmetrical petals.
Fold your pink or fuchsia satin fabric in half. Place your pattern piece against the folded corner and cut. Do this 4 more times until you are left with 4 symmetrical collar pieces.
Sew 2 petal pieces down, right sides together, only along 1 edge. Then lay your 2 sewn pieces on top of each other, with right sides facing together again along the zigzag edge of your petal shapes, making sure the raw, unsewn edges are correlating. Sew the unsewn edges closed, and hem the inner edge. Fill your petals with stuffing.
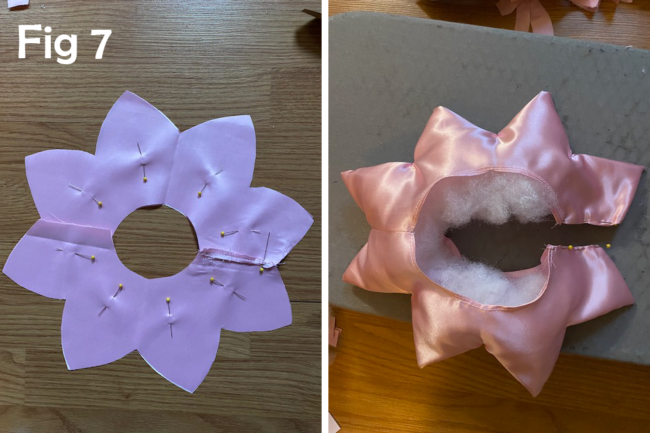
Sew your collar closed along the inner edge. Install a snap enclosure at each end.
Step 6:
Print out your Pilgrim Collar pattern and cut out the appropriate size. Tape your pattern piece flat on top of another sheet of paper and elongate the tip of your collar into a dagger-style shape. Cut out your new pattern shape.
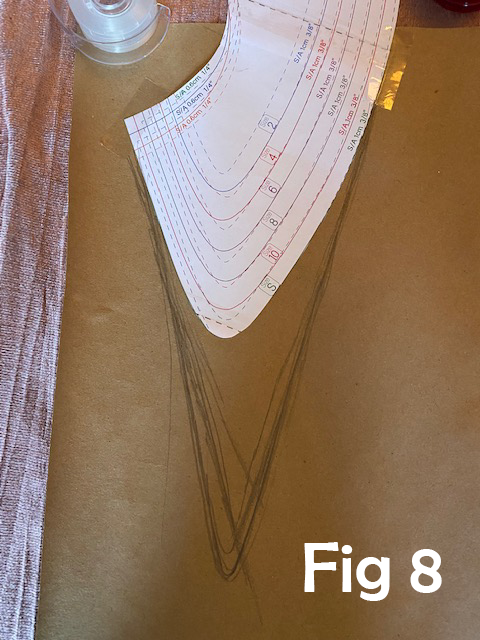
Using a long roll of butcher paper or plain wrapping paper, sketch out the shape for the tails of your cape, using your collar pattern as a guide.
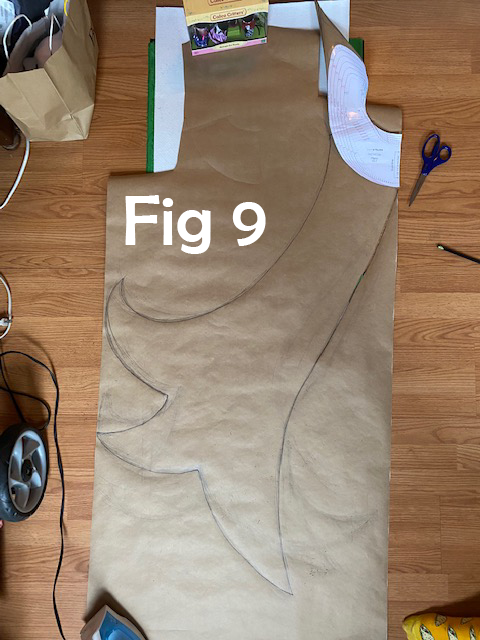
Lay your black and kelly green fabric together out flat and fold them over once. Pin your collar and cape pattern pieces down and cut them out, so that you have 2 of each pattern piece in both colors. Make sure to leave a margin of about ½ inch to 1 inch all around each pattern piece. This will be important for when we fuse our fabric down later on.
Take your Wonder Under fusible webbing and iron it down to the wrong side of each cape and collar piece.
Step 7:
Trace each of your cape and collar pieces onto your craft weight interfacing with a permanent marker. The interfacing may not be wide enough to fit the entire bottom piece of your cape. If so, simply cut off the pieces of your pattern that do not fit, and make them separate pieces.
Cut 2 of each of your pieces out, and hot glue the pieces that would not fit back where they belong. Then, hot glue your cape pieces together to create one complete cape piece. This will hitherto be referred to as the “base”.
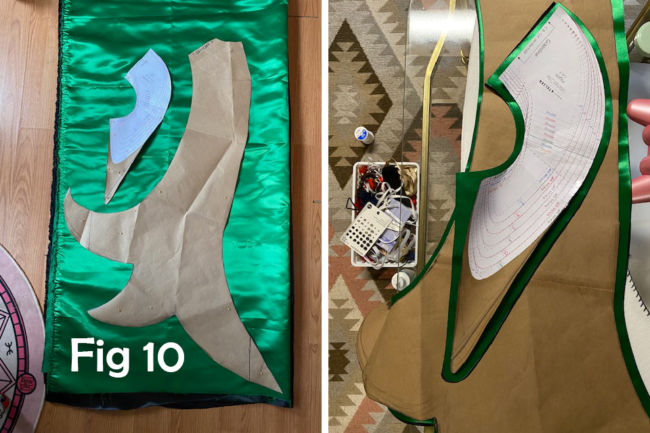
Attach your 12 gauge jewelry wire all around the edges of your base using embroidery floss to allow for more control over the shape of your cape.
Step 8:
Remove the paper backing from your fabric pieces and iron them onto your base, black on the back and green on the front. (The extra fabric will allow for a margin of error when trying to line up the fabric pieces to the base.) Trim away the excess. Wrap the edges with your black bias tape and glue the tape down on both the black and green sides.
Step 9:
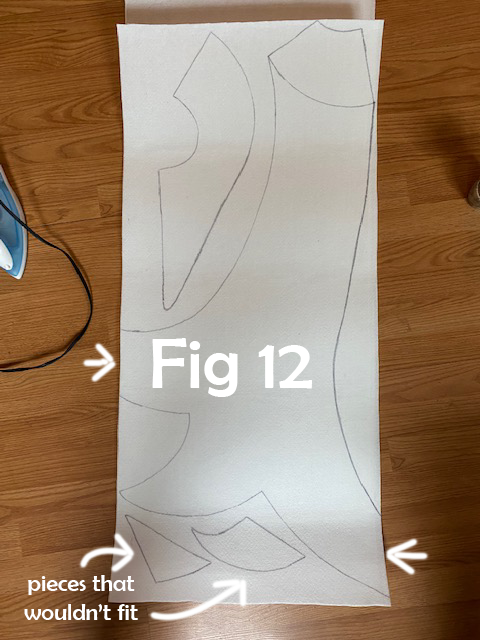
Print and cut out your Devil Hat pattern pieces, making sure to use the version that does not have a peak in the middle. You only need to cut out the cap pieces (B and C).
Sketch out the shape for your “ears” and cut that piece out as well.
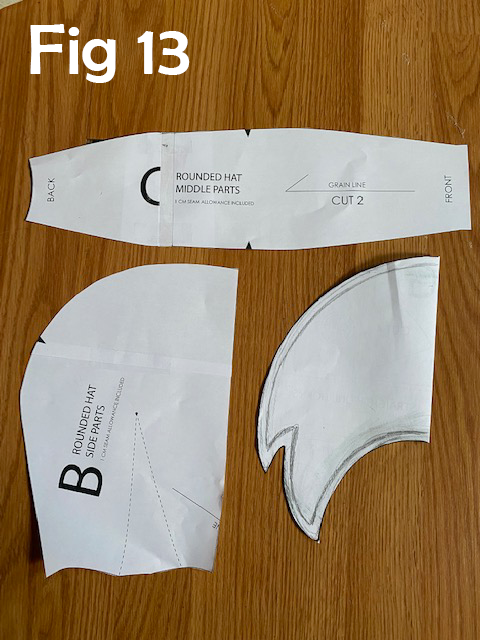
NOTE: I highly suggest making a mock-up of your cap first to make sure that you like the shape of your ears, and to see how everything fits together.
Step 10:
Cut your pattern pieces out of your white fleece and sew them together. (Cut 4 pieces of your “ear” pattern to yield 2 ears.) Stuff your “ears” with Poly-fil.
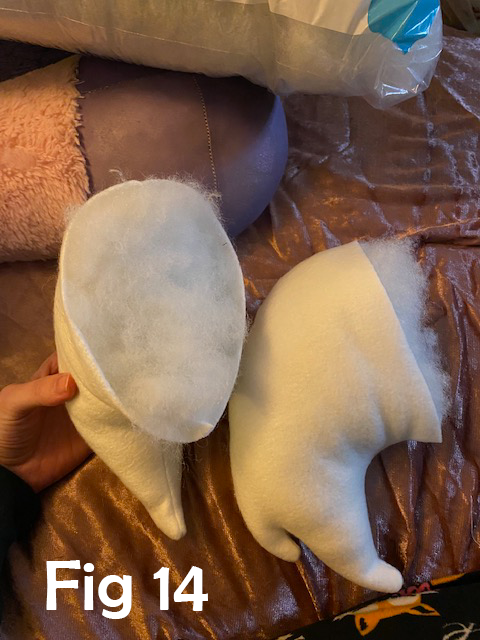
Using your white thread, position your ears on your cap and sew them in place by hand. You may also want to add 2 additional, smaller pieces to the back of where your ear pieces sit.
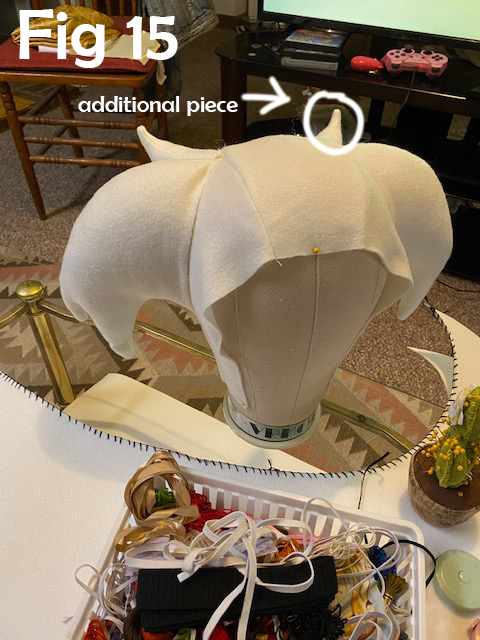
Instead of using the ties in the pattern, cut a small strip of fleece and sew it to the bottom edge of your cap. Install a snap to the other end, so that it snaps to the other side of the cap at the bottom. Cut a long, thin strip of fleece to act as binding tape, and sew the strip all the way around the unfinished edges of your cap.
Step 11:
Sketch a large puffy shape for your tail, and cut 2 pieces from your fleece. Sew them together and stuff them with Poly-fil. Cut a large circle from your fleece and hand sew it to the opening of your tail piece.
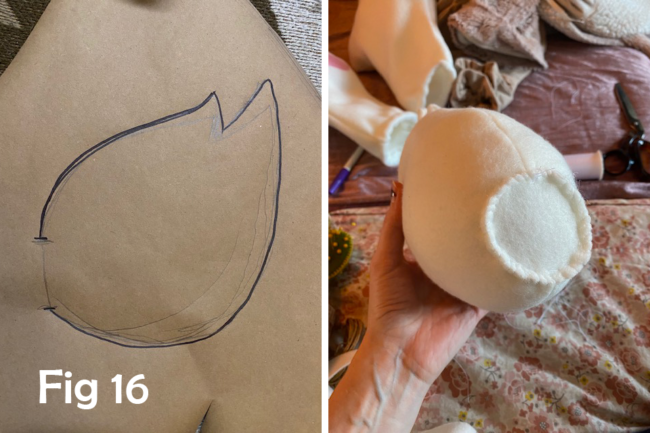
Hand sew your tail to your suit at the base of the zipper.
Step 12:
Sketch out a paw-shaped pattern AND a mitten-shaped pattern for your gloves.
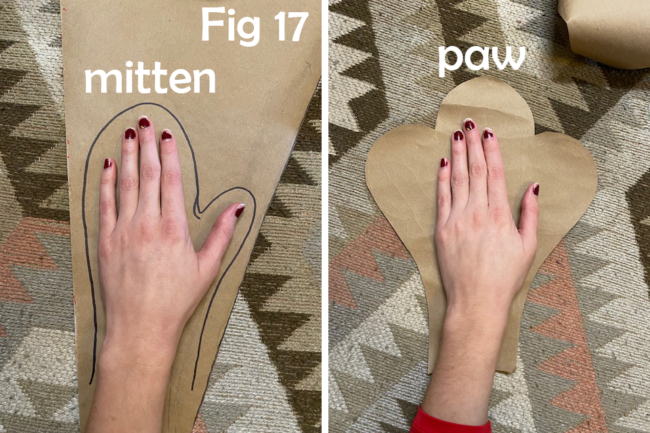
Cut 4 pieces each of your mitten and paw pieces. Using your paw pieces as a guide, make a pattern for your “toe” pieces.

Cut your toe pieces out of your pink fabric. Iron your Wonder Under to the back of each toe piece and then attach your toes to the top of 2 of your paw pieces.
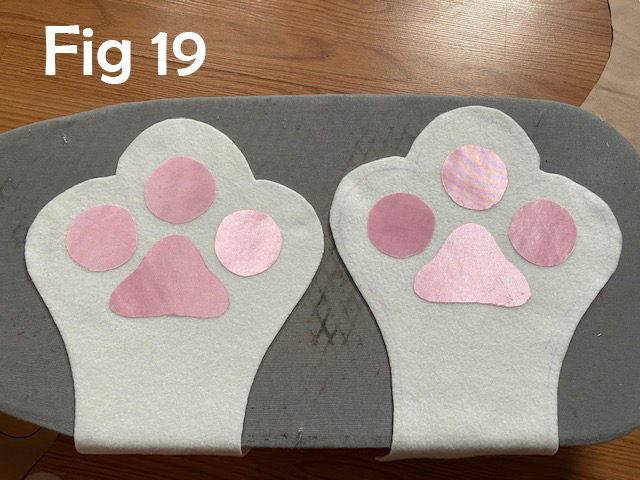
Sew your pieces right sides together to yield 2 mittens and 2 paws. Flip your pieces right side out and stuff your paw pieces with a loose filling of Poly-Fil, then insert your mittens into your paw piece. Sew your gloves closed at the ends. If you like, paint the tips of your paws with black acrylic paint to represent “claws”.
Step 13:
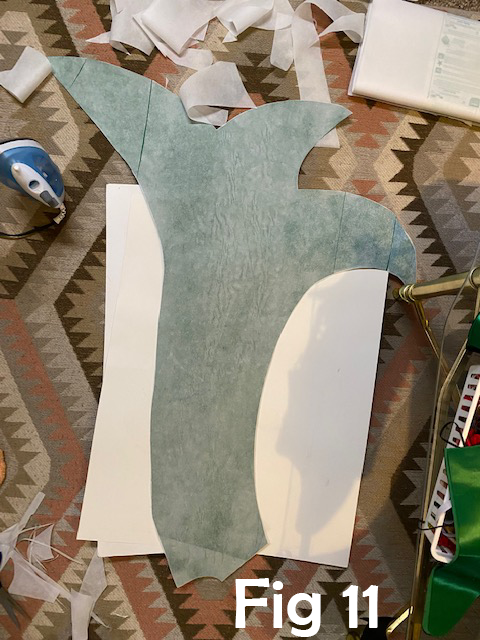
Sketch out a pattern for your mask using a large sheet of paper. Fold your paper in half, and cut out your pattern piece, including holes for the eyes. This may take some experimentation until you land on something you like. Cut your pattern out of EVA foam.
NOTE: Your pattern may be too wide for the EVA foam. If so, cut out 2 mirrored halves of your pattern straight down the middle vertically. Use your rubber cement to affix your two halves back together.
Step 14:
Cut out a large diamond shape from paper and place it on top of your mask. You will need a diamond shape for the middle of the forehead and both eyes. Move your diamond shape around to get a feel for how it will look. When you have a shape and positioning that you like, trace the diamond onto the mask using a dull pencil. Make sure your tracing is deep enough that it leaves an indentation, but not too deep that it rips all the way through the foam.
Next, paint your mask with your black FX paint on both sides, then retrace your diamonds once your mask has dried to make sure they still stand out. Lastly, paint them in with your green FX paint.
Step 15:
Push a paper fastener through the middle edge of both sides of your mask. Measure a length of elastic and tie each end of the elastic to each paper fastener. Pull the wings of your paper fastener down and reinforce with a generous dab of hot glue.
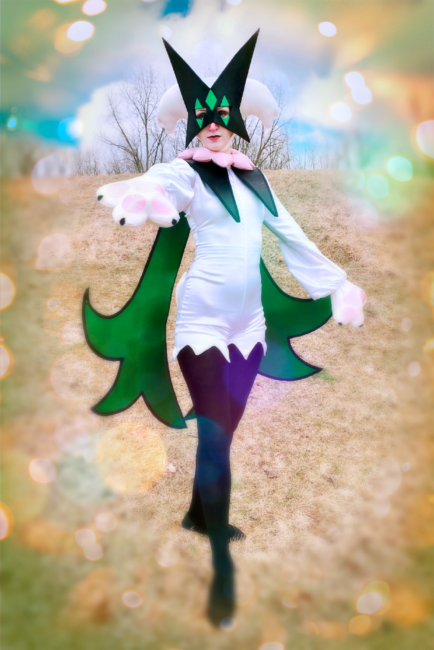
You’re all finished and ready for some Flower Tricks!
About the Author
Diomira Keane
Cosplayer, artist, cat-lover, party princess extraordinaire.


One Comment
Leave a Comment
Stay connected. Don't miss out!
Get new costume guides in your inbox once a month.


Greetings! Love the pattern and idea behind this, but I am not one for making my own clothing or costumes from scratch typically. If I wanted to get into it, I was wondering how one would account for size proportions in the amount of fabric/materials needed. In your example, you said 2 yards was enough for you with the stretch satin, but you are also far thinner than I am, so I was wondering how to account for that measurement wise and how much different sizing plays into how much fabric you would need.
Thanks!