Make Your Own: Cult Klaus from The Umbrella Academy

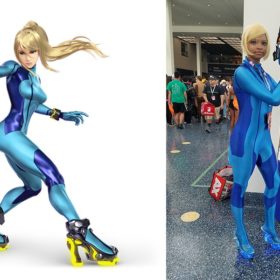
Cover photo credit: Strikingportraits and Joe Kok (thegreenscreenmanifesto)
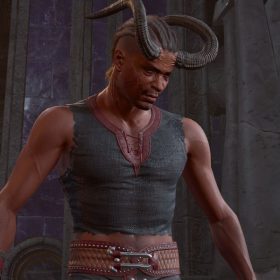
Do you ever see an outfit and go: “I have to cosplay that.” Picture me on my couch watching The Umbrella Academy Season 2, seeing Klaus, screaming at my television and immediately Googling reference pictures. Fans of the Hargreeves siblings can agree that Klaus’ cult outfit was a LOOK.
Usually, I have an idea of how to construct a cosplay in my head, but I had no idea what to do about that coat. Unfortunately, I don’t have a Netflix design team or a magic wand to make the coat magically appear. But I was determined to find a way. I couldn’t skip out on the most iconic part of the outfit!
Enter Lily Archer Creative, a fellow cosplayer and costume-maker who takes commissions. Thank goodness a spot opened, and this became our next project. While I assembled the pants, necklaces, and beard, she took on the coat. I asked if she wanted to collaborate on a full length tutorial and she replied with an enthusiastic yes. In her words: “If you’re going to run a cult, you’d better look good while you do it!”
Working with Lily was a blast. A huge thank you to her for helping write the latter half of this tutorial. Although her commissions are currently closed, you can browse the gallery and past client work on her website and Instagram. Don’t forget to leave a like on her FB page as well.
Materials
Coat:
- Off White Pleated Satin Fabric (about 4 – 5 yards, sold in ½ yard increments)
- White Lining Fabric (3 yards)
- Aqua Sparkle Organza (2 yards)
- Silver Leaf Trim (6 yards)
- Silver and Black Trim (unavailable online – purchased from Joann’s. 8 – 9 yards)
- Optional: Dark Silver Velvet Ribbon (2 – 3 yards)
- Interfacing – Pellon EK130 (7 – 8 yards)
- Shoulder Pads
- Something to drape on (I used a dress form, but if you have a friend you can do this on yourself!)
- White thread
- Silver Metallic Thread
- Muslin (or similar scrap fabric – a bed sheet works; 3 – 5 yards)
- Measuring Tape
- Ruler (I prefer a clear sewing ruler)
- Pins
- Sewing Needles
- Sharpie or Fabric Marker
- Fabric Scissors
- Sewing Machine
- Iron
- Serger / Overlocker (optional)
Pants:
- High Waisted Wide-Leg Striped pants (x2)
- White ribbon
- White buttons (x3)
- Scissors
- Marking Pencil
- Ruler
Necklaces:
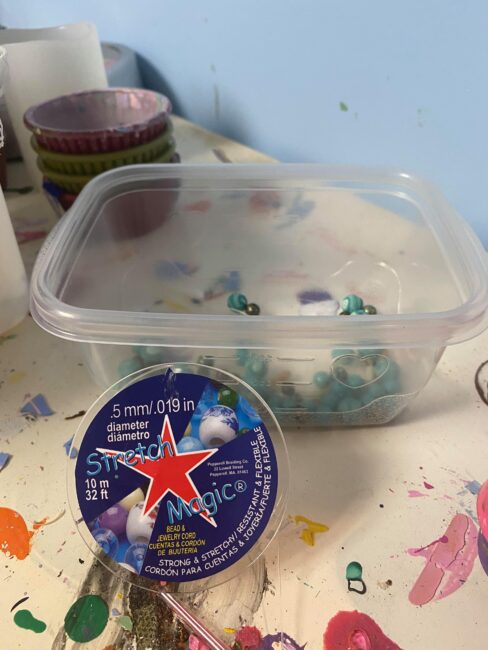
- Stretch Magic
- Smooth On Epoxy putty
- Gold spray paint
- E6000
- Gold rhinestones
- Dog tag necklace
- Assorted blue, white, and brown beads
- Sculpting tool
- Gray and silver acrylic paint (optional)
Beard:
Miscellaneous:
- White Ankle Boots
- Temporary Tattoo paper
- Vintage Red Sunglasses (these are dead ringers!)
- Beard Beads and Elastic Bands
- Fabric Pins
Necklace:
You can try and search for “vintage starfish necklace” or for the more ambitious route, you can make the necklace yourself.
Let’s start with making the starfish pendant. Take a handful of epoxy putty (gray) and combine it with the activator (white) by smushing it together like Play Doh. Don’t forget to wear gloves! On a paper towel, flatten the mixture to about 0.5 inch thickness. Use the sculpting tool to trace out the shape of the starfish pendant. Don’t cut all the way — this is supposed to be a rough outline.
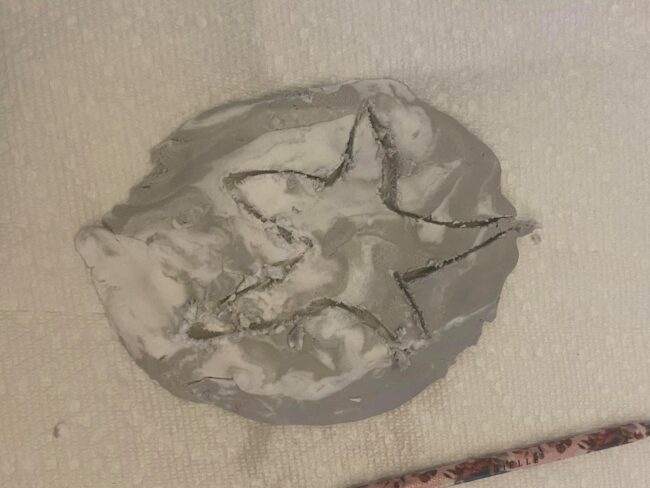
Once you like how it looks, cut deeper and fully carve out the shape. Take any excess putty to round it out and add bulk where needed.
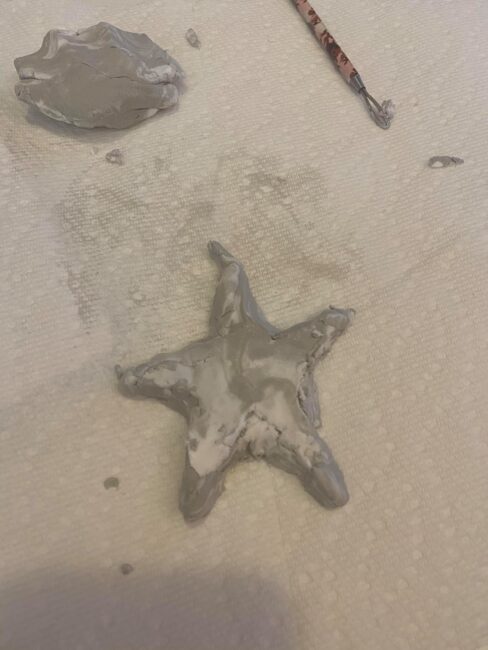
Hmm…not quite.
If you want, you can also use your tool to add texture.
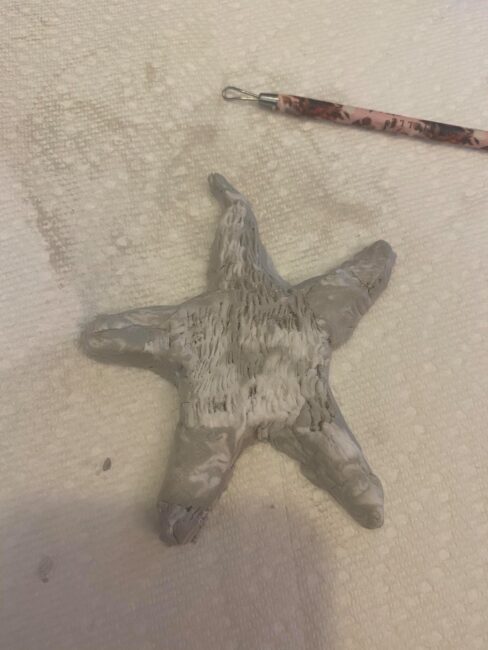
There we go! And yes, that’s a beauty tool…call it innovative.
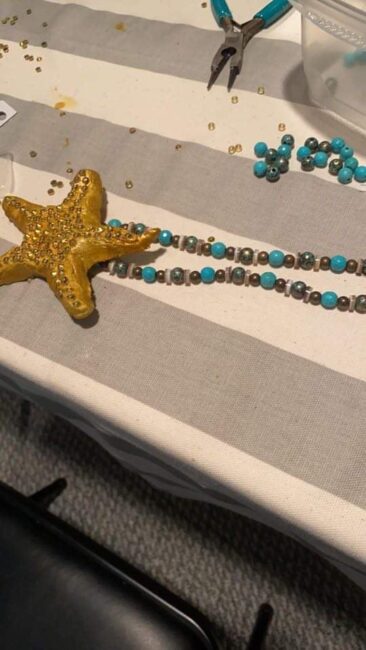
After you’re satisfied with the shape and size of the pendant, set it aside to cure overnight. A good way to check the size of the starfish is to hold it up below your chest where it will hang. The next day, spray the starfish with gold spray paint. You can leave it like this or you can be extra and rhinestone it. Use the E6000 to affix gold rhinestones on the front.
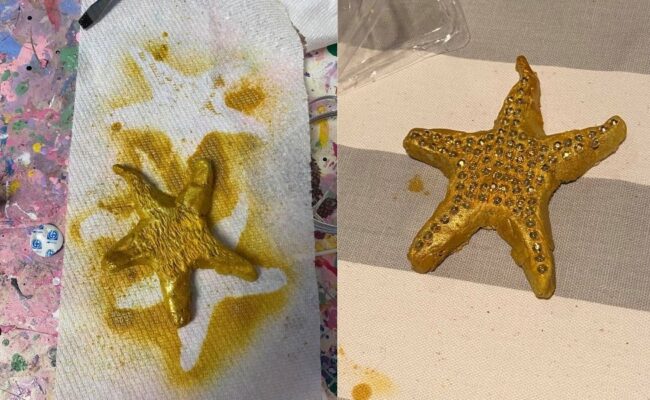
I couldn’t resist blinging it out.
Now for the actual necklace. Remember making beaded friendship bracelets? Get ready to revisit your childhood. Test a piece of Stretch Magic around your neck and cut it to the appropriate length. Tie a knot at one end and begin threading your assorted beads. I selected beads that played off his coat colors (white, brown, blue) and had a vintage feel.
Glue the top of the starfish in the middle of the necklace, and you’re finished!
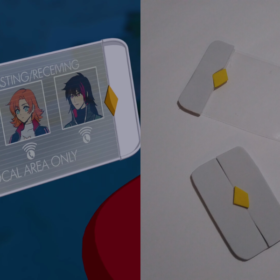
Dave’s Military Dog Tag:
The dog tag is much simpler. You can purchase military style dog tags, and even accurate ones for Dave. I found an old dog tag from middle school and painted it. It took about 3 layers of paint. I used some black to make it look more discolored and rusted, like it was actually from war.
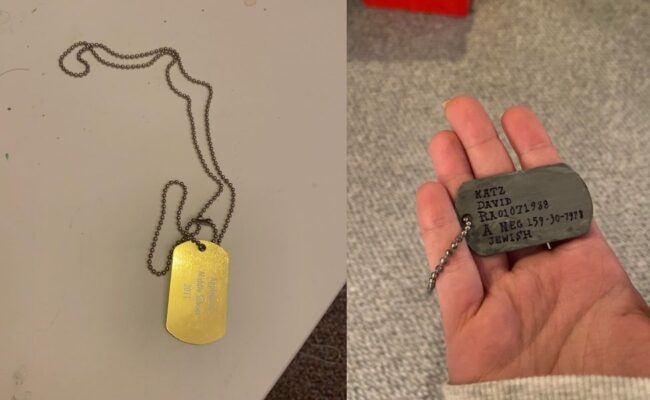
Before and after!
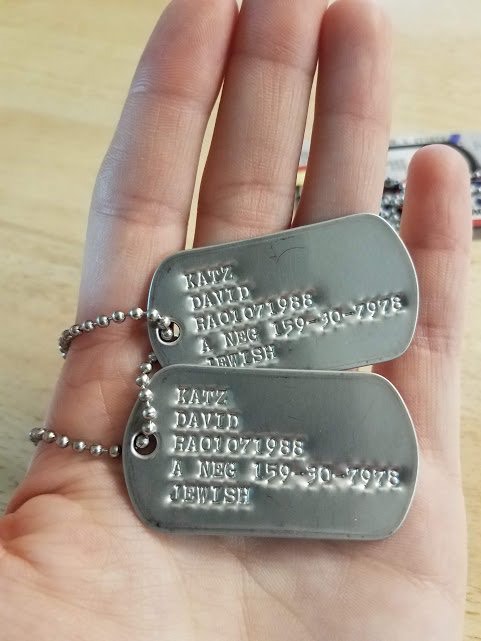
Here is the info on his tag if you’re making your own, which I wrote in thin black sharpie:
Pants:
Upon first glance, these look difficult to make, which is why I used two pairs of actual pants. I initially thought to buy fabric and drape it around first pair of pants. However, my local craft store didn’t have any good matches. So I thought, what if I used two pairs of these pants to make Klaus’ pair? Not only will it keep the fabric and color consistent, but the design pretty much looks like two pairs pants layered over each other!
Cut off the horizontally striped bottoms of both pairs of pants. From this point forward to keep things straight, I’ll refer to the first pair of pants as Pants A and the second as Pants B. With a ruler, measure about 4 inches from the bottom of Pants B, and cut a diagonal line upwards. Do the same on the other side in the opposite direction. Pull on the second pair of pants, aka Pants A, to see where to cut out the flaps. Make a line with a pencil down one leg. Upon removing the pants, cut along the line. Do the same on the other side.
Pro Tip: Use your first piece and reverse it on the other leg to achieve a symmetrical shape.
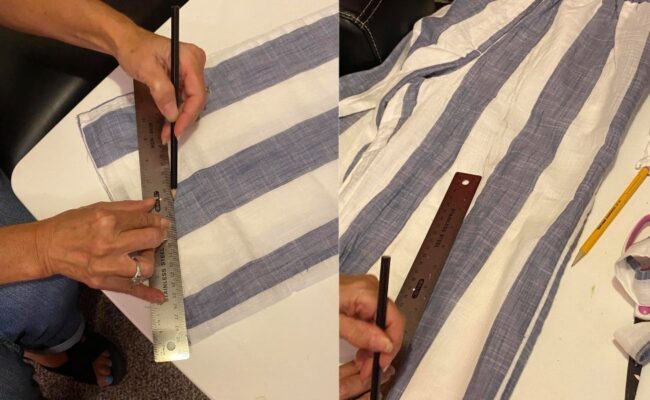
Be sure to thank your family and friends who help you out. Thanks mom!
While you can technically keep Pants A in tact, I thought pulling two pairs of pants on made the garment kind of bulky. Instead, I kept the waistband part and pinned onto the waistband of Pants B for a seamless design. Then I sewed the flaps onto Pants B with white thread. I also sewed the fabric and the liner together, and closed up the back a bit.
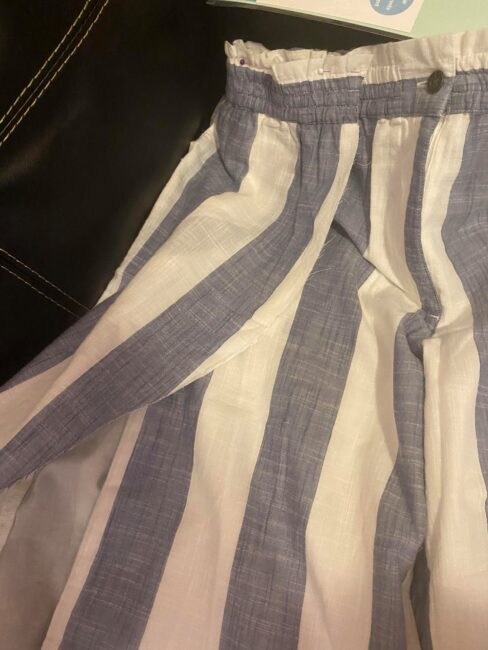
Flaps, glorious flaps!
Now for our trim. I used white ribbon and hot glue along the open sides and beneath the pockets of Pants A, on the bottom of Pants B. Remove the brown button and sew on three white buttons in a vertical row on the other side.
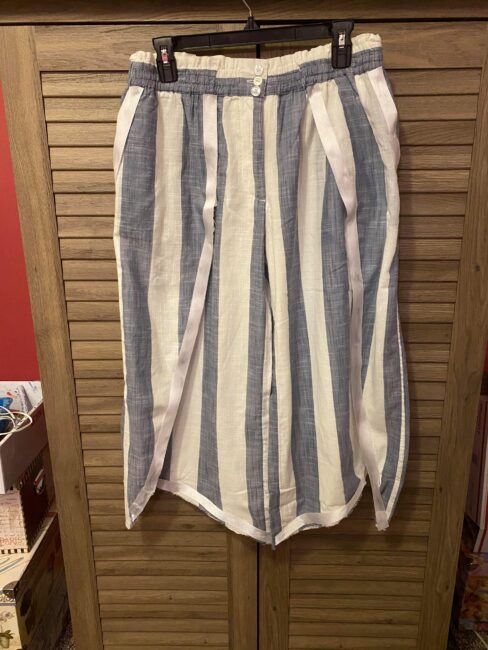
And here is our finished product:
Tattoos:
We wouldn’t be Klaus without a variety of tattoos. He has the umbrella wrist tattoo, Hello/Good Bye on his palms, and a Thai temple on his stomach that translates to “Klaus loves Dave.” Brb, my heart is breaking.
To make this into your own (temporary) tattoo, you will need tattoo transfer paper and the corresponding images. Follow the instructions that come with the package, and don’t forget to mirror flip the images, otherwise it will come out backwards. If you prefer an easier option, you can draw the tattoos on with black eyeliner or marker.
Pro Tip: Set your “tattoos” with powder to last longer, prevent smudging, and look more faded and realistic.
Beard:
Because I plan on wearing this cosplay more than once, I wanted to make a reusable beard applique. You can tell the show used an applique as well, picture below for reference:

The face when there’s one week until the con and your cosplay isn’t done.
I took inspiration from Arda wigs Beard Tutorial and Mehron’s Crepe Hair tutorial. I taped a long piece of plastic to my chin and created an outline of the beard using Sharpie. You can use the plastic from an unfolded Zip-loc bag.
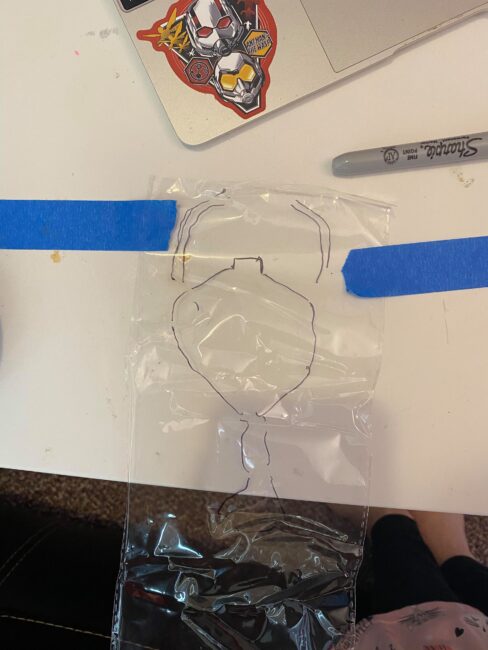
Be sure to leave space for your mouth!
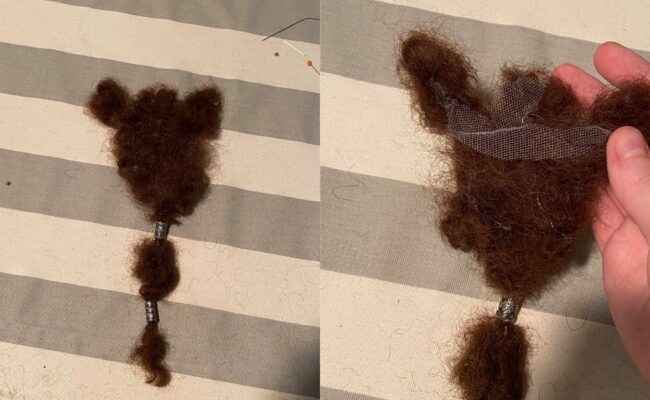
I found tulle and dark brown thread at my local craft store. You can follow the Arda tutorial with wefts, but I found crepe hair better matches the texture of Klaus’ beard. Cut the tulle into the shape of a chin piece. Pin it onto a section of tulle and with dark brown thread sew it on.
This step is quite difficult to explain into words, as I thought of it as I was making the beard. Pull the crepe hair with your fingers and use a teasing comb to amass volume. Use hot glue to layer the hair as to build thickness and cover empty patches. The hair looked a bit too light, so I used spray to darken it.
To style, section the hair from large to small. Use the stencil (and reference pictures) to create the shape. Tie off the sections with the small elastic bands. Find two cylindrical shaped beads and slide them onto the hair.
To apply, brush Spirit Gum onto your chin, where you want the beard. Wait until it gets tacky before pressing the tulle backing onto your chin. If it’s your first time working with Spirit Gum, test it on your wrist. If your skin has a negative reaction, you’ll want to look into another adhesive. I intended to make a matching mustache but due to time constraints, I drew it on with dark brown and black eyeshadow.
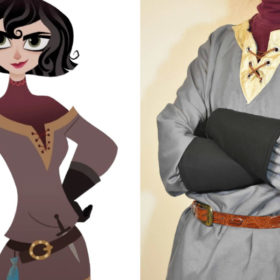
Coat:
Now for the piece de resistance — the glorious coat. I’m going to let Lily take it from here.
Step One:
Prepare to make your pattern! There are two ways to do this – you can either drape the pieces directly onto your dress form, or you can use an existing garment as a template. I’m going to use my favorite method: draping.
To drape properly you need to start with a dress form that has been sized to match the cosplayer’s shape. (If you have a friend to help, this can also be done directly onto a person!) Rough measurements are all you’ll need in most places for a coat like this. Make sure the form matches your shoulder width, approximate bust (or upper chest), approximate hips, and take a measurement for how long you want the coat to be (from where your neck meets your back to the desired hem line).
Step Two:
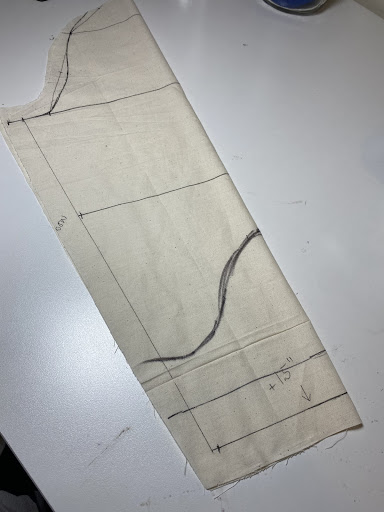
Once the form is sized correctly you will cut out a piece of muslin (or any spare fabric you have, like a thrift store bed sheet) equal to the length of your coat + 5 inches. Pin the top of your fabric to the shoulder line of the form, leaving an inch or so of extra fabric past the shoulder line and matching the edge of your fabric to the center front of the form. This is your canvas for drawing out your pattern lines!
Take your Sharpie or fabric marker and draw the shape of your front panel. This will include:
- A straight line on the shoulder
- A straight line down the front for the center opening
- A curved line at the neck where the collar attaches
- The hem line
- A curved line for the sleeve opening
- And a line for the side seam. This should go straight down from the underarm and angle slightly towards the back around halfway down.
Pro tip: If any of these seam lines confuse you, take a look at garments you already own or google basic sewing pattern images and compare with the shapes you see.
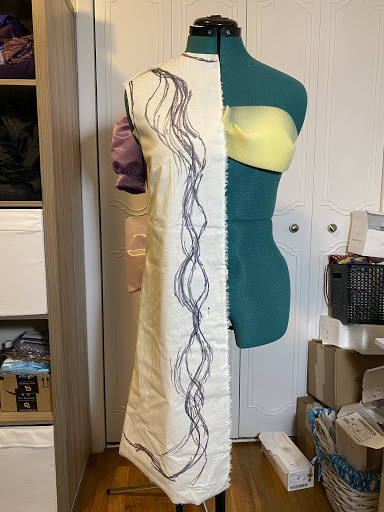
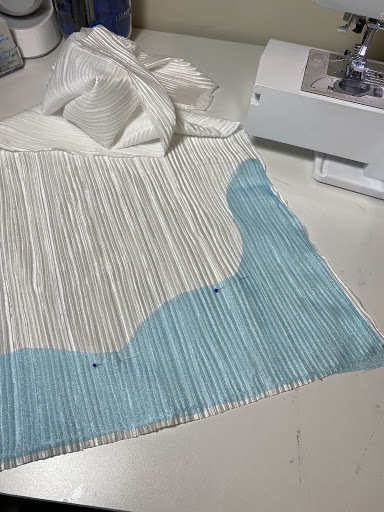
Here’s what my front panel looked like:
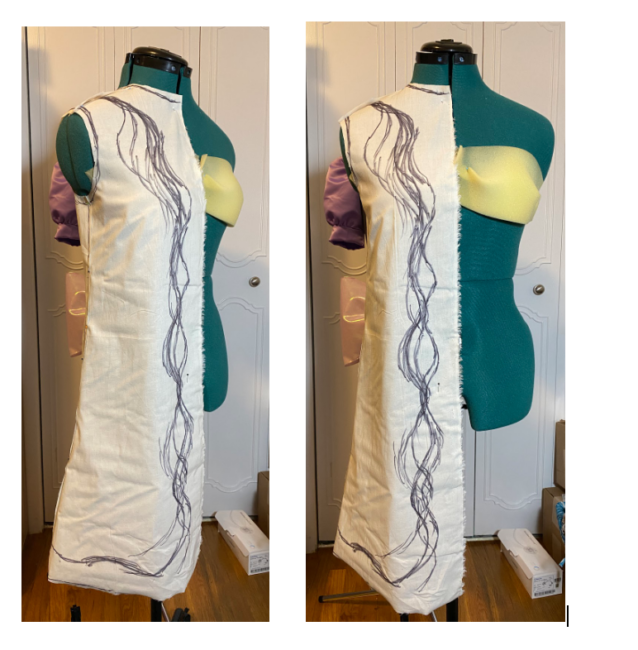
We’ll come back to the wavy lines later!
Step Three:
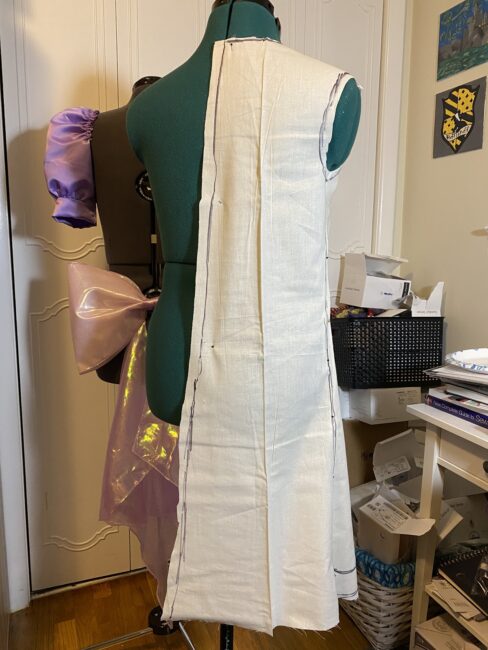
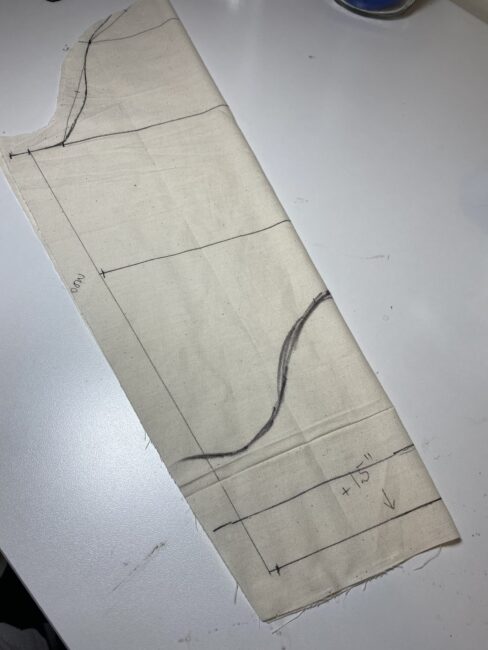
Repeat this process for the back panel, making sure that you match up the seam lines with the front panel. Instead of angling your side seam line towards the back halfway down, angle to the front. Klaus’ coat has a slight flare towards the bottom!
Here’s what my back panel looked like:
Pro tip: Don’t forget to leave room for a seam allowance when you cut off the excess fabric! I like to leave ⅝ inch between the sharpie line and my cut line.
You can either stop here if you are confident in your work, or make a full mock-up to test the fit. To make a mock-up you will need to draw out a duplicate of each panel, then either pin or sew along the seam lines to create a test run of the coat. Try it on, mark any desired changes, and then seam rip any stitches so you can use the panels as pattern pieces.
Step Four:
Now that you have your main pattern pieces completed, you can make patterns for your sleeves and collar. I will be the first to admit that I am not the best at creating patterns for these elements without some sort of a guide, so I turned to the internet for some tutorials!
Here is a link to the collar tutorial I used. This style of collar is called a “Mandarin Collar.” You can use the same muslin fabric as before to make your pattern.
And this is a link to my favorite sleeve drafting tutorial! The only adjustment I would make to this method is to add an additional ½ inch or so to your wrist measurement to make sure the opening of the sleeve is accurate for Klaus.
Step Five:
Time to cut out (some of) your pieces! Here is a list of everything you need to cut. I highly recommend labeling your pieces in some way – make piles for each panel of the coat, for example, and pink a post-it to the top labeling where it goes. Otherwise you’ll end up like me, ripping out seams partway through!
Front Panel:
- Pleated Satin: 2 pieces, one for each side. (This fabric doesn’t have a “right” or “wrong” side.)
- Lining Fabric: 2 pieces, one for each side.
- Interfacing: 1 piece with the pattern face up, 1 piece with the pattern face down. This is very important, as only one side of the interfacing has glue on it!
Back Panel:
- Pleated Satin: 2 pieces, one for each side.
- Interfacing: 1 piece with the pattern face up, 1 piece with the pattern face down.
*Note: Lining the back panels is entirely optional. If you want to do so, buy an equal amount of lining and pleated satin.
The Collar:
- Pleated Satin: 1 piece. Note that this pattern will want you to cut on the fold, so you will end up with a final cut twice the size of your pattern piece!
- Lining: 1 piece, also cut on the fold.
The Sleeves:
- Pleated Satin: 2 pieces, one for each arm.
- Lining: 2 pieces, one for each arm.
- Interfacing: 2 pieces, one for each arm.
Step Six:
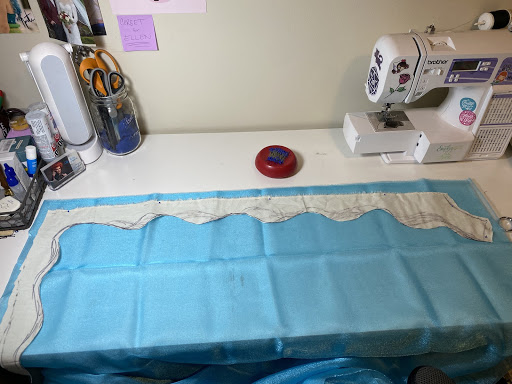
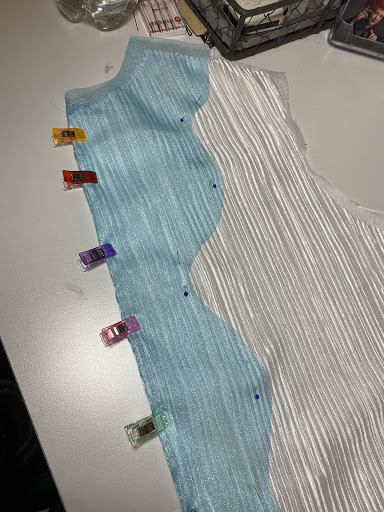
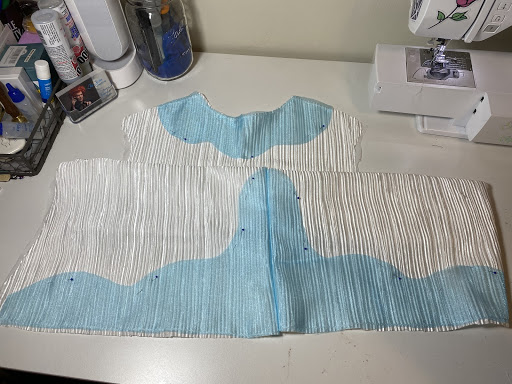
Take your existing pattern pieces and map out where the blue fabric will go. This is a trial-and-error process; the main goal is to replicate the original look and maintain the overall proportions of the wave lines, not necessarily the exact number.
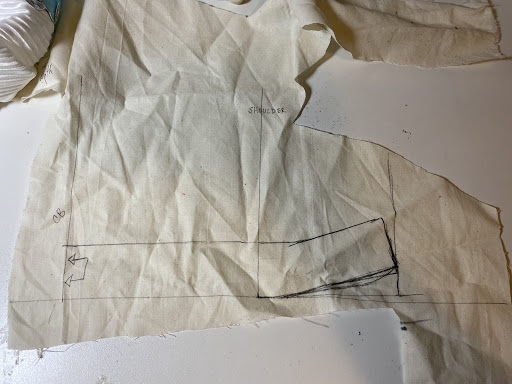
Here’s what mine looked like:
Note that on the sleeves I first marked out a 1.5 inch gap from the bottom of the piece to where the blue begins. That leaves space for the cuff.
Once you are happy with the design you have, cut out this section from your original pattern pieces. Cut exactly on the curved lines (no seam allowance), and leave your usual seam allowance everywhere else, including where the blue meets the cuff of the sleeve. The only exception to this is the upper back piece. Do not include the seam allowance at the center back seam, cut directly on the seam line.
Step Seven:
Cut out your Aqua Organza! Make sure you duplicate your pieces where necessary. The only exception to this is the upper back piece, which should be cut on the fold where you eliminated the seam allowance to create one single organza piece.
Step Eight:
Iron your interfacing onto the corresponding pieces of pleated satin. This will eliminate the stretch in the fabric while adding a slight weight to the body of the satin which more accurately represents the original garment. Be sure to follow the included instructions and move your iron often to avoid leaving an imprint or crease.
Step Nine:
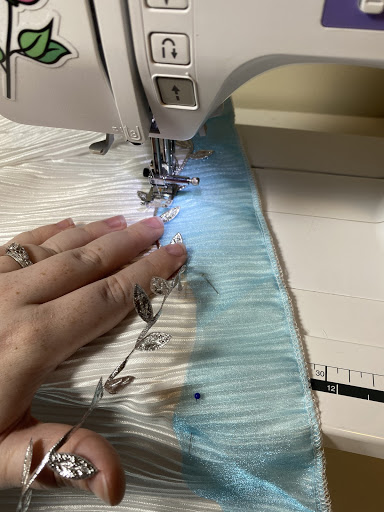
Lay out your satin pieces and pin down the corresponding organza pieces on top, placing pins within the seam allowance and using as few along the curved edge as possible. Take your time here, as you want the organza to be as smooth as possible. You will not be attaching the upper back panel at this time. Sew along where you have pinned, again using a smaller seam allowance than you would for the final garment.
Step Ten:
Sew your front panels to their lining pieces along the front center seam only, right sides together. Flip the pieces right-side-out and sew along the remaining edges at ¼ inch from the edge of the fabric. You can use sewing clips to hold the center seam in place for now if you wish.
Step Eleven:
Sew the back panels together along the back center seam. Finish the seam allowance with either a serger if you have one or a zig-zag stitch.
Pro tip: If you don’t have a serger, then take the time now to zig-zag stitch along the edge of each pleated satin piece, about ¼ – ⅛ inch from the edge of the fabric.
Iron the seam open and flat, then attach the upper back organza piece using the same method described earlier.
Step Twelve:
Sew the front panels to the back along the side and shoulder seams. Serge your seam allowance and iron the seam open and flat, then serge along the top and bottom edges to hold everything together neatly.
Step Thirteen:
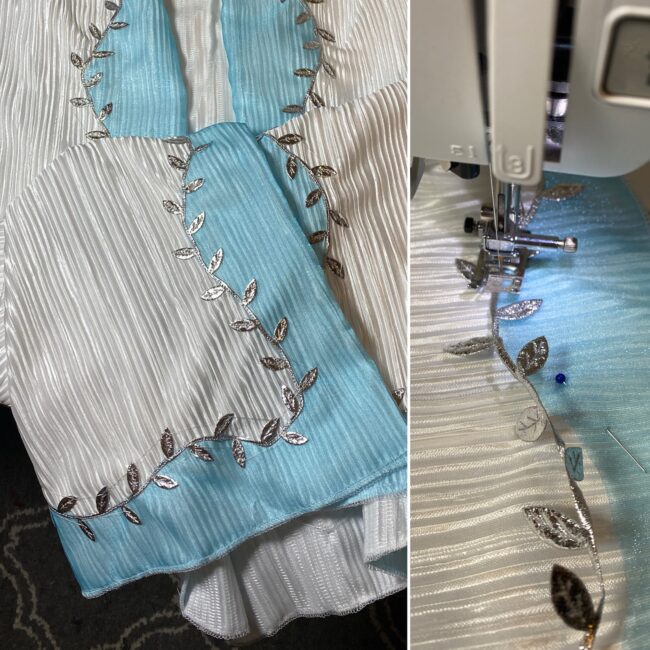
It’s time for the most time-consuming part of this entire build – attaching the silver leaf / vine trim. Pick a starting point; I would recommend near one of the side seams at the bottom of the garment. Using your silver thread, line up the thin part of the vine with the edge of the organza and begin to carefully sew, lining up the trim as you go. Be sure to stay just on the inside of the organza so you can sew the curved edge down at the same time as the trim.
Pro tip: Use white thread in your bobbin so the stitches stay invisible on the inside of the coat!
Work slowly and unwind your trim as you go. I found it helpful to move my needle to the center of the presser foot so I could more easily line up the trim as I went. My machine has a specific stitch setting for this; the same can be accomplished by changing the “stitch width” to move the needle to your desired position.
A note on the leaves:
- At this time you can either sew each leaf down as you come to it by moving the fabric and backstitching as needed, or you can focus solely on the vine.
- If you choose to focus on the vine now you will have a Step Thirteen and a Half, which will require you to go back later and stitch down each leaf. I did this method and jumped from one leaf to the next without cutting my thread, which formed a chain with threads visibly connecting each leaf. Those threads then had to be snipped off individually – this may take more time than it’s worth, but the method you choose is up to you!
Step Fourteen:
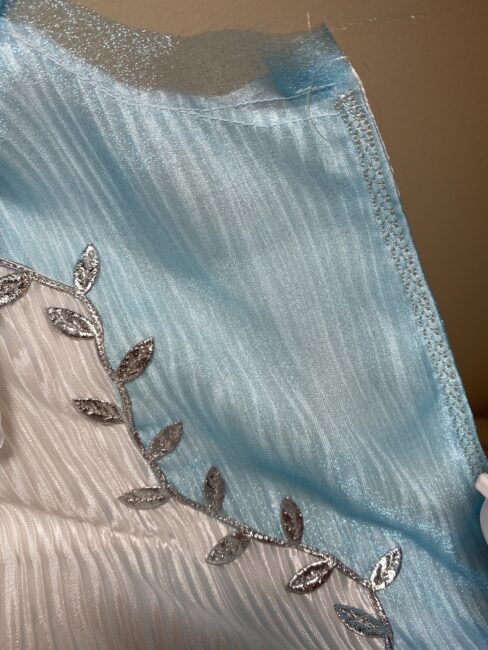
Fold the hem edges in twice (two ⅜ inch folds) and pin or use sewing clips to hold in place. Sew down using your metallic thread to form your hem, starting from the collar edge and sewing first along one side of the center opening, then around the hem, and back up the other side. My machine has some decorative stitches available, so I used one of them to create a larger and more obvious seam line. This subtly recreates the look of the beaded edge on Klaus’ coat. Bonus effect: the thicker seam work on the bottom hem gave the coat’s flare more stability.
Step Fifteen:
Create the cuff and collar details! I used two different trims to create the effect for Mandy’s coat, after we discovered that our first choice (the velvet ribbon) didn’t quite give the look we wanted on its own.
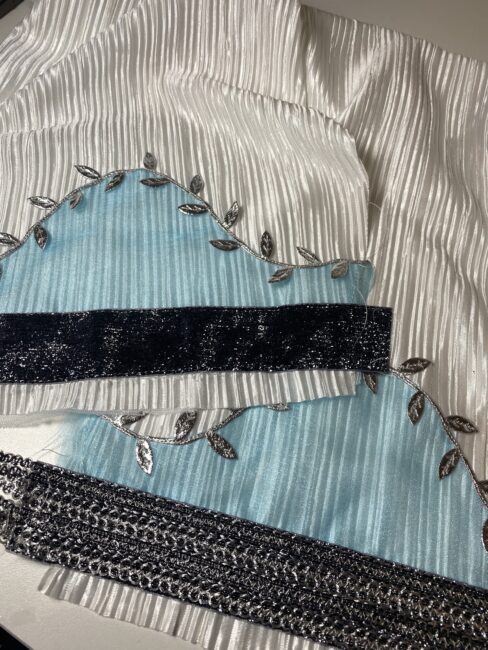
Top sleeve: ribbon only. Bottom sleeve: ribbon plus additional trim.
I made a last minute run to Joann’s, where I found this lovely ⅜ inch silver and black reversible trim! Sadly this isn’t available online, but a similar trim will work just as well if you aren’t able to make it to the store.
Measure your cuff and collar lengths, and cut your velvet ribbon to fit. For the mandarin collar I altered the ribbon in two places to fit the curve, so don’t be afraid to cut the ribbon into more pieces if you need to! This is a base layer and large cuts will not be visible at the end.
Using the silver thread (and white bobbin) topstitch your ribbon in place. On the cuffs this should overlap your organza and hide any previous stitching there.
Take your second trim and lay it on top of the velvet ribbon. Play around with the number of strips needed and which side will be showing until you get a look that you like. For our version I used four cuts of the thin trip to cover the ribbon, alternating which side was up.
Once your trim is cut and laid out, sew down using a zig-zag stitch directly over the trim.
Step Sixteen:
Take your collar piece and sew, “right” sides together, to the lining. Do not sew along the bottom edge. Clip your corners and turn right-side-out. The bottom edge can now be serged or sewn shut with a zig-zag and trimmed close to the stitch line. Please note that this is not necessarily the “cleanest” way to attach a collar, but it will give you a fairly clean inside edge while keeping the organza and collar trip free from visible stitches.
Step Seventeen:
And now your sleeves!
First sew the outer sleeve and lining together at the cuff line only, right sides together. Fold or iron the seam allowance towards the lining and understitch (sew the seam allowance to the lining to keep the lining from peaking out of the sleeve.
Lay your now double-length sleeve out and fold in half, wrong side out. Sew along the seam to create an extra-long tube. Reach into the pleated satin side, grab the cuff, and pull to flip the sleeve. Sew your sleeves into the sleeve openings and serge the seam allowance.
Step Eighteen:
The last step is to add in your shoulder pads, if desired. Stitch by hand into the seam allowances and lining fabric only, do not stitch through the pleated satin or interfacing.
And there you have it! One coat fit for a cult leader.
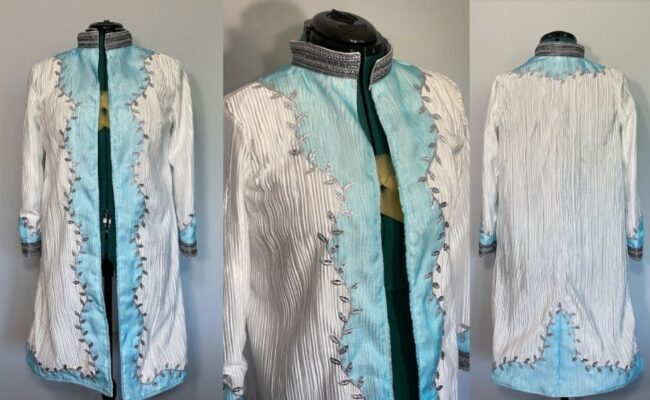
Put it all together and you have yourself a finished Cult Klaus cosplay! Now don’t go chasing waterfalls!

Photo credit: Joe Kok (thegreenscreenmanifesto)
About the Author
Mandy
Cosplayer, creative writer, cookie connoisseur. Pronouns: she/they.


There are no comments yet, add one below.
Stay connected. Don't miss out!
Get new costume guides in your inbox once a month.


Leave a Comment