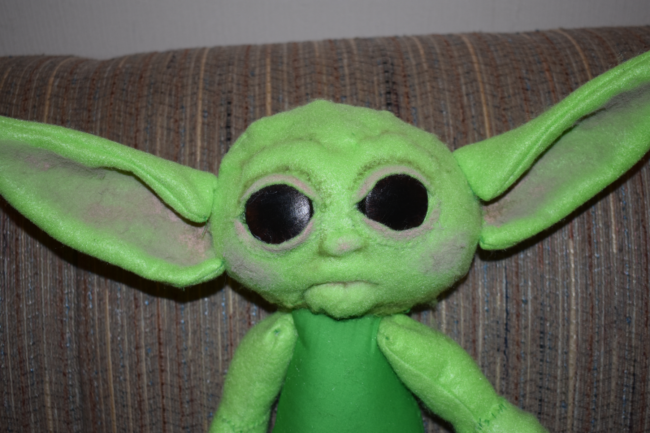
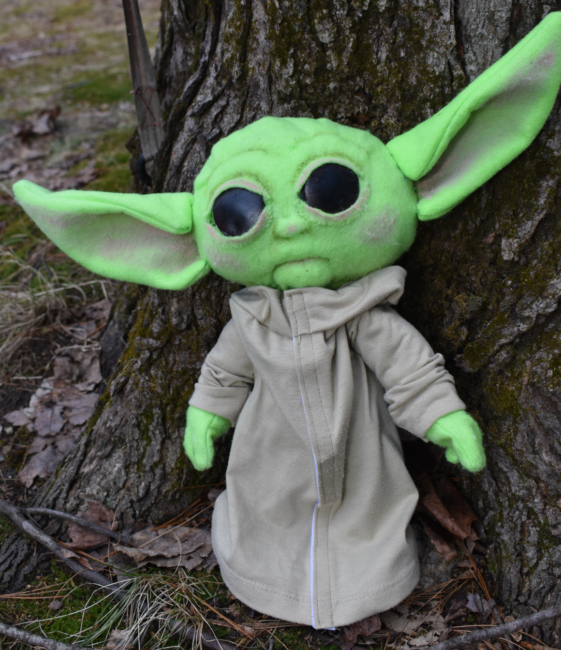
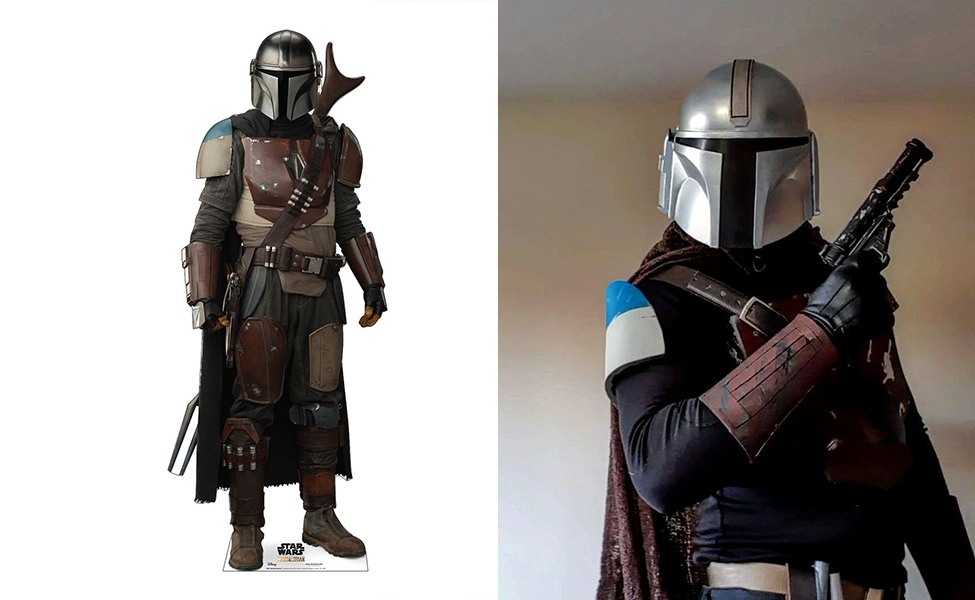
Make Your Own: Grogu (The Child / Baby Yoda) from The Mandalorian
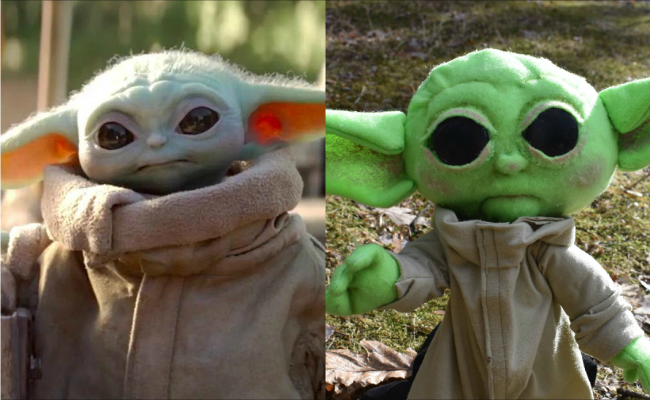
Known to some as “Baby Yoda” (and since revealed to be named Grogu), the Child is one of many characters introduced to Disney’s “The Mandalorian.” While his species is unknown, the Child is Force-sensitive, just like Yoda himself.
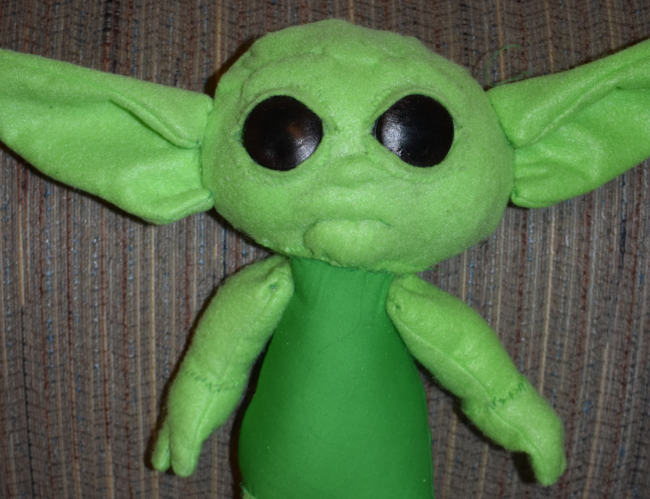
With big green ears and the cutest big, black eyes, the Child is beloved by many fans of the show. And if you’re planning to make your own Mandalorian costume, this Baby Yoda plush will make a great sidekick.
In this tutorial, I’ll show you how to make a “Baby Yoda” of your own.
Materials:
- Light Green felt
- 2″ Googly Eyes
- 1/2 – 1 yard Green fabric
- Pipe cleaners (optional)
- 1/2 yard tan knit fabric
- 1/2 yard tan fleece
- Sew-on Velcro
You will also need:
- Assorted Acrylic Paints
- Assorted paintbrushes
- Polyester Fiber
- Chalk pencils
- Hot Glue Gun (and Glue Sticks)
- Sewing Machine
- Matching thread
- Sewing needles for hand stitching
- Sewing shears
- Measuring tape
- Pins
- An iron
- Pattern making paper
- Mod Podge or clear nail polish
- Nail file or sandpaper
Step 1:
To start, take your two 2″ googly eyes and roughen up the surface a little bit using a nail file or sandpaper. This will help the paint stick to the googly eyes a little better.
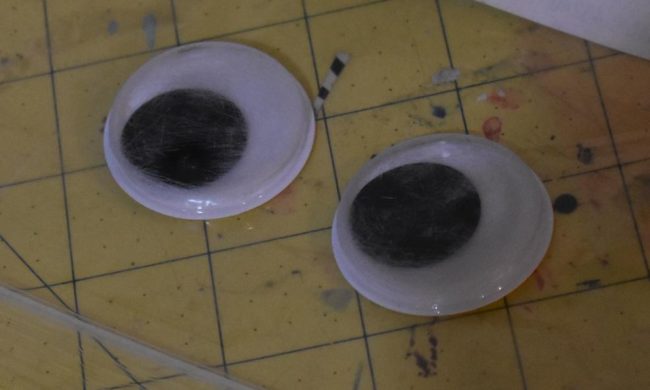
Once that’s been done, paint the googly eyes with black paint. You may need to go over with a few coats to get a solid covering. Once the black is dry, take a fine detail brush and using a little brown paint, paint on small lines going around the outer edge of the googly eye for a little color.
(I apologize that the lines can’t be seen super clearly in this image – I wasn’t able to get a better picture.)
Once the eye has been painted, seal it with a clear glossy nail polish or glossy mod podge. I found that the mod podge left paintbrush streaks all over the googly eyes instead of leaving a nice, glossy finish, so the clear nail polish might work better.
Leave the eyes to dry while you work on the next step: making a pattern.
Step 2:
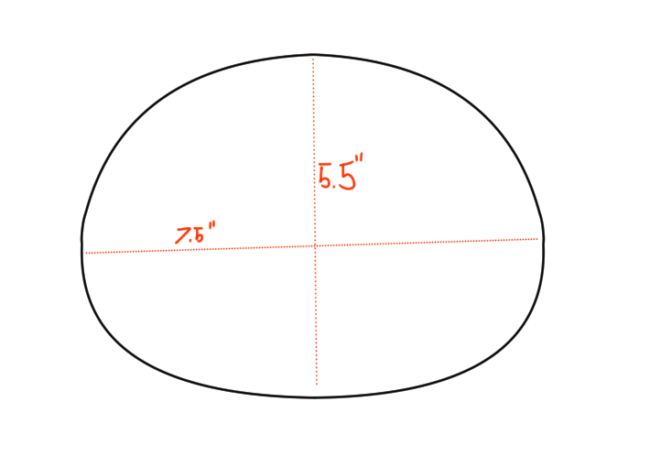
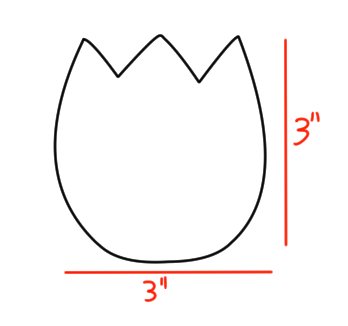
To start making Baby Yoda himself, start by drafting a pattern. For his head, you want to draw a kinda squashed oval shape that is 5.5″ tall and 7.5″ wide, like so.
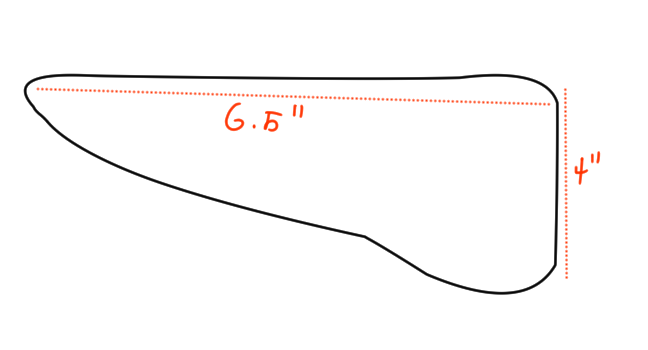
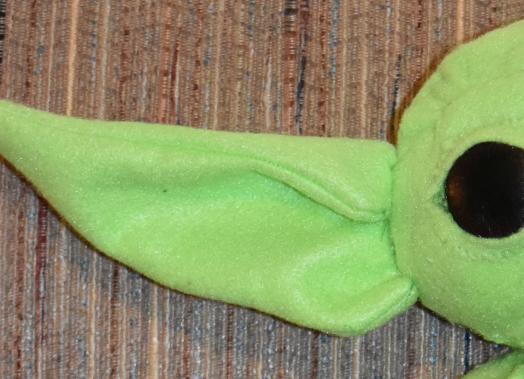
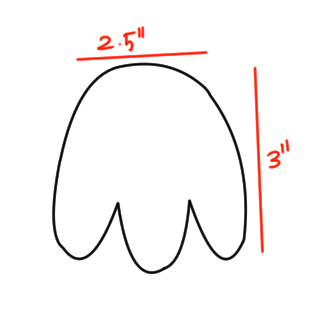
For his ears, draw a shape that looks something like this, that is about 4″ tall and 6.5″ wide:
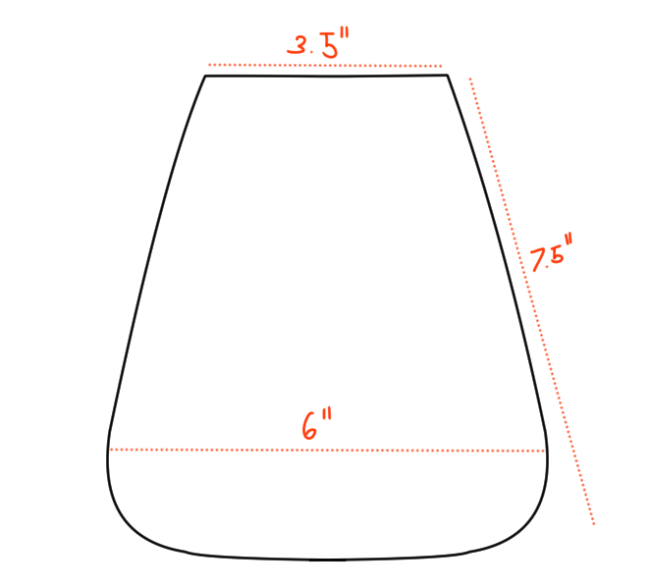
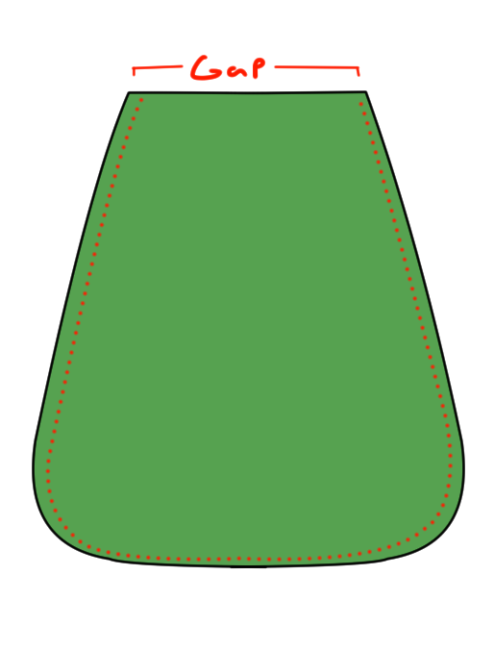
For his body, you want to draw a rounded trapezoid shape, that’s 3.5″ wide at the top and 6″ wide at the bottom, and 7.5″ long. It should look something like this:
Step 3:
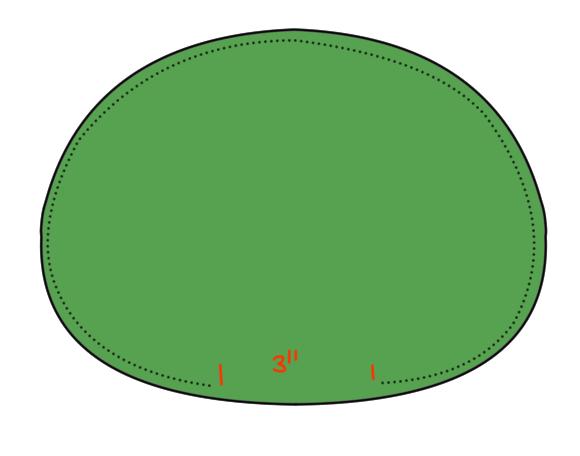
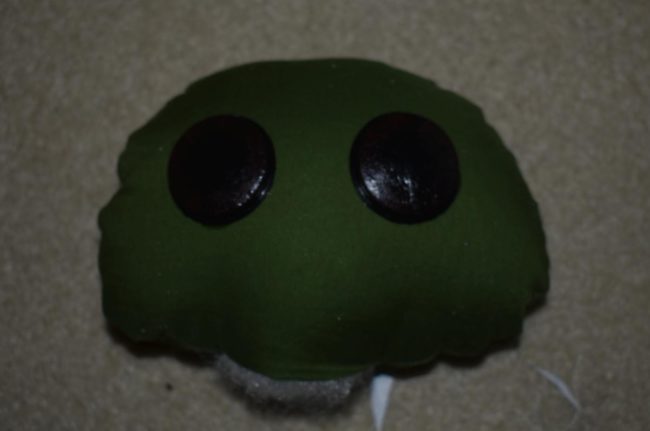
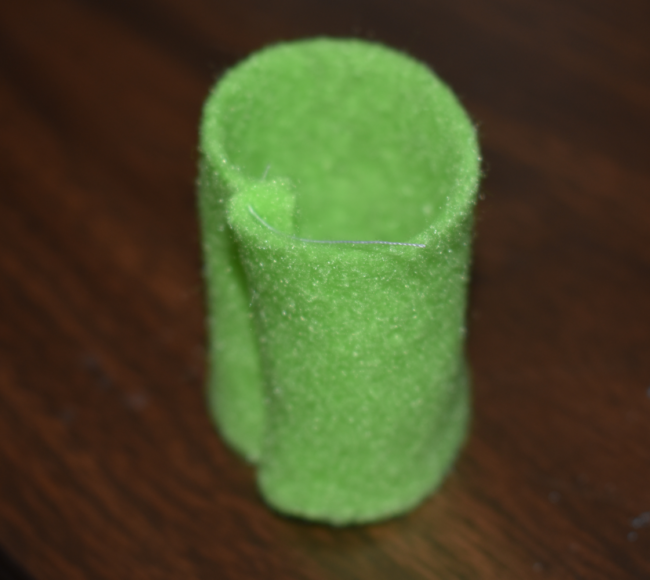
Take the pattern for the Child’s head and trace it out onto your green cotton fabric. Don’t forget to add seam allowance before cutting it out. You want to cut out two of these, so that you have a front and back. Once the pieces have been cut out, stack them, good sides together, and sew around the edges using a sewing machine, leaving a 3″ or so gap at the bottom so you’ll be able to flip it right side outs out.
One the head has been sewn, flip it right side out and stuff it with polyester fiber stuffing.
If you wanted, you could sew up the gap at the bottom with a needle and thread, but it’s not necessary.
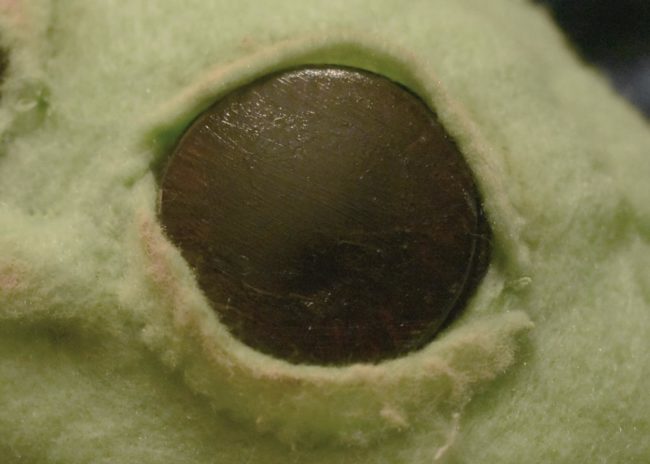
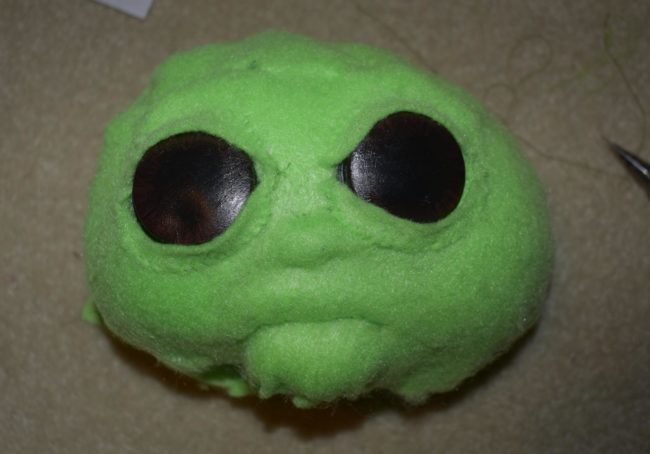
Next, using a hot glue gun, glue on the painted googly eyes, spaced evenly.
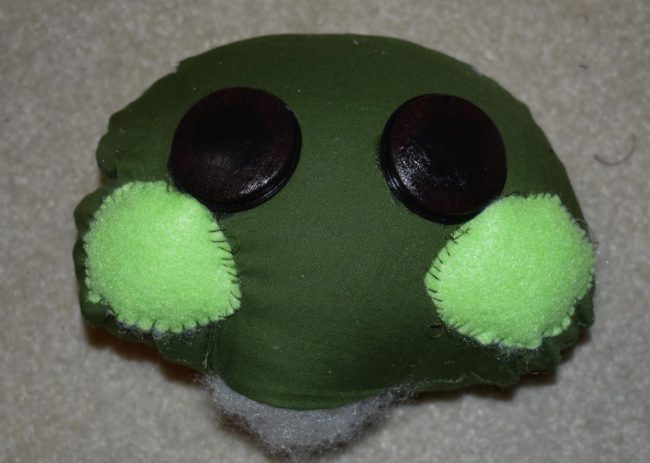
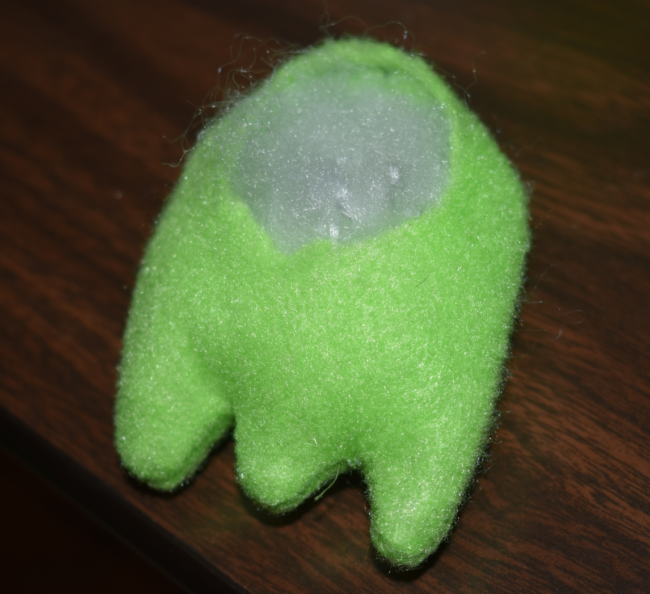
Next, you want to start building up the details on his face. To do this, cut shapes out of your green felt and hand stitch them onto his face, adding stuffing underneath the felt before completely sewing the felt pieces down. The areas you want to build up on his face are his cheeks, the area above his upper lips, his nose, and forehead.
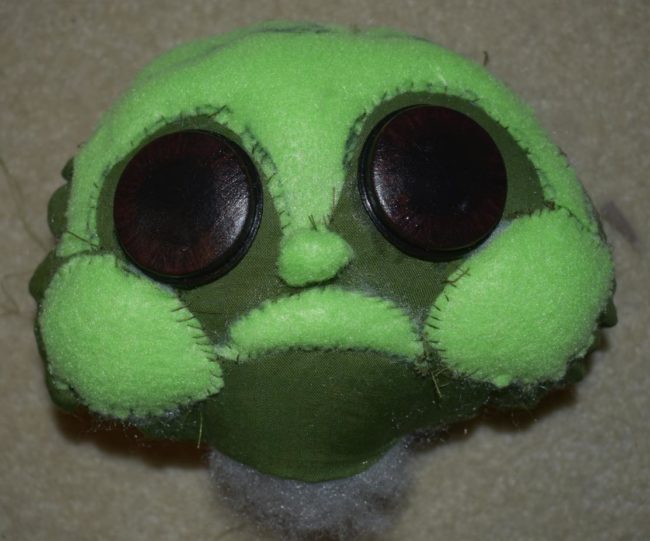
Once these have been sewn down, you want to use the same pattern you used to sew his head and trace it onto the same green felt, only you want to make it slightly bigger, along with seam allowance. You don’t want to make it too much bigger, but big enough so that the head will be able to fit snuggly inside of it. Cut two pieces out of the felt, and sew them together the same way you did for the head, only leave a slightly bigger gap at the bottom. Once it’s been sewn, flip it right side out and try to fit the head into this outer felt shell. If you’re having trouble fitting the head into the felt, you might want to cut a slit into the back of the head and stitch it up afterward by hand once the head is in place.
Once the head is fitting snuggly inside of the felt shell, you want to cut holes into the front of the felt shell so that his eyes are visible. Now, use a needle and matching green thread to emphasize some of the details on his face, like around his nose and mouth. You’ll also want to add some strips around his eyes for the eyelids.
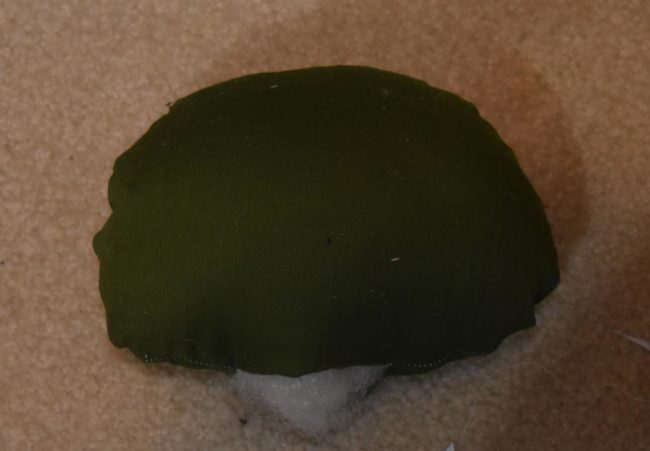
The head should now look something like this:
Step 4:
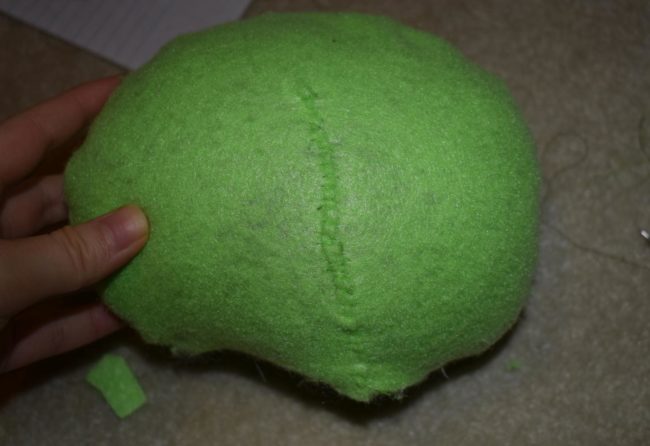
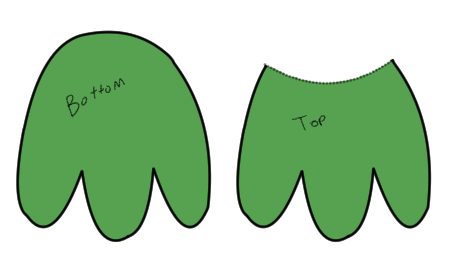
Next, you want to make his ears. Trace the ear pattern you made earlier onto the green felt and cut it out, adding seam allowance before cutting it out. You want to have a total of four pieces, two for each ear. Stack the pieces, good sides together, and sew around the outer edge, leaving a small gap so that the ears can be flipped right side out. Flip them, and then using a needle and thread, slip stitch the gap closed. Then, hand stitch the ears onto the head on either side like so:
Next you want to do the same for his body, using the pattern you made earlier and tracing it onto your felt. For my Baby Yoda, I didn’t have enough felt for his body and had to cut out of regular green fabric instead.
Add seam allowance, and cut out two pieces. Stack the pieces good sides together, and sew around the outer edge, leaving a gap at the top, like so:
 Once the edges have been sewn, you can flip the body right side out. Stuff it with polyester fiber, and then position it in place below the head and hand sew it to the bottom of the head.
Step 5:
For his arms, you want to make a pattern that is a rectangular shape with a curve at the top that is 2.5″ wide and 4″ tall, like so:
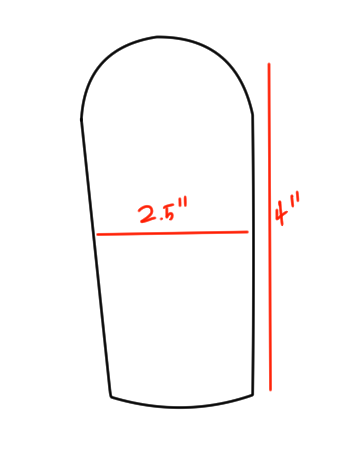
Trace this onto your felt 4 times, remembering to add seam allowance before cutting it out. Take two for each arm, stacking them good sides together, and sew along the outer edge, leaving the bottom open. Repeat for the other arm, then flip them right sides out and stuff them.
To make his hand, you can pretty much freehand 3-fingered hand shape, which is roughly 2.5″ wide at the top and 3″ long.
Trace this pattern onto your felt, cutting out 4 pieces. For two of the pieces, you want to cut the hand slightly shorter, so you should end up with two pieces of each piece like this:
Doing this will help make his palms more prominent, with the smaller piece for the top of his hand and the bottom one for the palm of his hand
Stack one “top” piece on top of one “bottom” piece, good sides together and sew around the edge, leaving the top of hand open so you can flip it right side out.
Now’s where you want to decide if you want his hand to be poseable or not. If you want it to be poseable, you want to take a few pieces of pipe cleaner and bend it into an armature of sorts, folding over the ends of the pipe cleaner so that the wire won’t poke through the felt.
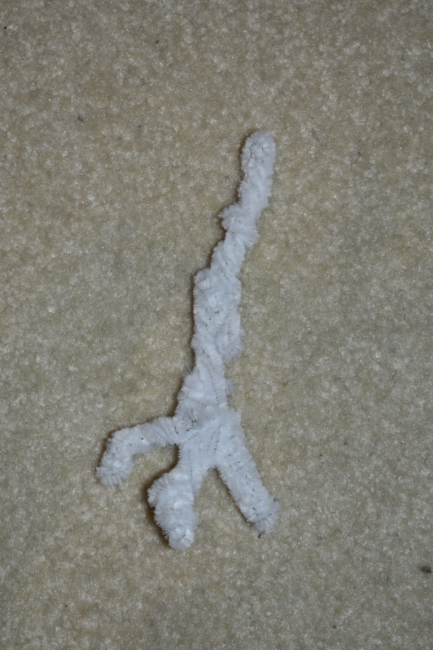
Add a little bit of stuffing into the fingers of the hand before inserting the armature. Line the hand up with arm you sewed earlier, and hand sew the hand to the arm.
If you don’t want the hand to be poseable, you can just skip the step the piper cleaner armature and proceed with the rest of the steps normally.
Once both hands are sewn, you want to position them onto the body, and sew them onto the body by hand. You want to place the arms so that the palms of his hands are towards his body. For added articulation, you could sew on the arms by sewing from one point on his arm, through his body, all the way to the other arm with one long piece of thread, going back and forth a few times, so his arms can pivot, but that’s not necessary.
Step 6:
The next step is to make Baby Yoda’s legs. Draw out a 5″ by 2″ rectangle onto your felt and cut two, adding a little seam allowance before cutting it out. Once the rectangles have been cut out, fold the rectangle in half and sew the edges together, to make a cylinder. Fold it right side out.
Next, freehand a foot shape with 3 toes that is roughly 3″ wide and 3″ tall.
 Trace the foot onto your felt and cut out 4 pieces, with added seam allowance. Stack two together and sew all the way around the edge, without leaving any gaps. Once the foot as been sewn, cut a small hole in the top of the foot that’s big enough to flip the foot right side out, and cone that’s been done, stuff the foot with polyester fiber.
Hand stitch the cylinder to the top of the foot with the seam of the cylinder towards the back of the foot, then stuff it with more polyester fiber before attaching the leg to his body.
Once both legs have been done, the construction for the Child is now complete.
Step 6:
Using some light pink, dark green, and brown paint, you want to start adding some shading and dimension to Baby Yoda’s face and hands. You don’t want to apply the paint too heavily, only lightly coloring his face. I added some pink around his eyes, in his ears, around his cheeks, and a little around his mouth and the tip of his nose. With the dark green and brown, you want to paint in the places where shadows naturally are, like around his fingers and the grooves on his head, as well as around his nose and below his mouth.
Step 7:
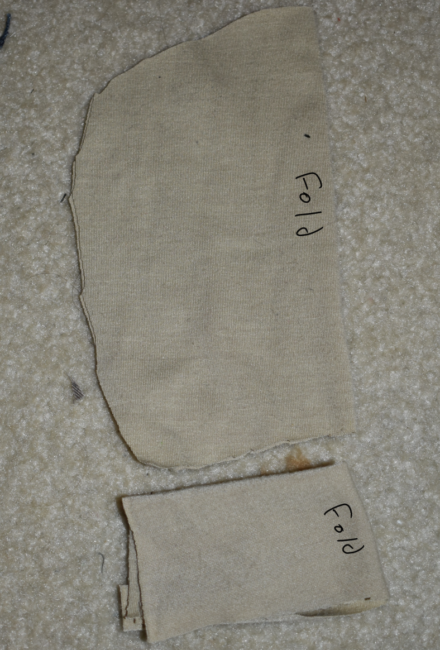
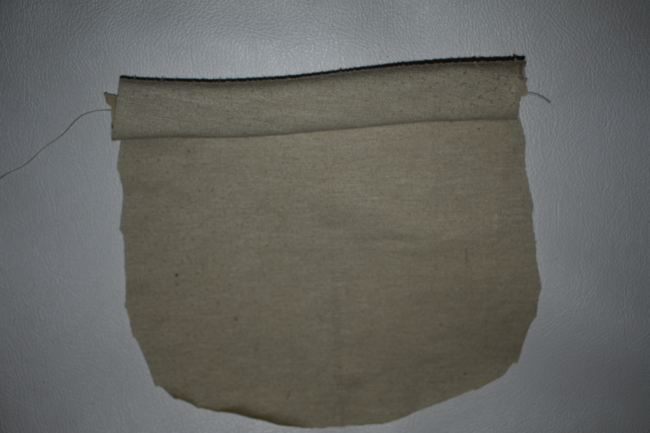
The next step is to make the Child’s robe. Start by taking your tan knit fabric, and wrapping it around Baby Yoda’s body, and overlapping the fabric at the front. You want to mark where his arms would be and then cut the fabric so that it overlaps slightly at the front. Lay the fabric out, and cut it to right height before cutting out armholes in the areas where you marked. Make sure they’re big enough for his arms to fit through. Then cut out a piece of fleece that is the same width as this large rectangle that you just cut, and about 3″ in height. You should end up with two rectangular pieces that look like this:
(I didn’t have fleece, so I used a strip of extra tan knit fabric instead.)
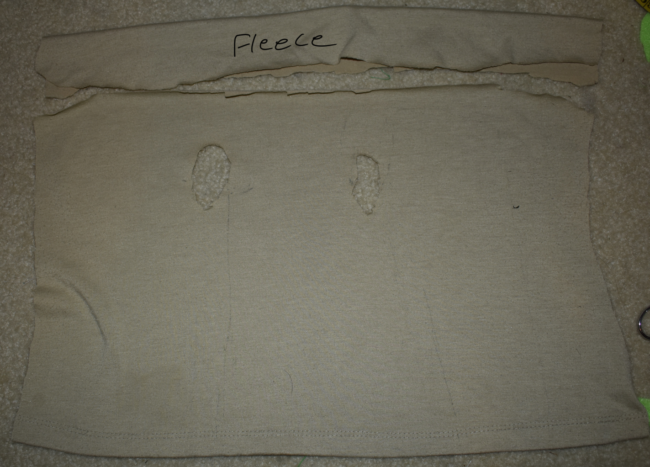
Measure the armholes and then cut out pieces for the sleeves to fit the armhole measurements, as well as a piece of fleece that is the same width as the sleeve.
To attach the fleece to the top of the main part of the robe as well as the sleeve, fold each piece of fleece in half lengthwise, wrong sides together, and then line it up good sides together with the top of the robe. bottom of the sleeves. Pin it in place, and then stitch along the top edge like so:
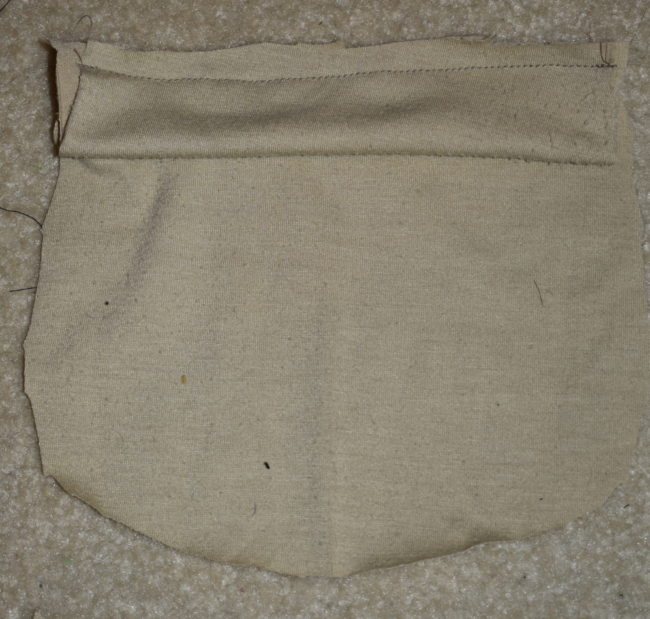
Fleece can be a little hard to sew at times because it is so thick, so please take your time and be careful while sewing it Once the fleece has been sewn, fold it over so that the seam is in the back.
Now assemble the robe by first sewing the sleeves. Fold each sleeve in half lengthwise, and sew the sides together. Then, fold it right side out, and attach the sleeve to the armholes. You could probably sew the sleeve to the armhole with the sewing machine, but because the robe is so small, I’d suggest sewing it by hand.
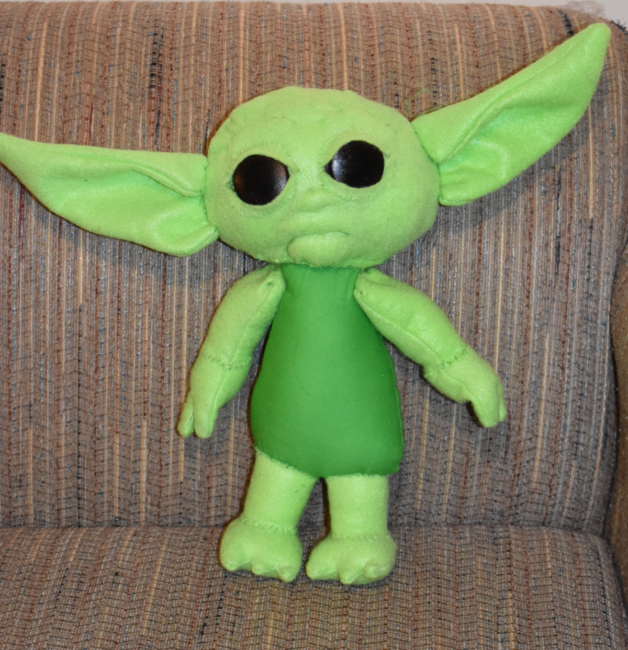
Once the sleeves have been attached, hem the bottom of the robe, and then add velcro to the front as a closure. Dress the Child in his robe, and your Baby Yoda plush is now done.
I hope this tutorial has been helpful in getting you your own Force-sensitive Baby Yoda to travel the galaxy with.
About the Author
Becky
Hello, my name is Becky. I started doing cosplay in 2016, but I've been sewing and making costumes since before then. Besides cosplay, I like music, art, and writing.
One Comment
Leave a Comment
Stay connected. Don't miss out!
Get new costume guides in your inbox once a month.


thanks becky i love him! My grand niece is obsesed with smelling his ears. And my elderly dog (17 y old poodle) lovves his shining personality :)