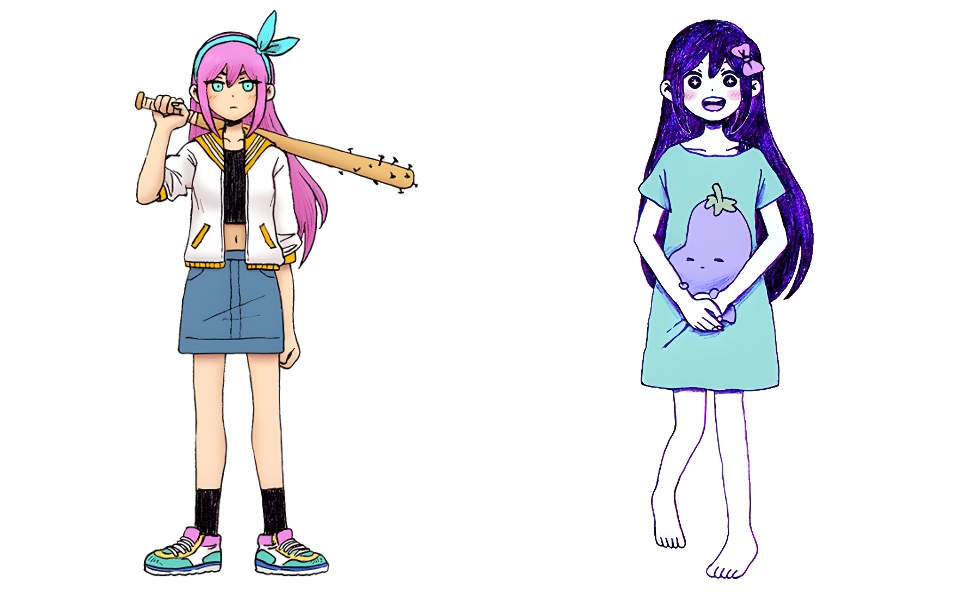
Make Your Own: Hornet and The Knight from Hollow Knight
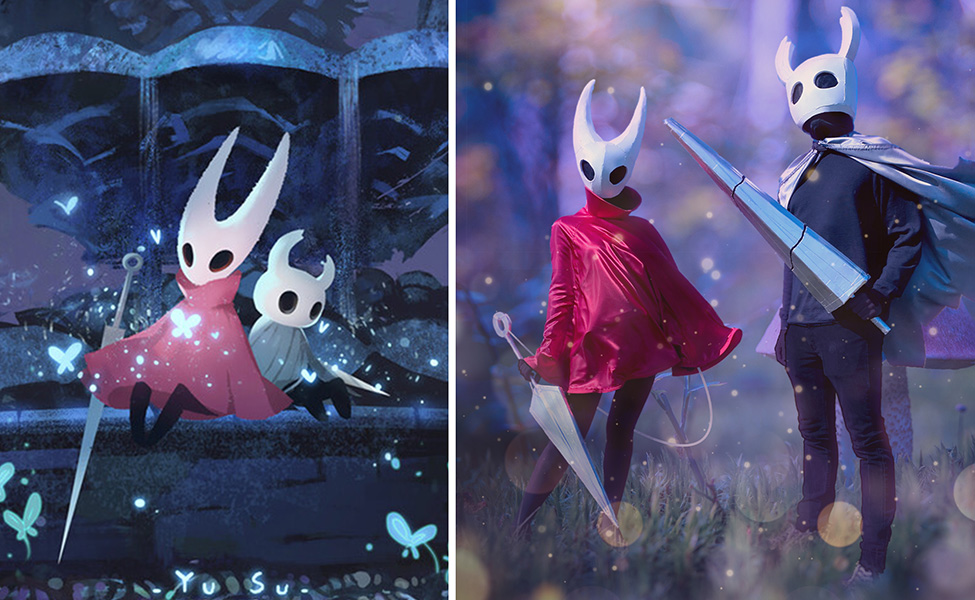
Illustration by Yu Su
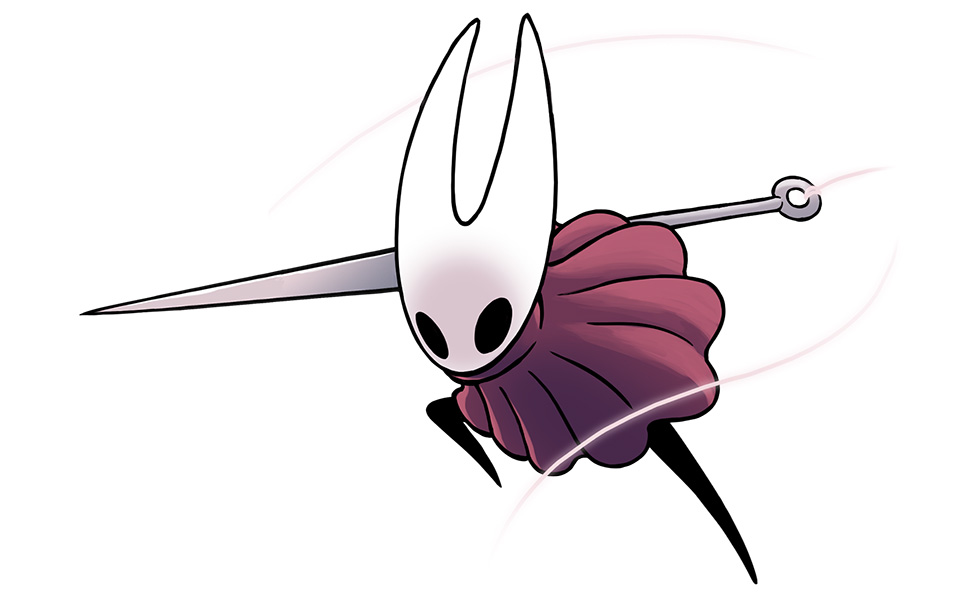
“Beneath the fading town of Dirtmouth sleeps a vast, ancient kingdom. Many are drawn beneath the surface, searching for riches, or glory, or answers to old secrets.” Hollow Knight is an indie 2D side-scrolling game that was released in 2017 by Team Cherry.
In this tutorial, we will be learning how to create costumes for the player character, called “The Knight”, as well as one of the other main characters, Hornet. This tutorial does require a bit of sewing knowledge, however it is also a good fit for beginner costume and prop makers. For a no-sew version, check out this Hornet costume guide.
You Will Need:
- 4 sheets 6-8mm foam
- Knight Helmet template from Bro Navaro
- Hornet Helmet template from Bro Navaro
- Masking tape
- Rubber cement
- Hot glue and glue gun
- Box cutter
- Cutting board
- 5 yards dark red satin
- 6 yards horsehair braid at least ½” thick
- 2 small buttons
- 2 packs (8 yards) extra wide double fold bias tape in dark red
- 1 yard craft weight interfacing
- Dark red thread
- 2 yards grey satin
- Grey ribbon
- Grey thread
- Self-adhesive Velcro dots
- 1 yard black broadcloth
- 1 yard black mesh
- Plasti-Dip
- Mod Podge glossy sealer
- White spray paint
- Silver spray paint
- Black paint
- General purpose sandpaper
- Cardboard
- Dowel rod (about 1” x 36” for Knight, ½” x 36” for Hornet)
- Duct tape
- Tacky glue
- White paracord
- Black tights (Hornet)
- Black undershirt (Hornet and Knight)
- Black balaclava (Hornet and Knight)
- Black gloves (Hornet and Knight)
- Black pants (Knight)
Step 1:
Purchase, download, and print the Hornet and Knight helmet patterns from Bro Navaro. To make sure that you are printing the patterns out from the .PDF files at the correct size, make sure you click the “more settings” tab at the bottom of the print options, then choose “actual size” instead of “fit to printable area”.
I found the helmets to be a bit snug, especially considering the width of the foam (I used 8mm), so you may consider choosing the third option under “actual size” and putting in a quantity of over 100 (115-120 would be my recommendation), as per your measurements. If you do this, you will need to also select “tabloid” from the paper size drop-down menu. In order to print tabloid-size paper, you may need to send your files to a print shop to have them print everything out for you.
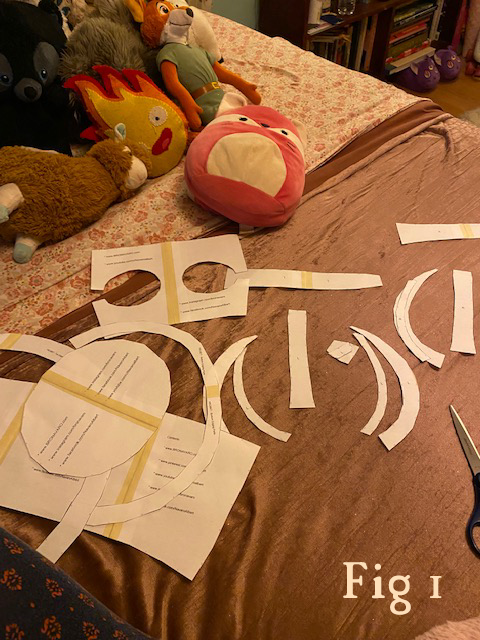
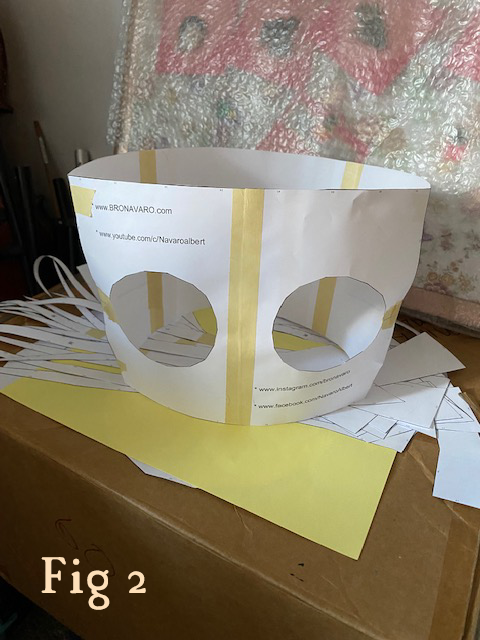
Step 2:
Tape all of your pattern pieces together with masking tape, using the row and column guides at the bottom of each page, then cut out all of your pattern pieces. Next, adhere your pattern pieces to your foam sheets using either your masking tape or craft bond spray adhesive. Make sure the numbers surrounding each pattern piece are still visible/legible, as we will need to be able to see those for the next step.
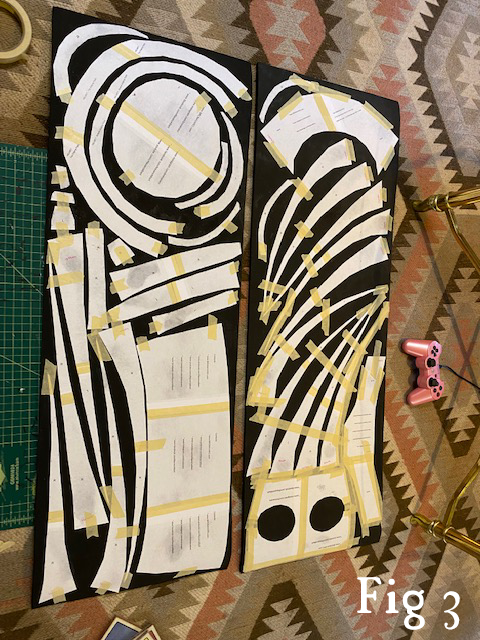
Step 3:
Using your box cutter and cutting board, cut out all of your foam pattern pieces. To adhere the pattern pieces together, cover all of the edges with rubber cement. Allow the rubber cement to become tacky, and stick them together. You will be able to reposition your pieces until you are satisfied with their shape using rubber cement. If you would like to reinforce your edges, use hot glue to do so.
Make sure you are attaching your pieces together using the numbers along the sides and matching them together. Each pattern also comes with a construction guide to help illustrate where each piece goes. Remove each paper pattern piece from the foam pieces as you work.
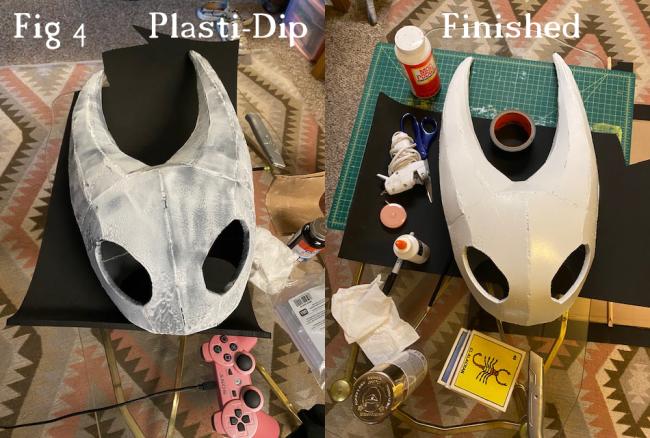
Step 4:
Once your helmet has dried, spray it with 1-2 coats of Plasti-Dip. If you would like a smoother finish, sand down some of the rough edges between coats. Allow the Plasti-Dip to dry completely, then cover your helmet in a coating of Mod Podge. Once the Mod Podge has dried, complete your helmet by spraying it with white spray paint.
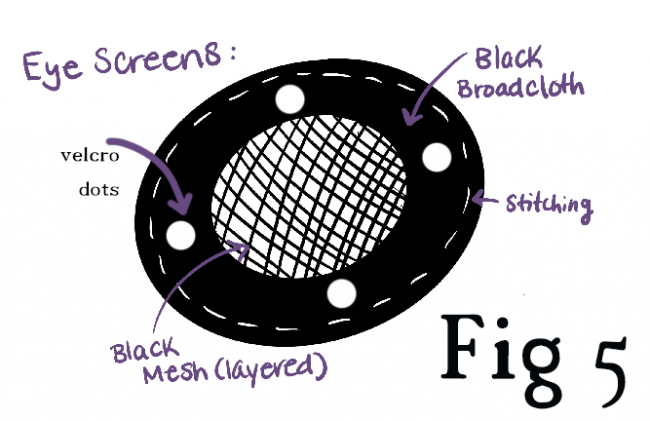
Step 5:
Create black screens for the eye holes of your helmet by holding a piece of paper to the eye hole and tracing the shape. Add about ½”-1” around the entirety of that shape and cut out your eye hole pattern piece. Fold your black mesh over at least 2 or more times, then place it on top of your black broadcloth. Cut out 2 equally-sized squares of your layered fabrics. Pin your eyehole pattern piece on top of your fabric layers. Sew all of your layers down with your pattern piece still pinned in place. Cut about ½” around your sewn piece.
Take your sewn piece and pull the broadcloth away from the mesh. This can be a bit difficult, but you can feel to make sure you have only your broadcloth and no mesh by rubbing your fingers together. Make a small snip in your broadcloth. If you end up snipping a little mesh, it’s totally okay. Once you have your slit, slide your scissors in and start cutting away the broad cloth, careful to continue avoiding the mesh, so that you are left with a thick outline of black broadcloth around your black mesh eyehole pieces.
Stick 4 Velcro dots around each eye piece. Stick the mate to each Velcro dot on top, then carefully stick the eye screen to the inside of your helmet.
Step 6:
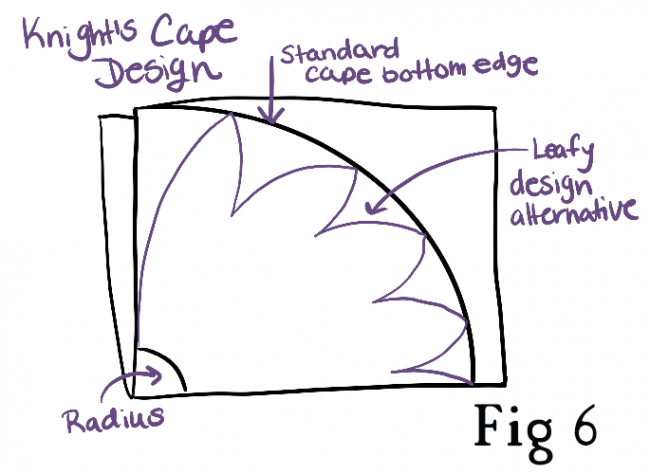
Create the Knight’s cape by using the Circle Skirt App by Hand London. Choose the “quarter” or “half” options, and the “mini” option. Instead of putting in the measurement for your waist, put in the measurement for your neck, plus about 3-5 inches. Use the guides the app gives you to cut out your cape. If you would like to have a more ragged-looking or leaf-like look to your cape, cut your cape out in a similar shape to the guide in the figure below.
Step 7:
Fold the bottom and inner edges of your cape inward and sew them down. This will keep them from fraying and give your cape a “finished” look, however, if you would like a more raw look to your cape, you can leave your edges as they are. I chose to sew down my inner edges, but since I cut a leaf-like pattern out of the bottom, I left the bottom raw.
For your neck line, you will need to fold your edge in and sew it down, leaving a generous “channel” space for your ribbon to fit through it. The way I threaded my ribbon through the channel is by tying it to a long chopstick, then pulling the fabric down over the chopstick until it came through out of the other side, then I untied it from there. This will create an adjustable drawstring neckline that you can either tie closed where it is or overlap it and tie it in the back with a longer piece of ribbon.
Step 8:
To create Hornet’s cape, use the same Circle Skirt App, instead this time, choose “full” and “mini” from the options. Once again, put in the measurement for your neck instead of your waist. Sew your pieces together at both of your side edges, then cut a slit of about 5-7 inches down what will be the back of your cape, and sew the edges of your slit inward to create a finished look.
In order to create a much more exaggerated, flowy look to your cape, sew your horsehair braid to the right side of the bottom of your cape, along the bottom edge. Then, flip the horsehair braid underneath so that it is sitting against the wrong side of your cape fabric, and sew it along the top and bottom. Finish the edge of your cape bottom with the extra wide double fold bias tape.
Step 9:
We will create the collar for Hornet’s cape in the same way. Choose “half” and “mini” (though we will be changing the length, so it doesn’t really matter) from the options in the Circle Skirt App, along with your neck measurements. Your radius will be the same, but since we are making a collar, make your length between 5-7 inches, depending on how tall you want your collar to be.
Cut 2 pieces of fabric (add about ½” – 1” around the top and sides for seam allowance) and 1 piece of your craft weight interfacing (no seam allowance needed). Sew your 2 fabric pieces right sides together along the outer edge and either side, then flip your piece right side out. Next, tuck your interfacing into the casing you’ve created, and sew everything together along the bottom.
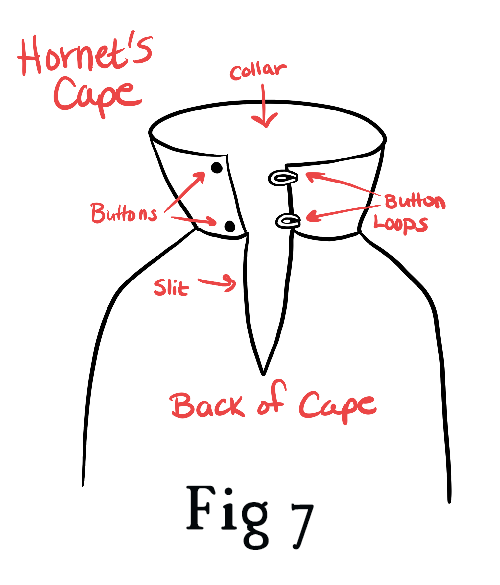
Right sides together, attach the neckline of your collar to the neckline of your cape, so that the back opening of the collar aligns with either edge of the slit you created. Instead of sewing your collar closed, hand sew a button to the area where the bottom edge of the collar meets the top edge of the slit you created in your cape, as well as the top corner of your collar on the same side. On the other side, create 2 small loops for your button to go through out of leftover fabric and attach them the same way.
Step 10:
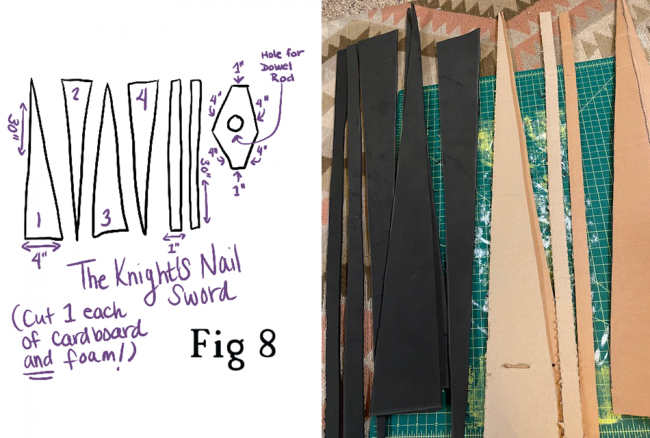
Create the Knight’s nail by cutting 4 identical triangles about 4” wide and 30” long and 2 equally long strips about 1 inch wide. (A perfect resource for making the nail is by seeing if your local Joann’s or other fabric shop has an empty bolt used for apparel fabric that they can give you. Apparel fabric bolts are the perfect size and shape.) For the top of the nail, cut a diamond-like shape out of your cardboard with a hole in the middle for your dowel rod to go through. Cut these same shapes out of your foam.
Assemble your 4 cardboard triangles by gluing them with hot glue along the edges. Reinforce with duct tape.
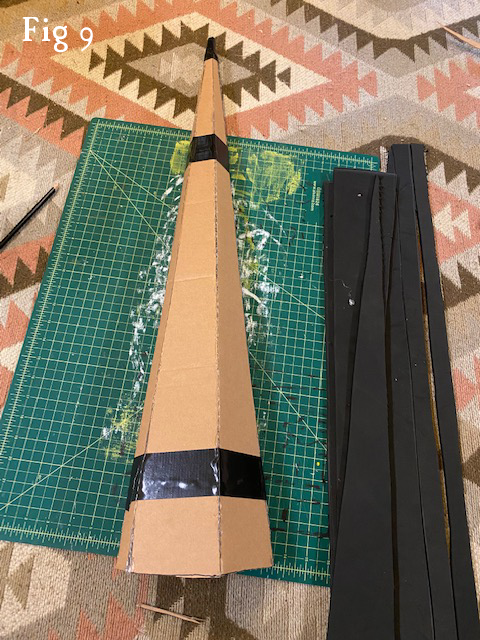
Once dry, glue your foam pieces on top of your cardboard structure with tacky glue. Fill in your edges with hot glue. Cover your structure with tape going vertically to close up any rough areas.
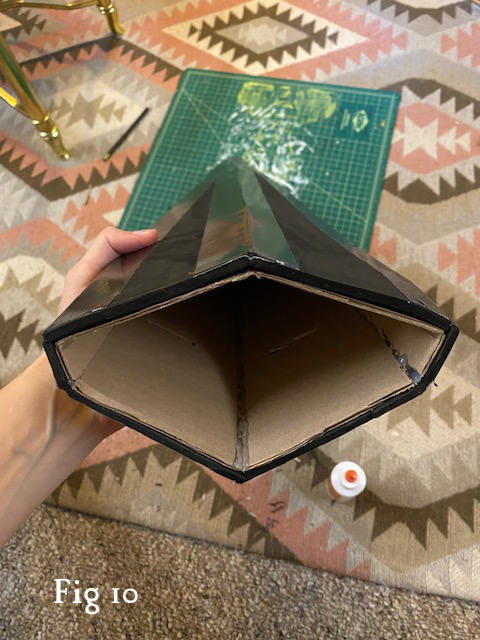
Glue your diamond-shaped cardboard piece on top, then attach the corresponding foam piece. Remember to have the hole for your dowel rod already cut. Fill in the edges with hot glue and cover edges with duct tape if desired.
Place your dowel rod into the hole and glue it in place. Wrap your dowel rod with duct tape and spray your finished structure with Plasti-Dip.
Step 11:
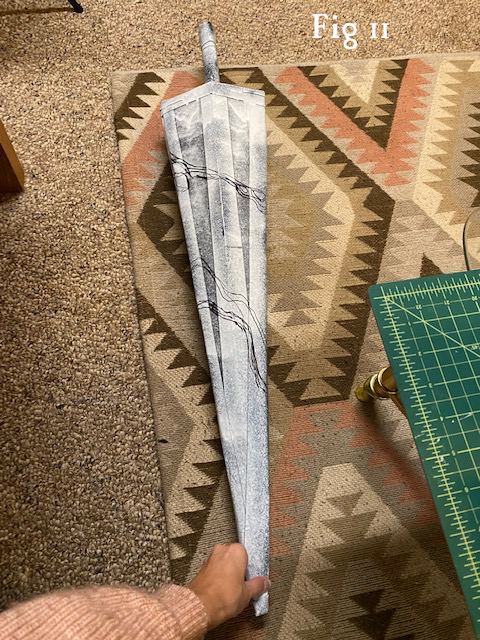
Next, sketch out a place for the cracks in your nail to go. Once you have your design figured out, carve out pieces of your foam along your crack designs – do not go so far with your box cutter that you hit your cardboard. Peel out your foam carvings and fill the cracks in with hot glue. Spray paint your nail with silver spray paint. Paint in the cracks with black acrylic paint.
Step 12:
For Hornet’s needle, cut 1 piece of cardboard and 2 pieces of foam in a diamond-like shape that is about 25” long and 6” wide at its greatest width, and cut a slit to about 23” up the middle that is about ½” wide. Cut also 1 piece of cardboard and 2 pieces of foam in a 5 x 3 oval shape with a hole in the middle and a 2” tab on one end. Glue your foam pieces to either side of your cardboard pieces using tacky glue and reinforcing as needed with hot glue.
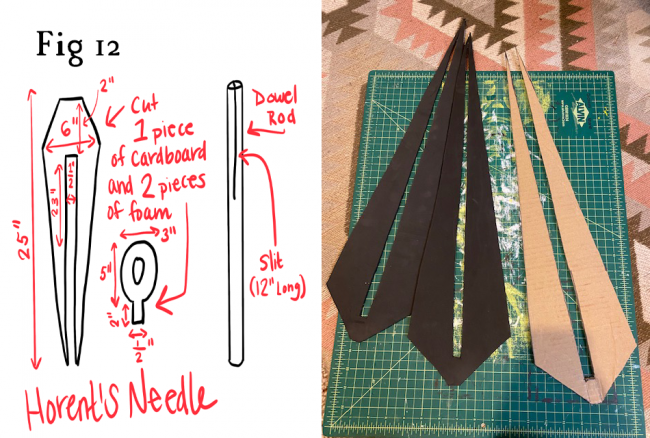
Cut a small slit to about 12 inches down your dowel rod. Tuck your diamond needle piece onto the slit. Glue the diamond piece to the remaining length of the dowel rod with hot glue. Place the tab of your oval into the open slit of your dowel rod and glue it in place.
Wrap the remainder of the dowel rod (your handle, essentially) with generous amounts of duct tape to close the slit and keep everything in place. Finish up your structure by covering any loose or rough areas with duct tape. Cover your needle with 1-2 layers of Plasti-Dip, then spray with silver spray paint. Lastly, tie your white paracord through the hole of your oval piece (the “eye” of your needle) to act as your silk rope.
You’re now ready to explore all of Dirtmouth!

About the Author
Diomira Keane
Cosplayer, artist, cat-lover, party princess extraordinaire.

There are no comments yet, add one below.
Stay connected. Don't miss out!
Get new costume guides in your inbox once a month.


Leave a Comment