Make Your Own: Clare from Claymore
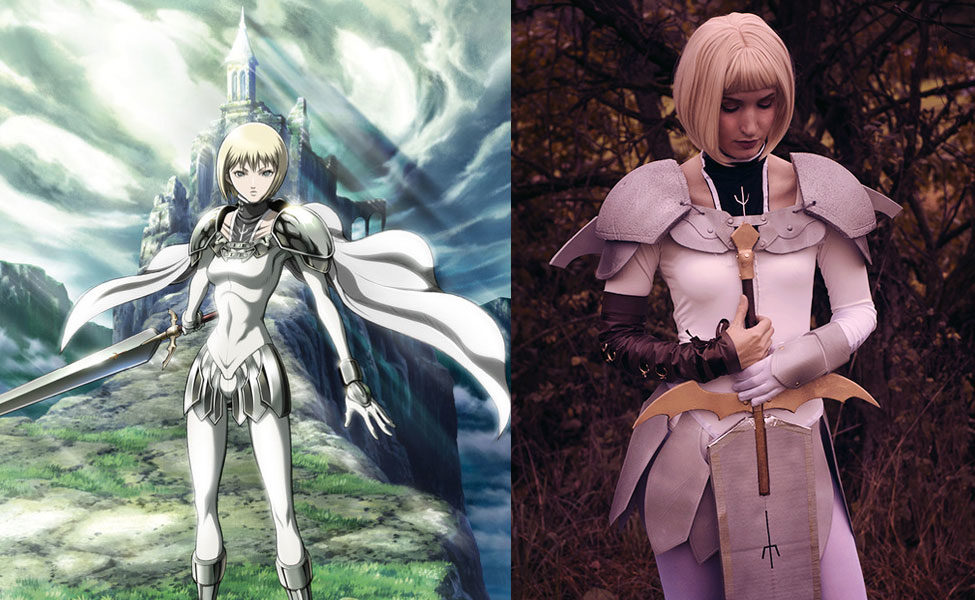
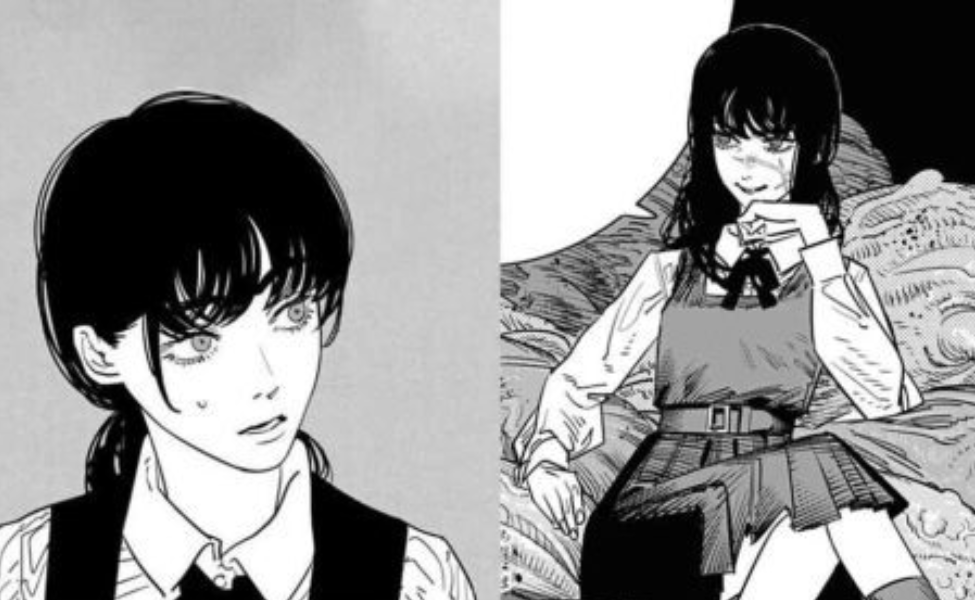
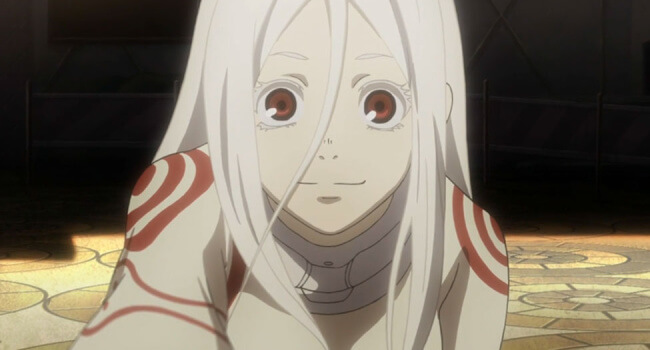
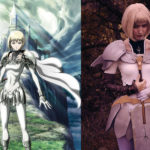
The Claymore manga series first appeared in 2001 as a feature in Shonen Jump magazine. In 2007 it was adapted into an anime, which was recently released on Hulu and Netflix. The story follows the journey of a Claymore by the name of Clare, who travels to a small town to control an infestation of Yoma; a deadly breed of monster that can shape-shift and take human form. The Claymore belong to an organization consisting of half-woman, half-Yoma hybrids who remain the only chance at defeating the Yoma entirely.
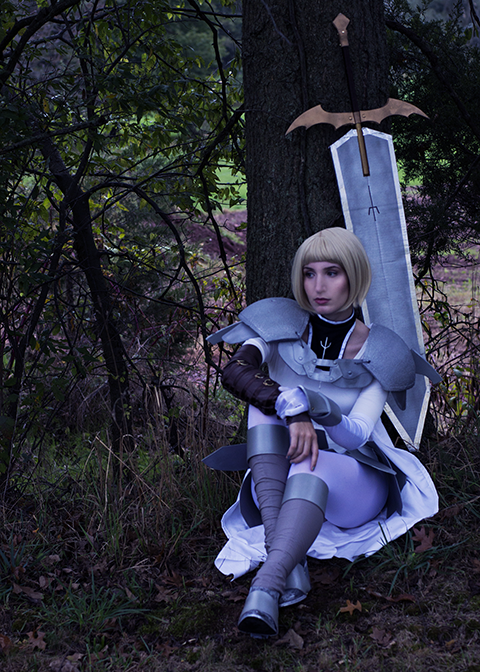
Towards the end of the story, (and for reasons I won’t get into detail here, because spoilers!) Clare wears a brown belted brace around her right arm. This is the version of her costume I’ve chosen to adapt, and as such, will be showing you how to make yourself. Additionally, I’ll be showing you how to make her claymore sword as well. Naturally! Let’s begin with the main portion of her costume.
YOU WILL NEED:
OR:
- A ready-made bodysuit to use as a base (which will save both time and money)
YOU WILL ALSO NEED:
- Thin foam sheets (at least 3)
- White satin ribbon of thin-medium width (at least 1 spool)
- 1 yard white cotton fabric
- Metallic silver spray paint (at least 2 cans)
- Plasti-Dip (at least 2 cans)
- ½ yard black cotton fabric
- ½ yard brown vinyl
- Brown satin ribbon of medium-thick width (2 spools)
- White fabric puff paint (1 bottle)
- White all-purpose thread (1 spool)
- Copper metal D-rings (4 count)
- Brown all-purpose thread (1 spool)
- White or silver silk craft cord (1 spool)
- Wax paper (1 roll)
- X-acto knife
- Sharpie marker
- Polyurethane spray (1-2 cans)
- Ticonderoga graphite pencil
- Velcro (1 roll)
ADDITIONAL COSTUME PIECES:
STEP 1:
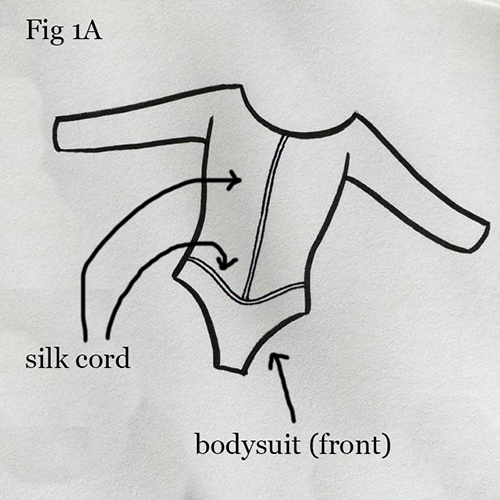
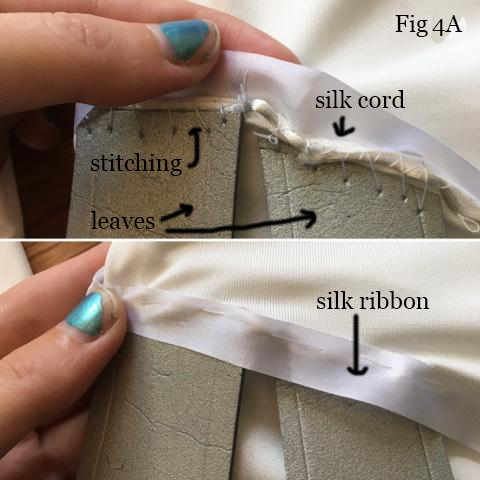
If you chose to make your own bodysuit, cut your pattern pieces out and follow the instructions accordingly to assemble your garment. If you went with the ready-made bodysuit option, begin by hand-sewing a strip of your silk craft cord down the middle of your body suit. Making sure your cord stays properly aligned can be difficult, so if you have a dress form, using it may be in your best interest. If not, you can do what I did and wear the bodysuit while you sew in the cord, checking in the mirror to make sure it’s straight. Make sure this piece begins at the very top of the neck and ends approximately 3 ½ inches below your bellybutton. Next, sew a strip of silk cord all the way around your bodysuit at your hips. This will serve as a placeholder, where you will later sew in the leaves of Clare’s skirt.
OPTIONAL STEP:
If you feel that your body suit could be tighter, sew two strips of ribbon to the center middle of the back of your body suit, about 5 inches apart. When you put the suit on, you can tie these ends together to give the suit a more form-fitting look.
STEP 2:
Now it’s time to make your leaves. Trace each individual shape on a piece of wax paper. My shapes consisted of 2 small leaves (one facing inward, one facing outward) per side (equalling in 4 total), 2 medium-sized leaves similar in shape to the smaller leaves (again, one facing inward, on facing outward, with 4 total), and 2 large leaves to sit in the center of each side. You have only to draw three shapes out by hand (one small leaf, one medium leaf, and one large leaf), and use those three shapes as your patterns.
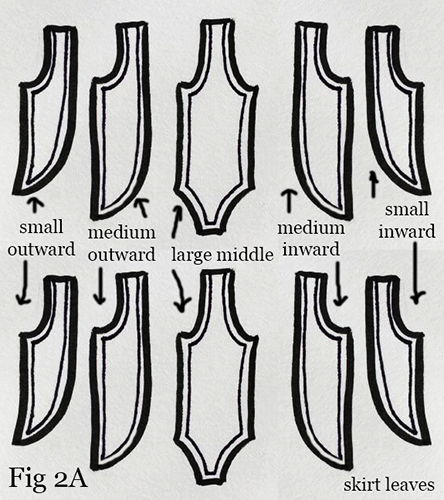
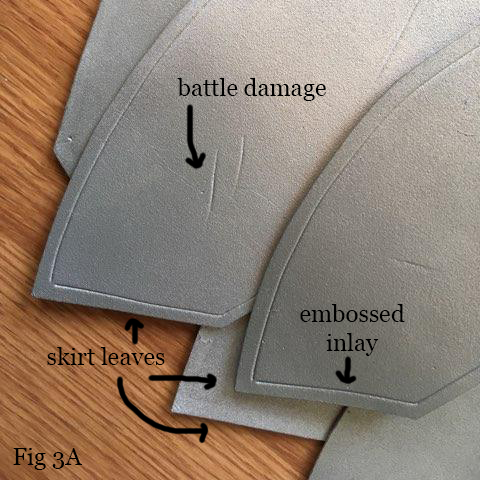
Lay your patterns flat on a sheet of thin craft foam and trace them out. (You will be tracing out 2 large leaves, 4 medium leaves, and 4 small leaves, for a total of 10 leaves; 5 on each side). Now, if you would like to add some detail to your leaves, you can do what I did and trace a thin “inlay” line around the shape of your leaves. Additionally, I chose to add some “battle damage” marks with a pencil as well. This is an optional step, depending on the look you are going for. Next, spray BOTH SIDES of your craft foam with Plasti-Dip with as many layers as you feel necessary. You will then use your x-acto knife to cut them out. Next, you will spray both sides of all your leaves with your metallic silver spray paint. You may wish to seal them with polyurethane as well.
STEP 3:
While either wearing your bodysuit or displaying it on your dress form, you will begin to place the leaves onto your skirt, starting with your 2 small inner leaves (facing inward) on either side. Using your white thread, carefully hand-stitch your leaves along the underside of the silk white cord you previously sewed in. Once you have your 2 innermost leaves in place, continue on to the larger inward facing leaves, allowing them to overlap slightly on top of the 2 small leaves. Next, on the very outer sides of your body suit (right by the outermost extent of your hips), sew in your largest leaves, again, allowing for some overlap.
At this point, if you’re wearing your bodysuit while you sew, you may want to flip it around so that you’re wearing it backwards in order to finish the leaves that follow along the back of the suit. You will continue on by sewing in the medium-sized leaves just as you did before. Furthermore, since you are wearing the costume backwards now, you will sew them in so that they are facing each other inwardly, just as you did when you had the costume on facing frontwards. Finish by sewing in the final 2 smaller leaves.
In order to cover your stitches, take a strip of white satin ribbon and sew it on top of the silk cord guideline so that it covers not only the cord but the very top bits of your leaves. This will accentuate the line you’ve created with your silk cord and give your bodysuit a finished look. Again, you may do this by hand on the dress form or while you wear it.
STEP 4:
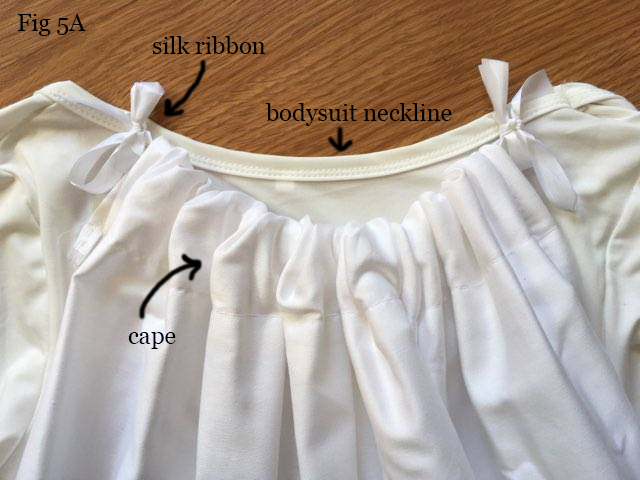
On to the cape. The 1 yard of cotton fabric will be a sufficient size – simply hem all the edges so that they are finished and do not fray. Fold over the top of your cape and sew it down. String a piece of white satin ribbon through the fold, so that it gathers on the top. I chose to sew 2 strips of ribbon onto either side of the back of the bodysuit at the very top of the neckline and tie the ribbon running through the cape to either end. You may choose to simply sew the cape’s ribbon directly to the neckline. Either way, your cape will be secured. Next, on to Clare’s belted arm brace!
STEP 5:
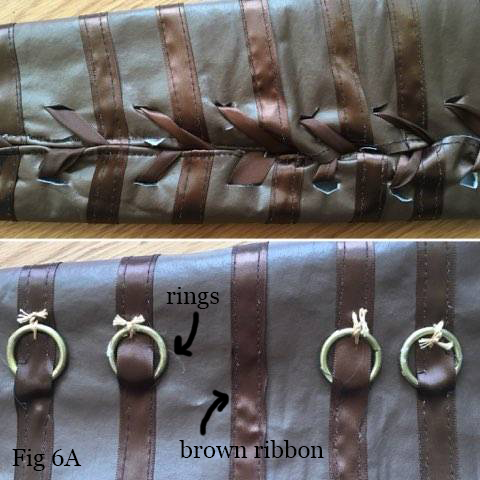
To begin Clare’s arm brace, trace your arm from your wrist all the way up to your armpit on a piece of wax paper. Fold this tracing in HALF, and trace a 1 inch border around your drawing, then cut out your pattern (all while still folded). On a piece of folded brown vinyl, trace your wax paper pattern, matching the folded piece of wax paper with the fold of the fabric.
Next, sew strips of your brown satin ribbon running horizontally across the length of vinyl, making sure to thread the ribbon through your copper D-rings sparsely. Once you have your length of vinyl decorated in ribbon and D-rings, you may choose to make your arm brace adjustable as I did. If this is the case, cut very small holes down the sides of your vinyl, making sure the holes on either side mirror each other in number and placement. Next, simply thread a long strip of your brown ribbon through the holes as one would lace a shoe. This will make it easier for you to slip your brace on and off.
Note: You will be wearing the white opaque tights under the body suit, and the left white opera glove underneath the sleeve of the suit as well. Clare’s costume is drawn as exceptionally form-fitting. In order to emulate this, I chose to go with tights and a bodysuit instead of pants, leggings, or a top.
STEP 6:
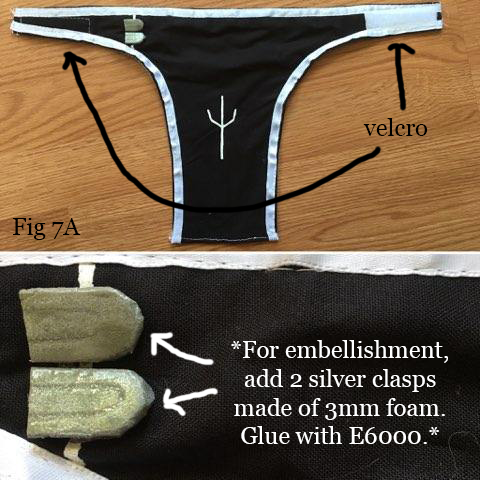
Last but not least, the final main piece of the Claymore uniform is the black neckerchief that is tucked under the white body suit. To create this piece, trace a pattern on to wax paper. Similar to the arm brace, fold this tracing in half to make sure it is symmetrical, then cut it out. Using this pattern, cut out a piece of black fabric and hem it along the edges. Using your white thread, sew your white satin ribbon along all of the edges. Once you’ve done that, you can sew in your velcro to the outer edges that wrap around the neck. Lastly, using your white fabric paint, carefully draw her symbol in the middle of the black fabric. You may wish to try drawing this symbol out a few times on a piece of scrap paper to make sure you’re confident enough to try it with fabric paint.
Note: When you wear the neckerchief, you will tuck it under the neckline of the white bodysuit. You may wish to add velcro to each garment so that it stays in place, or simply use a safety pin hidden on the inside.
CLARE’S ARMOR AND SHOES
Next, let’s move on to Clare’s armored pieces. This includes a pair of pauldrons, a back piece, and one partial gauntlet. For these components you will need:
- Hollow styrofoam half ball (2)
- 3mm craft foam sheets (at least 3)
- Plasti Dip
- Metallic silver spray paint
- Polyurethane
- X-acto knife
- Sharpie marker
- 1 inch paper fasteners (1 pack)
- White or silver silk craft cord (1 spool)
- E6000 glue
- Toothpicks
- Ticonderoga graphite pencil
- Wax paper
- 1.5 yards of grey fabric
- Thin elastic (1 pack)
- Sewing tape measure
STEP 1:
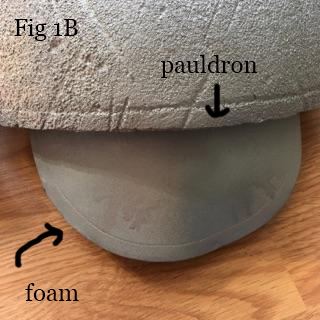
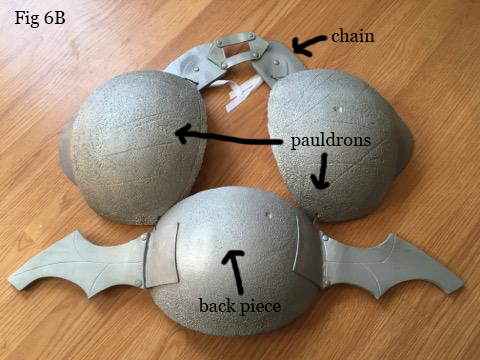
Cut both of your hollow styrofoam half balls in half. Two of these halves will serve as the pauldrons, and the other half will serve as the back piece. Cut out 2 similar half-circle shapes and, using your E6000 glue, glue them to the underside of the pauldrons to create the secondary layer that Clare has spanning out from under each plate. Spray all of these pieces with as many layers of Plasti Dip and metallic silver spray paint that you deem necessary. (For me, I did 2 layers of each, followed by a layer of polyurethane.)
STEP 2:
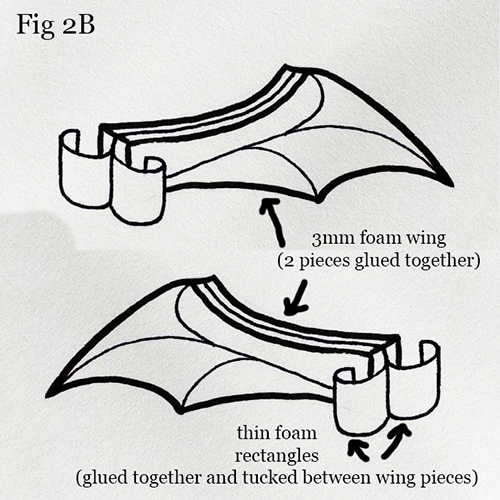
Using your wax paper, draw the shape of the wings seen on Clare’s back piece, and cut this pattern out of your 3mm craft foam 4 times, giving you 4 pieces. (If you would like to draw a design into your wings with a pencil as we did with the leaves of Clare’s skirt, you may do so. Make sure that your designs are facing outward and mirror each other.) Additionally, cut out 4 rectangular strips of your thin craft foam. Lay down a thin line of E6000 glue on the very edge of these pieces and glue them together so that you have 2 separate pieces of 2 rectangles glued together at the ends. Next, sandwich these pieces (at the end where you’ve glued them together) in between 2 of the 3mm wing pieces. You should now have one pair of wings, each consisting of 2 3mm pieces glued together, each with 2 pieces of thin foam sandwiched in between them. Spray both wings entirely with Plasti Dip, metallic silver spray paint, and polyurethane.
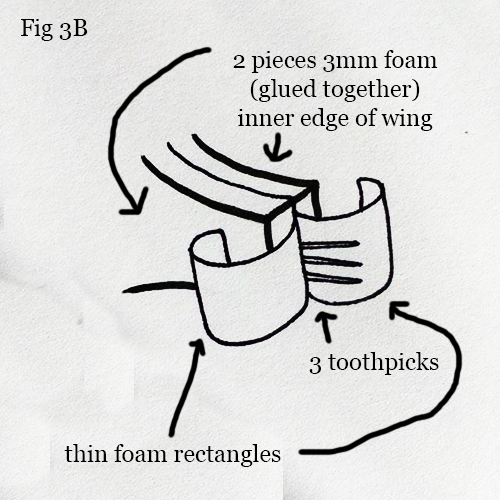
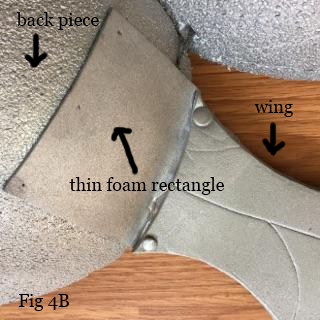
After the E6000 glue has become tacky yet sticky, open the strips of thin foam that you’ve sandwiched into the wings and stick 3 toothpicks into the mouth of the opened strips of foam. Do this with both wings. Cover the toothpicks (and the undersides of the strips of thin foam) with a thin layer of E6000 glue and, on the outer edges of your back piece, sink the toothpicks into the styrofoam body of your back piece.
STEP 3:
Clare’s pauldrons are connected in the front by 2 side pieces and one center piece. We will call this her “chain”. To make these pieces, cut out 2 medium-sized squares from your sheet of 3mm craft foam, and a smaller rectangle shape from your sheet of thin craft foam. Glue the thin rectangle on top of the thick square. Once more, if you would like to add any inlay details or “battle damage” on your connecting pieces using your pencil, you may do so. Push a paper fastener through the center for reinforcement.
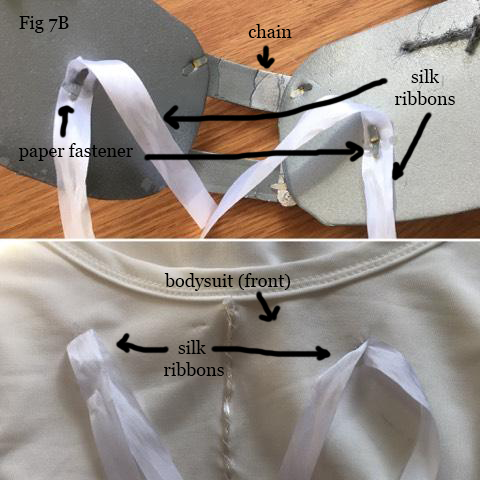
For the center piece, cut out 2 very small, rounded-off rectangles, and two long triangles. The triangles will serve as the right and left sides, and the rectangles the top and bottom. Connect these 4 pieces to each other and to the 2 outer squares using 4 paper fasteners. Prime with Plasti Dip, color with your silver spray paint, and seal with polyurethane. Connect the 3 pieces of the chain you’ve made with a pair of paper fasteners, making sure the center piece is in the center where it belongs.
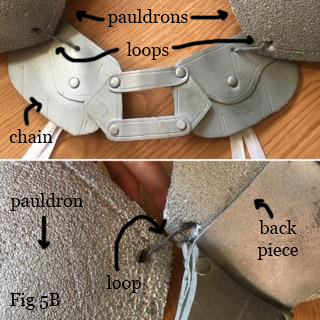
STEP 4:
Using your pencil, carefully poke a hole through each corner of the styrofoam halves, as well as the outer sides of the chain. String these pieces together using loops made from your silk cord, with the winged back piece and “chain” in the front and back, and the pauldrons on the left and right. They should all connect together continuously.
In order to get the chain to sit flat on the bodysuit, glue 2 pieces of white ribbon to the back of the 3mm squares. Making sure they are aligned properly, sew in two pieces of white ribbon directly onto the bodysuit. This way you can tie these ribbons together, ensuring that the chain will sit flat against your chest, and the pauldrons will remain in place.
STEP 5:
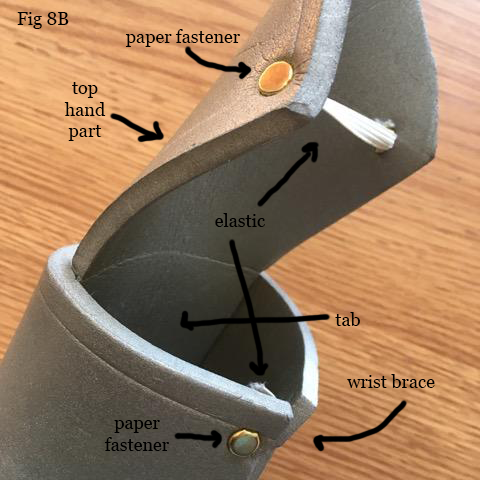
Clare’s gauntlet! To make this gauntlet, draw a design on a piece of wax paper. This design should consist of 2 pieces; a long rectangle (which will wrap around the wrist) and a large pentagonal shape that has a tab at the bottom. The tab’s length should correspond to the long rectangle’s width. Cut your patterns out on 3mm foam, and glue the tab of your pentagon into the middle of your rectangle. As always, prime, color, and seal.
Next, push a paper fastener through each corner of the ends of the wrist wrap, and secure the ends together by pushing each fastener through the end piece of 2 elastic strips. To reinforce the elastic, dab a bit of E600 glue on top of the arms of the paper fasteners, after you spread them outwards.
STEP 6:
To make Clare’s shoes, I started with a cheap pair of base shoes and sprayed them with metallic silver spray paint. Similar to my process that I used to make the wrist wrap for her gauntlet, I attached a thick rectangular piece of thin, silver-painted craft foam around each shoe with elastic.
For the top part of her boots, trace your leg with wax paper and, again, similar to my process in making the arm brace, fold it over to along the line of your shin (as opposed to your calf) to make sure it is symmetrical. Your pattern should reach from just below your knee all the way down to the middle of the top of your foot, excluding your heel (similar to spats). Next, draw around this tracing about 1-2 inches for some wiggle room. Trace your pattern onto the grey fabric, lining up your folds accordingly, and cut your pieces out. Hem around all the edges, and sew velcro along the outer edge. If you would like the extra reinforcement, you can sew a piece of elastic under the “foot” part of your pattern so that it slips around your foot securely and doesn’t get bunched up when you put it into your shoe.
Lastly, for the very top part of her boots, measure around the top of your calf with measuring tape. Use this measurement to cut out 2 equal-sized strips of thin foam with about 2 extra inches. These strips should be about 4 inches thick. Prime, spray, and seal, then glue velcro to the outer edges of your rectangles. Glue these rectangles onto your grey fabric boot pieces, making sure the velcro edges match up, and you’re done!

CLARE’S SWORD
Alright guys, you’ve been patient, and I saved the best for last. Clare’s claymore sword is not only durable, but fun to make as well. This is a great introduction to prop making, and I hope you enjoy making it as much as I did!
YOU WILL NEED:
- One large wooden dowel
- 3mm craft foam (at least 2 sheets)
- Thin craft foam (1 sheet)
- Metallic silver duct tape (1 roll)
- Brown ribbon
- Paper fasteners
- Brown craft paint (1 bottle)
- Metallic gold craft paint (1 bottle)
- Small can of metallic gold spray paint (1 can)
- Large sheet of corrugated cardboard (1)
- Sharpie marker
- Polyurethane
- Box cutter
- A ruler or a tape measure
- E6000 glue
- Wax paper
- Spray adhesive
- A table saw (or borrow a friend’s!)
STEP 1:
Using a table saw, begin by cutting a notch up the middle of your dowel that is approximately ⅛ of an inch wide and 7 inches deep. Cut your dowel down to the size of about 20 inches. Sand the end of the dowel that has the notch on it so that it is rounded and smooth.
Next, cut the blade shape out of your corrugated cardboard. Using a wax paper pattern is wise, as it will ensure that you’ve got the shape down that you want before you begin cutting. Use a ruler or tape measure to make sure your lines are straight and your angles are even. You will be cutting this shape out twice. Next, spray both sides of your two blade shapes with your spray adhesive, line them up, and glue them together. It’s best to keep something weighted on top of your blade while it dries to make sure they stick together securely. Now that your blade is cut out and glued together, prime, spray, and seal.
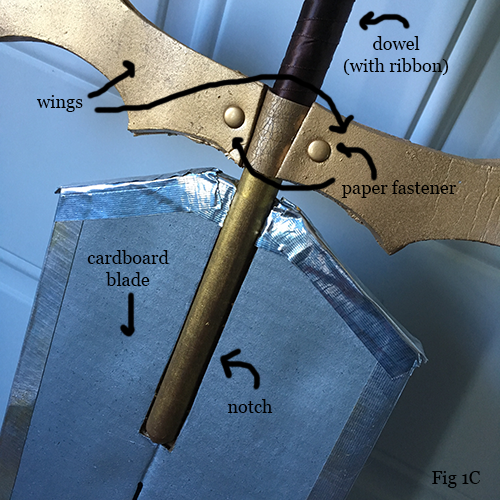
STEP 2:
You will now have to cut a notch out of your blade in the middle of the top where your dowel will be in order for the cardboard to fit securely into your dowel’s notch. Trace the width and length (which we already determined is 7 inches) of your dowel where you will be cutting the notch out, and carefully begin slicing into the cardboard where you made your tracing. Due to the many layers that corrugated cardboard has, you will be able to strip away each layer one by one until you are left with a midsection that is small enough to fit into your dowel. Make these notches on BOTH SIDES of your cardboard so that your dowel fits in evenly. Coat the notched section of cardboard with a thin layer of E6000 on both sides and slide it into your dowel’s notch.
Next, tape up the edges of your sword using your metallic silver duct tape. Using your Sharpie marker with the cap ON, you can slide the marker down the middle of your blade repeatedly to create an embossing effect on both sides. Once you’ve done that, you can draw Clare’s insignia onto her sword using your marker.
STEP 3:
Clare also has a pair of wings on the hilt of her claymore. To make these wings, you will use a process similar to the one we used when we made the wings on her back piece. Cut out 4 identical wing pieces using the 3mm foam and sandwich 2 thin foam rectangles in between each of the 2 3mm pieces of the 2 wings, but this time, instead of allowing the ends of these rectangles to dangle off, use them as a bridge between the two wing pieces, leaving a hole in the middle to place the dowel through. Glue the wing pieces together, then prime with Plasti Dip, paint with your gold metallic spray paint, and seal with polyurethane. You can add the paper fasteners in for decoration as well as reinforcement. Place the dowel through the gap between the two thin foam pieces, and paint the bottom part of the dowel with you gold metallic craft paint.
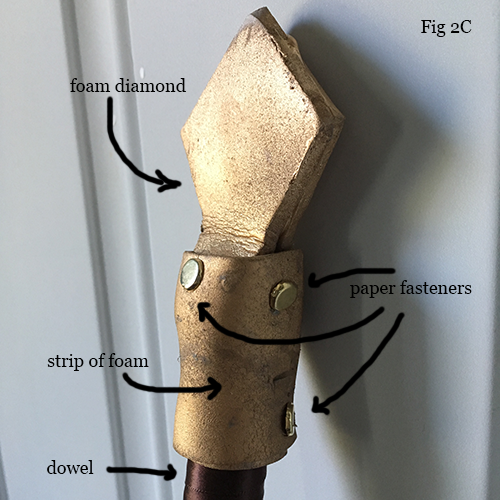
Next, paint the part of the dowel that is above the wings with your brown craft paint, and embellish it by placing a few long strips of E6000 along the handle and wrapping your brown ribbon all the way up to the top. Cut out 2 identical diamond pieces that each have a long tab at the bottom from your sheet of 3mm craft foam. Glue them together, prime, paint, and seal them, and glue the tabs to the top of the dowel with E6000 glue. Cut a long rectangle out of your sheet of thin craft foam, prime, paint, and seal it, then wrap it around the section where the diamonds’ tabs are glued to the dowel, securing it with a generous amount of E6000. Reinforce with paper fasteners.
You’re all done, congrats! Now go fight some Yoma!
About the Author
Diomira Keane
Cosplayer, artist, cat-lover, party princess extraordinaire.


There are no comments yet, add one below.
Stay connected. Don't miss out!
Get new costume guides in your inbox once a month.


Leave a Comment