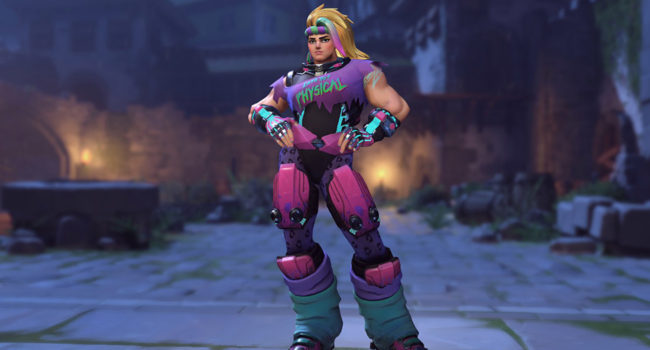
Make Your Own: Tracer from Overwatch
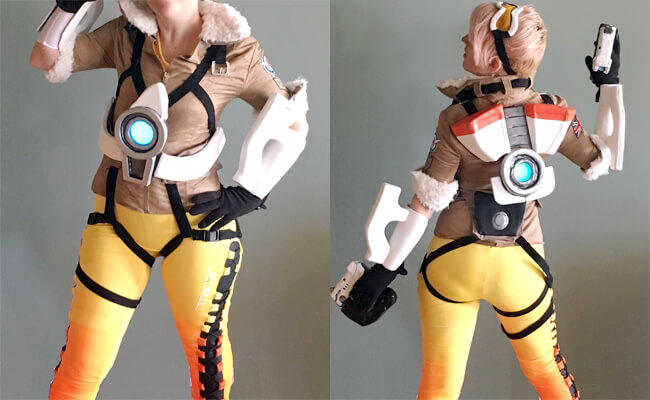
Skill Level: Advanced
I would recommend this NOT be the first costume you make yourself if you have never endeavored in costume making. You may find methods for your foam armor pieces that work better than explained here. Testing fit against your body for any armor costume as you go is highly recommended.
Tutorial is for US women’s XS/S. Please adjust material amounts to your body size.
Jacket Tutorial
Materials:
- Pattern: McCall’s M7026 or Similar
- 1 1/2-2 yds Tan faux suede or cotton
- 1/2 yd Faux fur (I used a “Llama” look fur and trimmed it down)
- ½ yd 1” Black Webbing
- 1” Silver buckle
- 18” Tan Separating Zipper
- Tracer Patches: Union Jack, Tracer Patch, Admiral patch
- Thread
- Fray Check
Tools:
- Sewing Machine
- Hand sewing needles
- Straight pins
- Clear Quilting Ruler
- Fabric Chalk
- Fabric Scissors
- Paper Scissors
- Pencil
- Tape
- Paper (I Prefer Canary tracing paper or pattern paper, but printer paper works)
- Iron
PATTERN: NOTE: This is a STRETCH pattern I’m using, with non stretch fabric. If you do use this pattern, I highly recommend cutting out a size up. Any basic women’s seamed jacket will do.
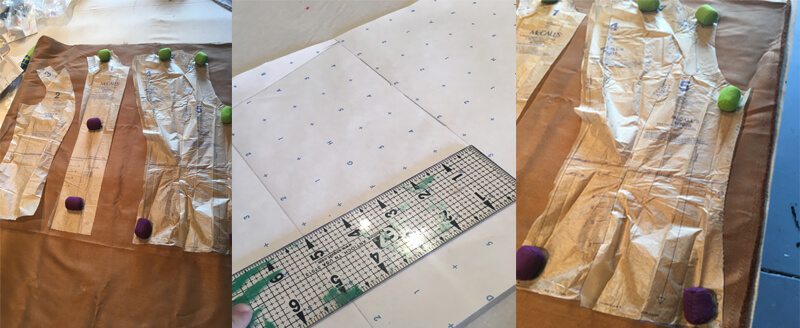
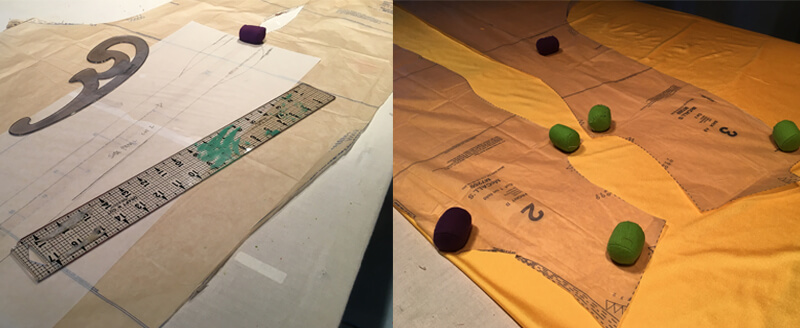
Cut out front, side front, and sleeves to size. Shorten sleeves to be elbow length. Combine back, side back, and yoke pieces into one larger pattern piece, overlapping seam allowances.

COLLAR: Measure along neck line pieces to determine collar length. Create a pattern piece for your collar by taking the neck measurement (ex: 14”), and measuring up 3-4” depending on your desired collar height. Extend top line to measure past 1/2” to 1” on either side. This should create a pointed ended polygon shape.
CUFFS: Repeat similar steps from collar by measuring along the bottom of your sleeves to create cuffs.
CUTTING: Cut jacket, cuff, and collar pattern pieces out of your tan fabric. Cut collar and cuff pieces out of your faux fur to create cuff linings. Cut cuff and collar pieces from your fusible interfacing. Iron to cuff and collar pieces.
Cut 5 3” by 1” strips to create loops for the jacket collar.
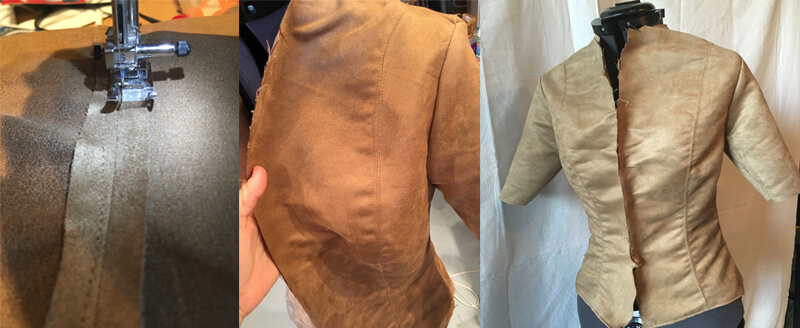
SEWING: Follow pattern instruction notes to attach fronts, side fronts, back and sleeves.
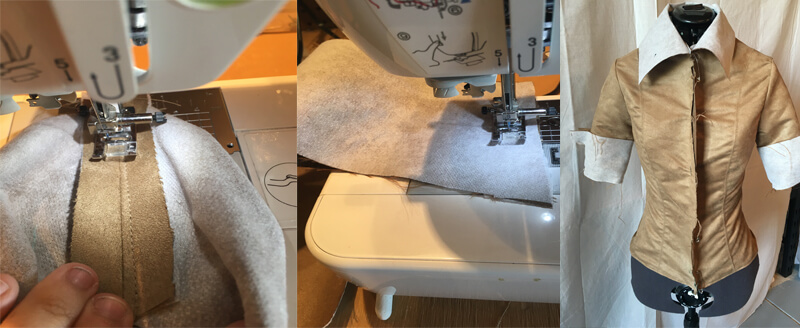
Sew tan collar, and cuffs to jacket.
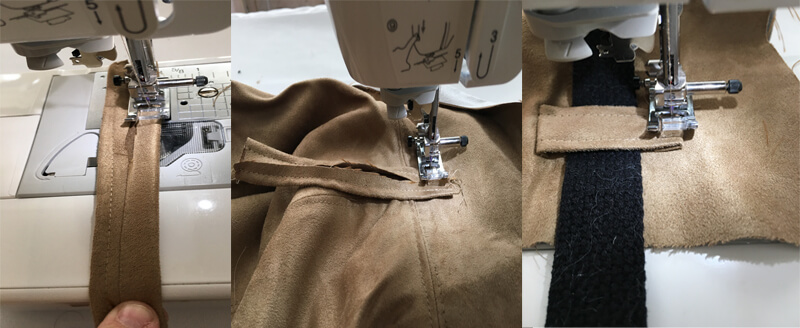
Take your 5 small strips, fold in edges, and stitch down. Mark your collar where you would like each loop to be placed. Sew into place.
Attach buckle to end of webbing. Fray check other end to keep it from coming unraveled.
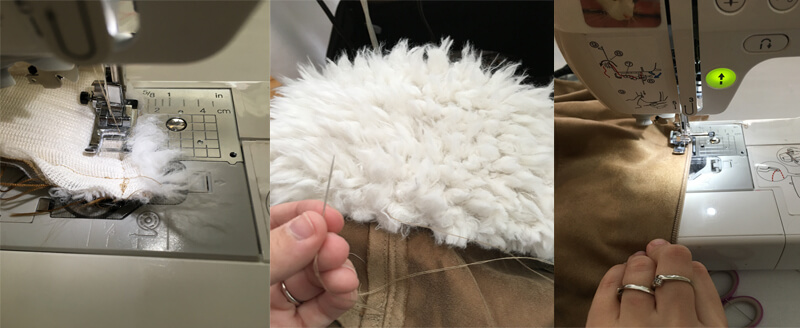
Sew faux fur along collar top and sides. Repeat for cuffs. Hand sew each bottom edge down to seam allowance to create a smooth edge. Insert zipper.
PATCHES: If your patches are iron on (as mine were), you can iron them on. If you have sew on patches, I will highly recommend you sew them on before you construct your sleeves.

NOTE: Fit is everything! Please try your costume on as you go to ensure an accurate fit. I also top stitched down all of my seams to recreate the look of a real suede jacket.
Chronal Accelerator Pack Tutorial
Materials:
- 1 pack 5/8” thick EVA foam
- 1 small sheet thin EVA craft foam
- Super 77 Spray Adhesive
- 1 Sheet Jumbo Black Worbla (You can order less, I ordered this to do the full costume)
- Plastidip Spray
- 3 yds 1” Black webbing
- ½ yd tan cotton
- ½ yd fusible interfacing
- Thread
- Hot Glue Sticks
- E6000 adhesive
- 2 Quick release buckles
- Spray Paint: White, Orange, Silver
- Acrylic Craft Paint: Light Silver, Gunmetal
- 1 Small Sheet Clear Worbla or Clear Acrylic sheeting
- Large sew on snaps
LIGHTS (Optional):
Tools:
- Sewing machine
- Iron
- Compass
- Pencil
- Pattern or Tissue Paper
- Clear quilting ruler
- Fabric tape measure
- French curve
- Heat Gun
- Dremel
- Sander or Sand Paper (120 or Higher grit)
- Hot Glue Gun
- Optional (And super helpful): Dress Form
(Here is a tutorial to create your own dress form out of duct tape)
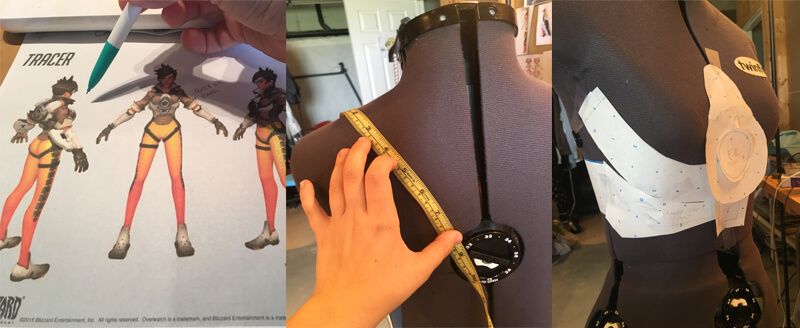
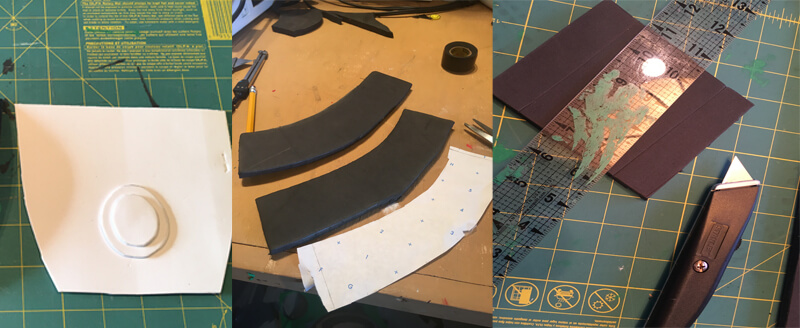
PATTERN: First look at your reference image, and print it out. Take a pencil and break each piece down by shape. I did this by tracing around each piece to see how many parts were needed. One you have this figured out, start breaking each piece by simple shapes. I then looked at my dress form, and measured with my tape measure for general scale. Take these measurements, and begin to draw out all your pattern pieces onto paper. Cut them out.
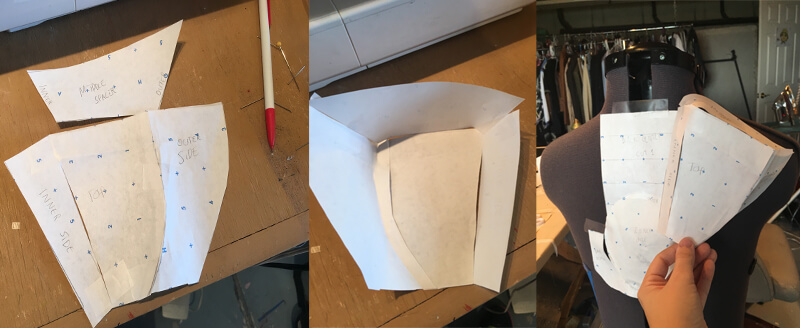
Take your initial pieces and tape them to your form (or look at them in comparison to your body). Make adjustments as needed. Make sure to clearly label each piece (what is supposed to be foam versus fabric, what piece goes where, etc)
CUTTING: Cut out each of your pattern pieces out of your EVA foam or fabric. Cut lower back panel out of thinner EVA foam. You will need to cut multiple of some pieces to achieve desired thickness.
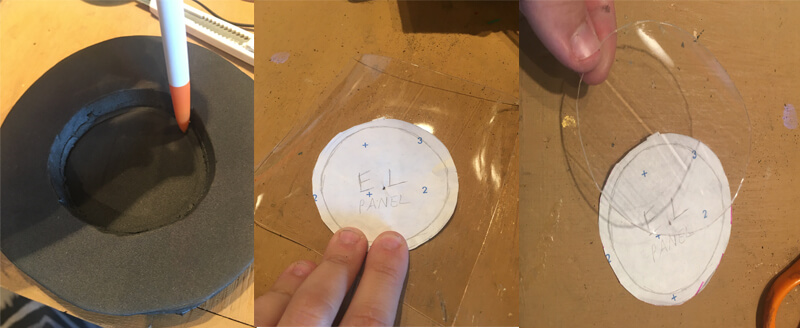
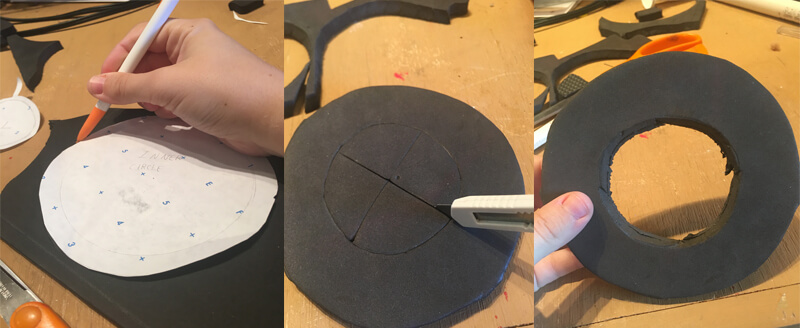
Cut a circle the same size as your EL circles out of your clear worbla or acrylic sheeting. SAVE YOUR PATTERN PIECES. You will need them again when we cut out our worbla.
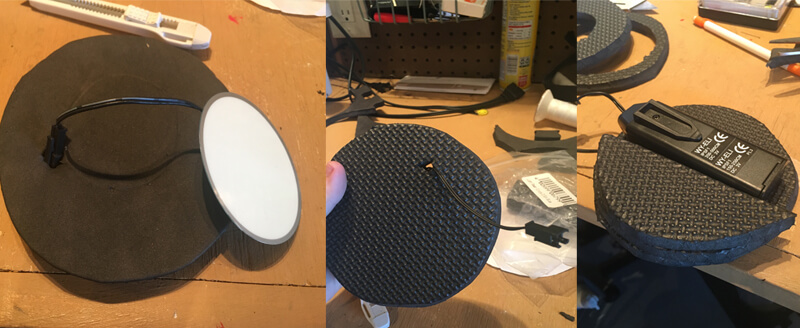
If you are using your EL lights, apply to large circular pieces with electrical tape. Cut holes in foam to thread your wire connector through. Cut an extra circle, and trace your battery pack onto it. Remove this piece, leaving only two outer edge circles. Glue to bottom of panel piece.
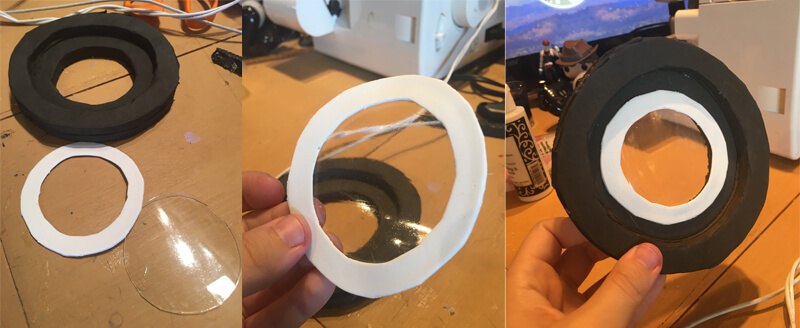
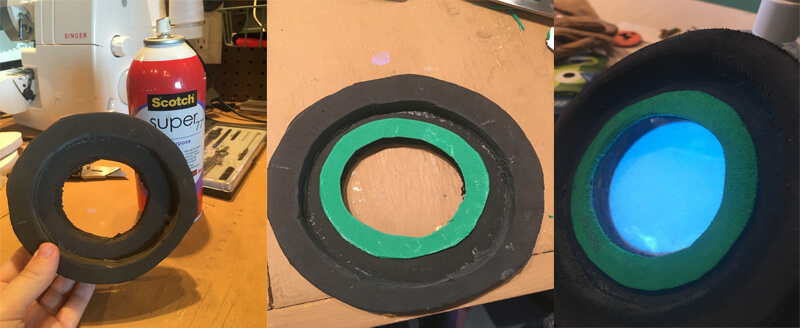
Apply clear plastic over light, and place another foam circle with space cut out for light to shine through. Glue an outer O piece for outer ring, and a small craft foam ring to cover edges from clear worbla or acrylic panel.
Cut smaller circles and glue down for lower back panel. Take each piece of upper back edges and apply to one another. Take a blade and cut lines in center upper back panel to create textured lines.
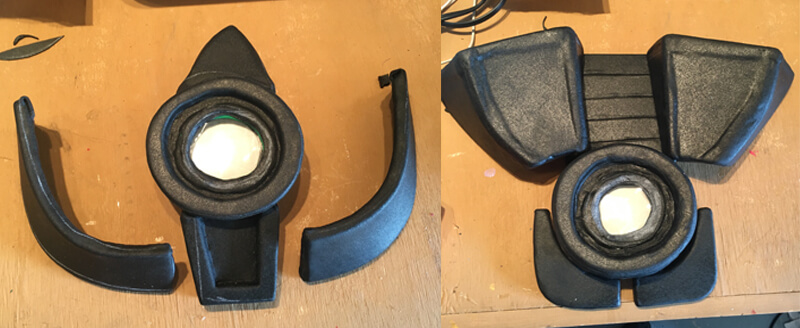
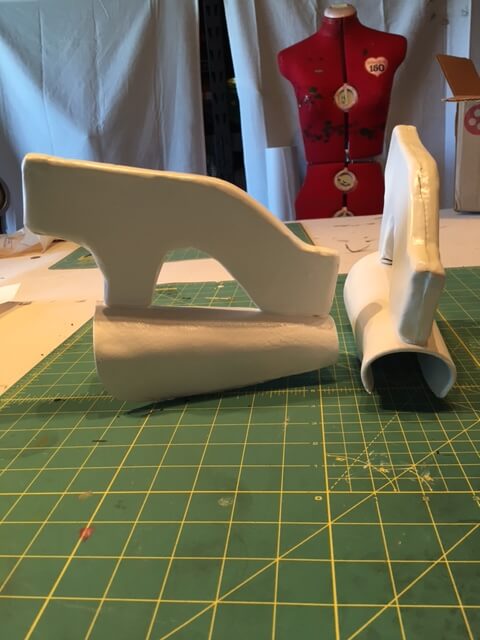
Take each of your foam pieces and slowly start gluing layers of each shape. Only glue similar shapes, we will assemble each piece once we move into worbla.
Sand off rough edges. I like to take sand paper and give everything a smooth rounded edge.
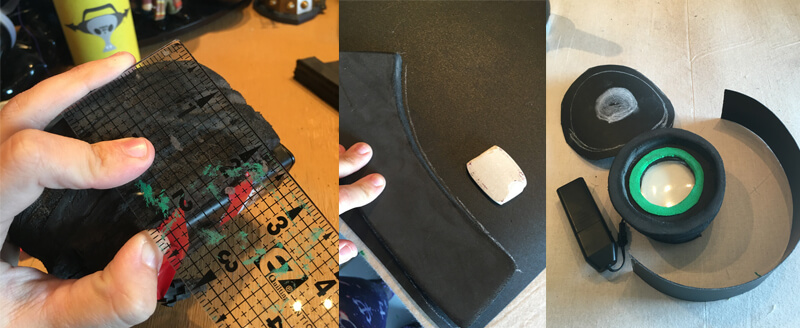
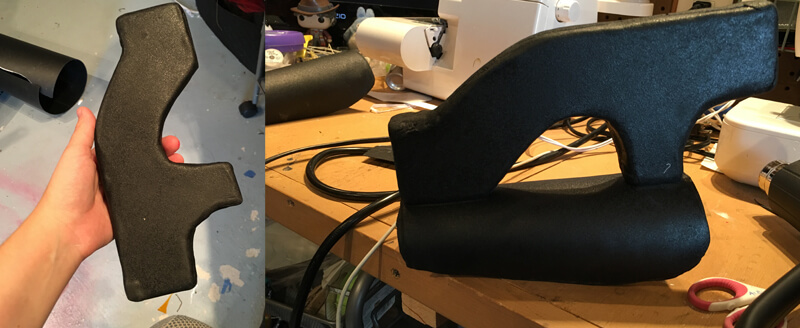
CIRCULAR BASES: Take each of your newly created foam bases, and trace around them with chalk onto your black worbla. You may want to measure each piece first to determine the exact thickness you need for each piece. For my circular pieces, I traced around each circle, and cut a hole out in the middle for my lights. I also measured around the base, and then cut a separate strip to wrap around the outside.
BACK AND SMALLER PIECES: I simply traced each of my paper pattern pieces from the foam onto worbla, and gave them an extra 1/2” to 5/8” allowance around all edges.
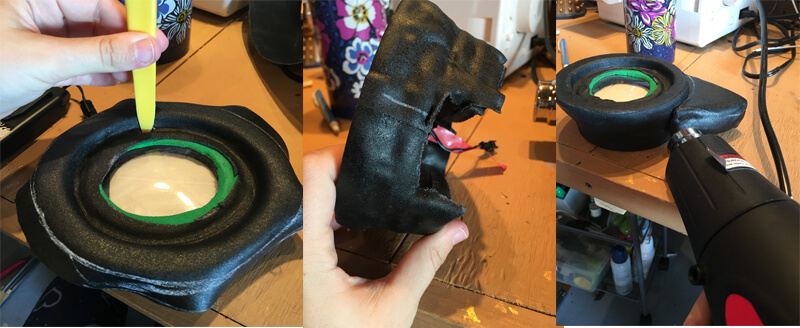
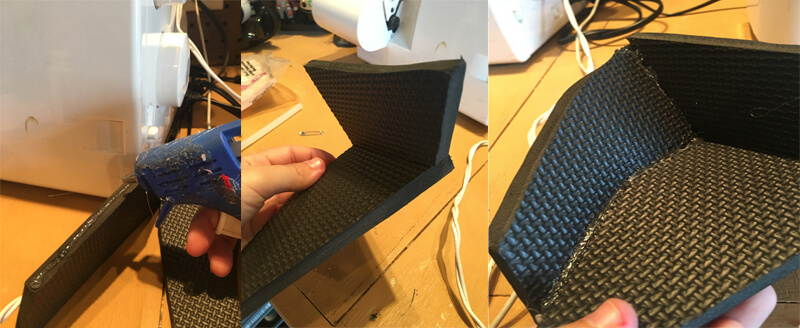
Cover each Foam piece with your worbla pieces by heating them with a heat gun, and wrapping each edge. Apply top circles, then wrap edges with strips, leaving room for battery packs to be inserted. Apply detail pieces for inner circles.
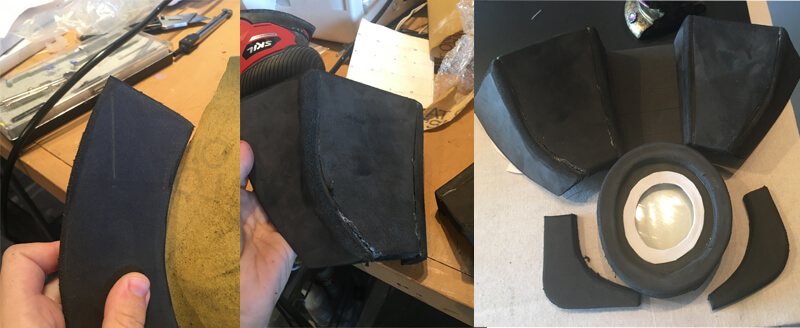
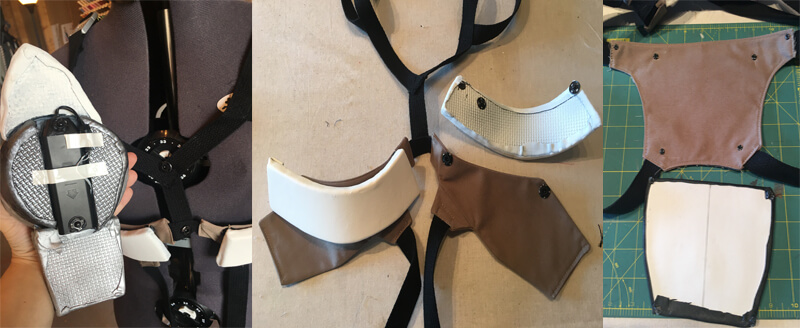
Cover under bust pieces with worbla, and allow to cool. Reheat, and shape to fit body.
For my large back pieces, I applied each separate worbla piece separately, then heated repeatedly to smooth out any edges. Worbla is self adhesive. Heat each piece lightly and stick together.
NOTE: You may wish to cover the backs of each piece, but I didn’t find this necessary as they were towards the body.
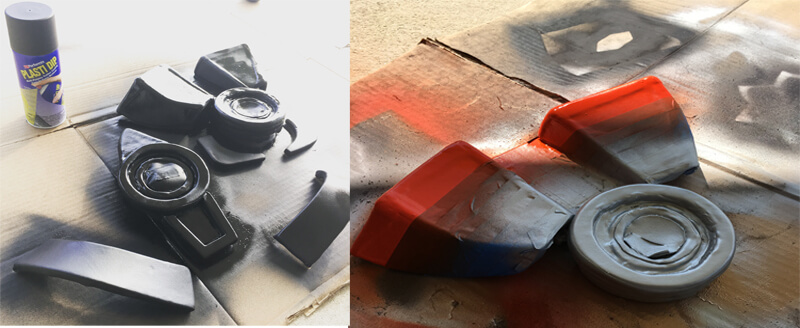
Take painters tape and thoroughly cover your clear acrylic pieces. Tape over ends of your EL panel wires if you are installing lights to avoid getting paint on your connectors. Apply 3-4 even coats of Plastidip spray to prime, allowing drying time in between. Take spray paint and paint everything white. Taking painters tape, tape off sections and paint appropriate colors (Silver and orange). Allow to dry fully.
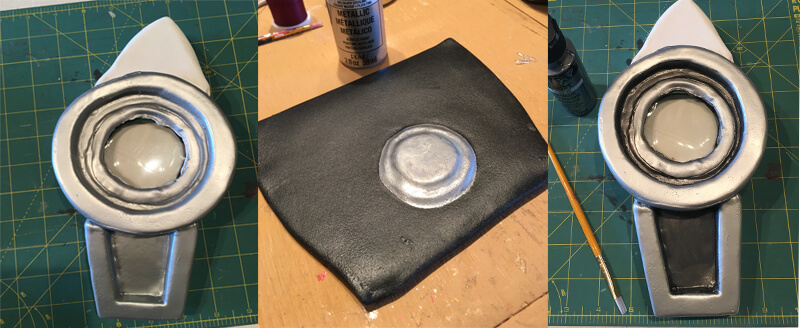
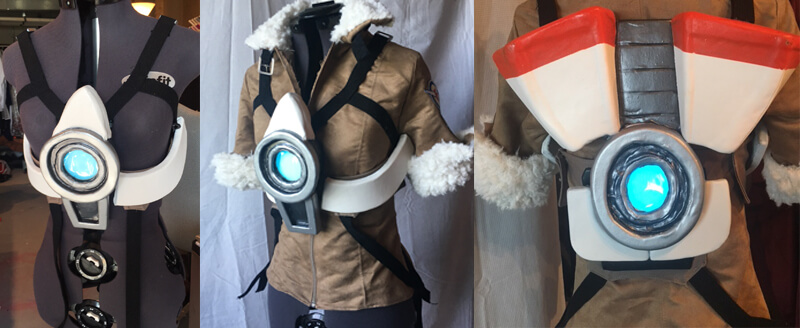
Remove painters tape. Take your darker and lighter silver acrylic paints to add highlights and shadows where necessary.
Spraypaint buckles white. Allow to dry. Spraypaint buckles silver.
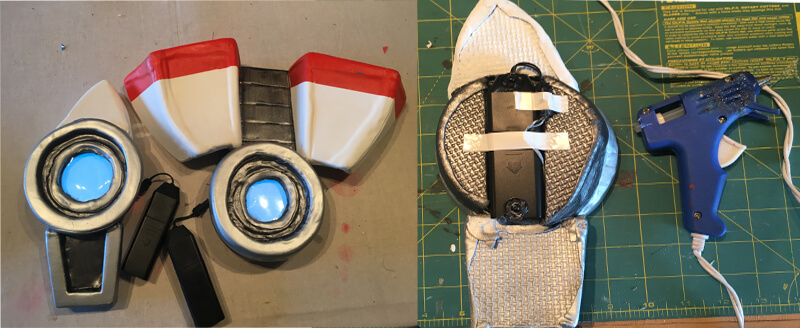
FOR LIGHTS: Making sure you can access the section to change the battery, hot glue down each battery pack. Apply painters tape over top of pack and wire to secure in place. I chose hot glue in case I need to pop the entire pack out to be replaced.
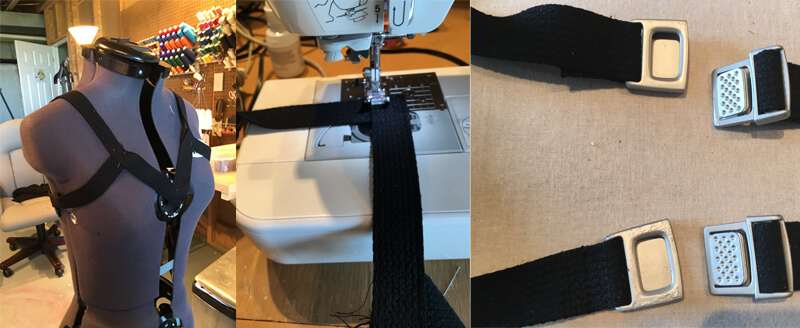
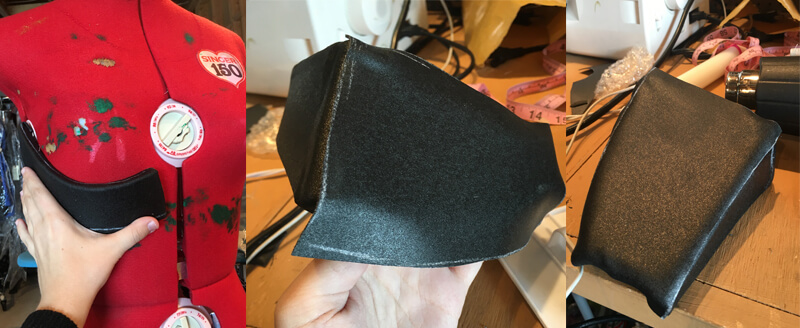
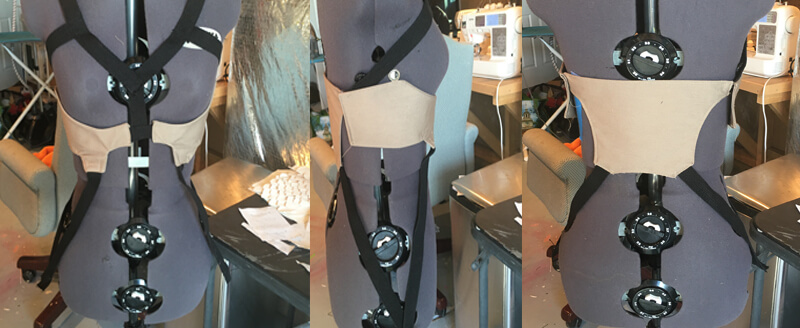
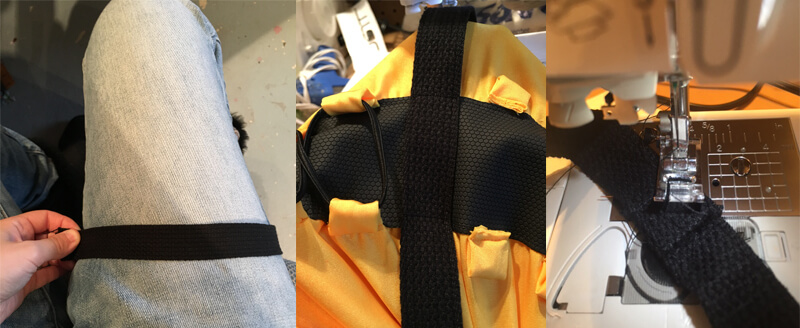
HARNESS: Take your pattern pieces, and cut double layers of each from your fusible interfacing and tan fabric. If you have a dress form, you may lay your straps out on the dress form to determine placement in reference to the packs. Alternatively, measure where you’d like your straps to lie, and cut co ordinating length strips for your upper and lower body, allowing extra room to sew to pack and sew on buckles.
Sew together by overlapping webbing and sewing a box around each corner to reinforce and ensure a strong hold. Attach one end of buckles at shoulders. Take longer pieces of webbing and sew to other end of buckles. Glue these separate webbing pieces and glue to back of accelerator pack.
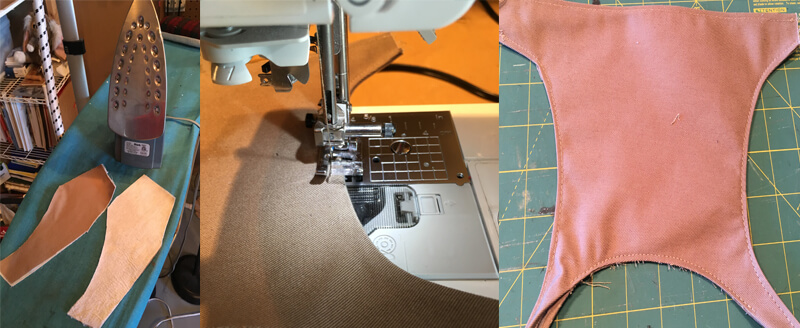
Take your front and back harness pieces and apply fusible interfacing. Sew together, leaving ends open. Turn inside out and iron. Sandwich black webbing pieces in each edge opening, and stitch in place. I left longer pieces on the edges of the front and back that will eventually attach to our leg straps from our body suit. Add snaps to the front and back to snap together and close.
SNAPS:
Snaps are completely optional, but would highly recommend you use this method of attachment. It will allow for ease of swapping out battery packs if you add lights, and it will also allow your harness to be washed.
Hold each of your newly completed armor pieces up to your harness on your dress form (or your body), and determine where the best place to anchor each piece will be. Glue male ends of snaps to back of armor pieces. Sew female ends of the snaps to the harness itself. Now simply snap it all together.
Jumpsuit Tutorial
Materials:
- Pattern: Mccall’s 7269
- 2 ½ yards Yellow 4 way stretch spandex
- 1/8 yard Orange 4 way stretch spandex
- ½ yard black Hexagon print spandex
- 3 yards black elastic cording
- 2 yards 1 inch black cotton webbing
- 2 Quick release black plastic buckles
- 22 inch Invisible zipper in yellow
- Hook and eye
- Thread
- White Iron on Vinyl or White fabric paint
- ColorShot Fabric paint in Orange
Tools:
- Sewing machine with zigzag stitch capabilities
- Clear Quilting Ruler
- Straight Pins
- Fabric Scissors
- Paper Scissors
- Pencil
- Tracing Paper
- Iron (if using Iron on paper)
- Paint Brush (if using paint)
Prewash your spandex fabric to prevent shrinkage.
PATTERN: Cut pattern for view B. Shorten sleeves to elbow length. Line up front and back pieces at side seam, overlapping at 5/8” seam allowance. Take a piece of tracing paper and draw out side panel design.
CUTTING: Cut sleeves, jumpsuit front and back out of yellow spandex, following cutting instructions from the pattern. Take your side design pattern piece and cut out hexagonal fabric. Cut a 2 inch by 26 inch strip of your yellow spandex, and a 2 inch by 20 inch strip of your orange fabric.
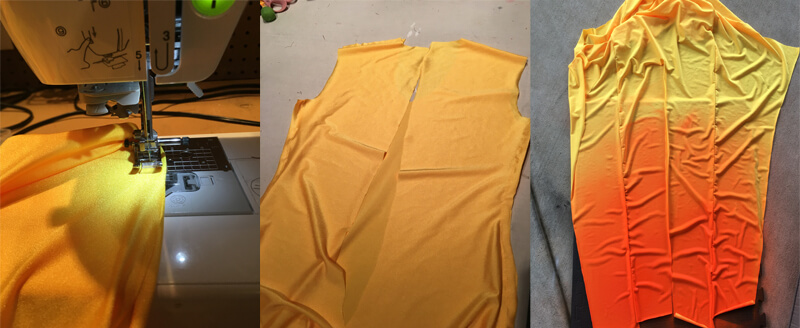
CONSTRUCTION : Sew together body suit at outer seams and shoulder seams, following pattern instructions.
PAINT: Concentrating on the bottom of the jumpsuit legs and bottom of sleeves, spray your pant legs and sleeves orange. Lightly work your way up to fade the color into the rest of the body suit. Allow to dry.
NOTE: You can also dye the fabric to achieve the ombre effect, but I opted for this method because it offers more control.
Take your hexagonal piece, pinning in place, and sew down, sewing as close to edge as possible. Sew partially up center back seam, leaving room to sew zipper in.

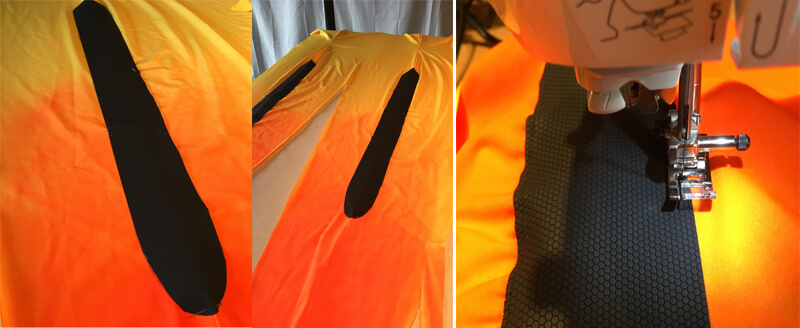
Take your strips of yellow and orange spandex, fold in half, and sew at a 3/8 inch seam allowance. Turn inside out. Measure out how large you’d like your loops, and cut tube into pieces. Sew each piece in half.
Stitch down small loops to outer edges of side panel, stitching right outside of the black panel. Trim excess seam allowance. Sew seam between legs together. Attach sleeves.
For right leg, Take a piece of your black webbing the measurement of your thigh plus a little extra for seam allowance. Stitch to body suit at black panel. Sew ends together.
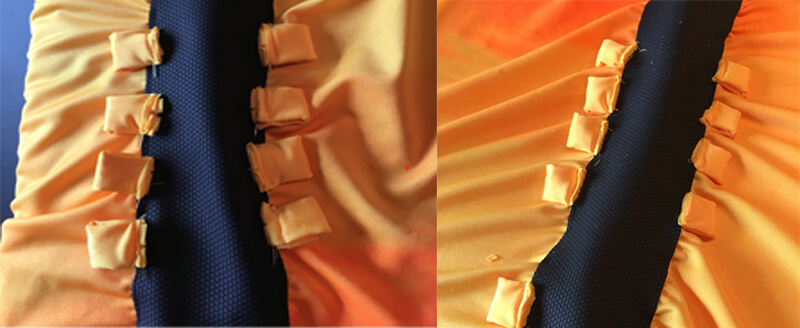
Run your tube black elastic through each of your loops. Hand tack each edge of elastic together.
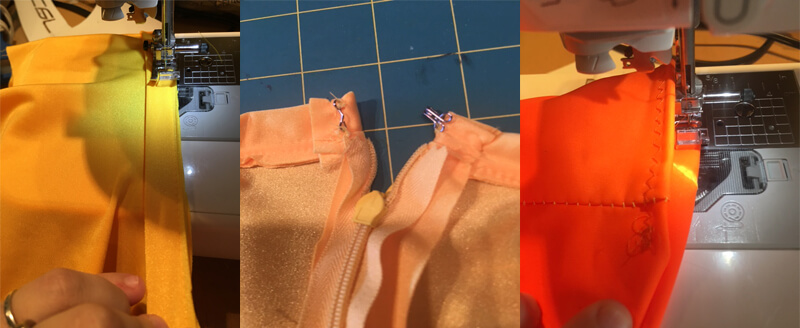
Finish neckline according to pattern instructions. Sew in invisible zipper. Add hook and eye closure at neck. Hem sleeves and pant legs.
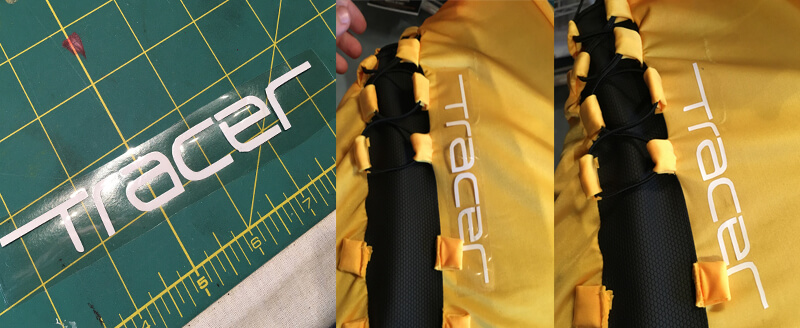
Cut out your iron on vinyl letters, and iron to left leg of suit. Alternatively, if you are using paint, paint your design and let dry.
NOTE: You can save this until the end, but it does make it easier to do these designs when you can lay the project flat.
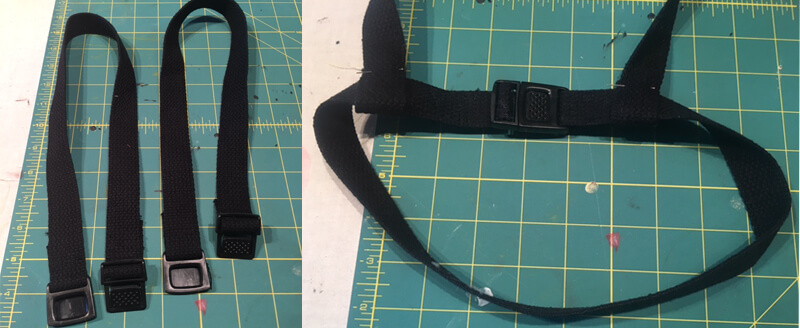
TO ATTACH JUMPSUIT TO HARNESS: Measure around upper part of leg, adding an extra 2″ for seam allowance. Cut two pieces of black webbing to this length. Sew buckles to each end of the webbing. Take your long pieces from your upper harness, and loop around your newly created buckle loops. Stitch in place.
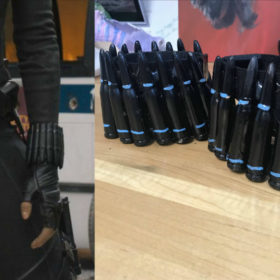
Pulse Pistols Tutorial
Materials:
- 2 NERF N-Strike Mega BigShock Toy Guns or other NERF guns
- 1 Sheet 5/8″ EVA foam
- 1 Sheet Thin Craft foam
- Worbla BlackArt (I used leftovers from the armor)
- Plastidip Spray
- White Spray Paint
- Craft Paint in Black, White, Gunmetal, and Silver
Tools:
NOTE: This isn’t the most accurate way to make your gun props, but it is the easiest and potentially most cost effective. Also when viewing photos, initially I was going to glue foam on the bottom of the guns, but that didn’t work out. Disregard any foam patterns in photographs for the bottom of the gun.
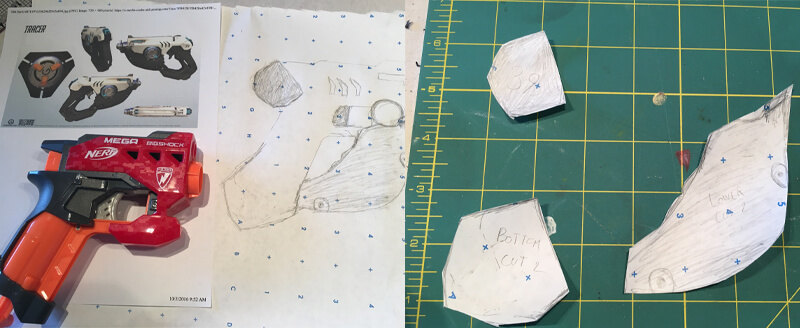
Trace around your nerf guns onto a piece of paper. Determine what pieces you need to add or extend by looking at your reference image. Sketch over your outline of your gun to create your pattern pieces. Cut out these new pattern pieces, and label them.
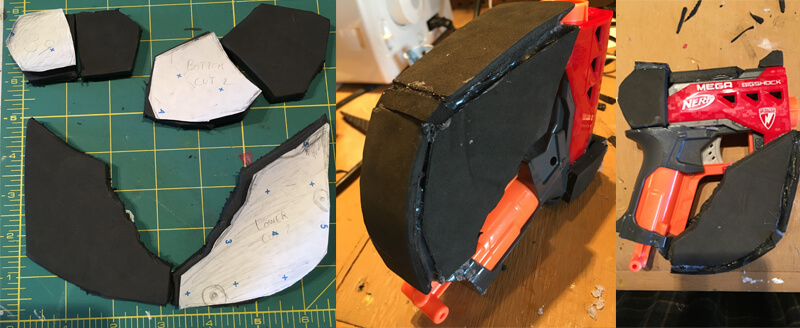
Cut out pieces from your 5/8” EVA foam. Glue these to your gun using either hot glue or another adhesive. Cut strips of your EVA foam to fill in any gaps, and adhere them to your new pieces. Cut out a face plate design for the smaller, more intricate stuff out of your thin craft foam. Glue to face of gun. Sand out any uneven edges.
NOTE: I’d select a different adhesive if you can. Unfortunately while making these, I used hot glue, so whenever I adhered the worbla the glue would shift and left me with quite a few uneven edges.

Take your pattern pieces, and cut out pieces of worbla slightly larger than each piece. Cut out additional strips of worbla to cover up any of the pieces you used to fill gaps. Heat and adhere worbla to your gun, smoothing out any uneven edges.
IF YOU’RE USING THE EXACT NERF GUN I USED: Take any worbla scraps you may have, and heat them together. Worbla when warmed becomes like a putty. Take this new putty you have made, and fill in the bottom of your gun, evening out as you go. Take flat pieces of worbla to cover any uneven sections you may have.
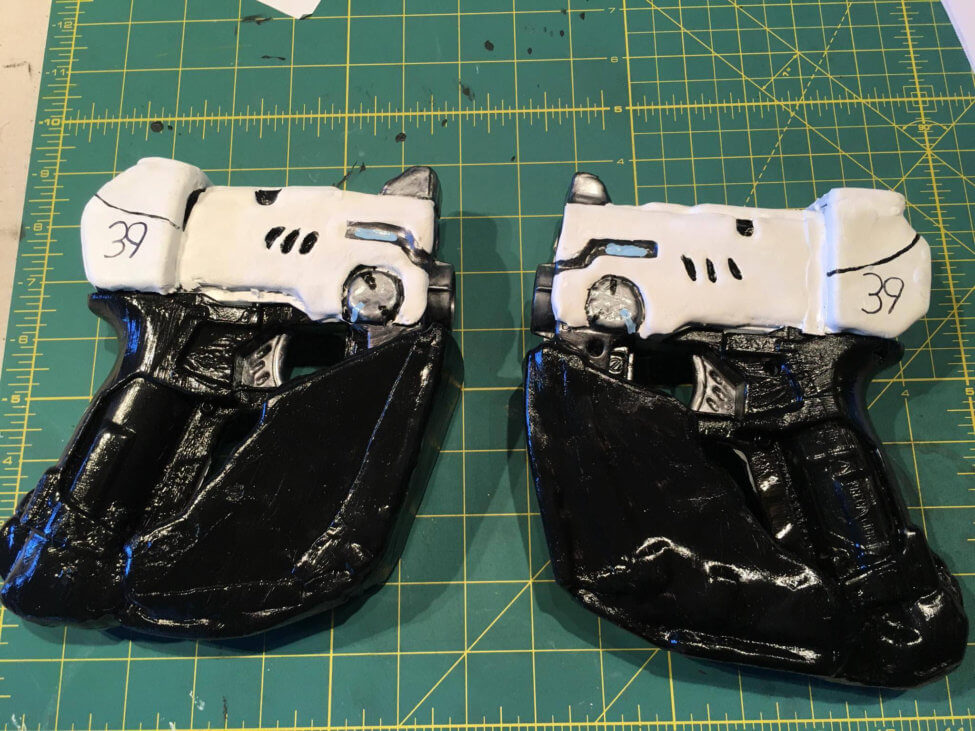
Prime gun with plastidip, allowing for drying time in between coats. Spray paint guns flat white to have an even base.
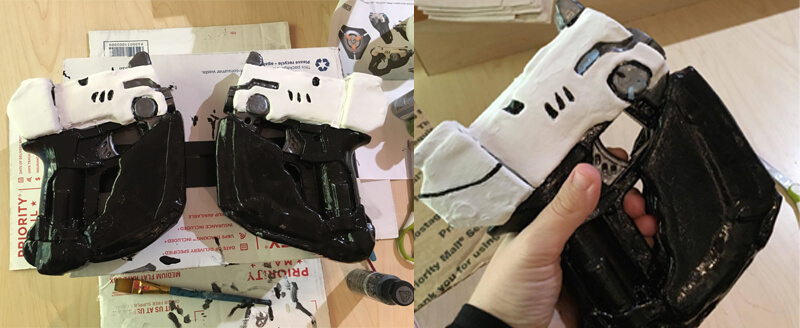
Take acrylic paint, and paint out your different colored sections of the gun, allowing drying time between coats. When fully dry, take small brushes and add all your detail colors and highlights.
Arm Bracers Tutorial
Materials:
- 2 Sheets thin craft foam
- Worbla Black Art
- Plastidip Spray
- White Spray Paint
- 1/4 yard White Spandex
- White thread
Tools:
- Heat Gun
- Scissors
- Hot Glue Gun and Glue Sticks
- Marker
- Saran Wrap
- Masking Tape
- Sand Paper
- Sewing Machine
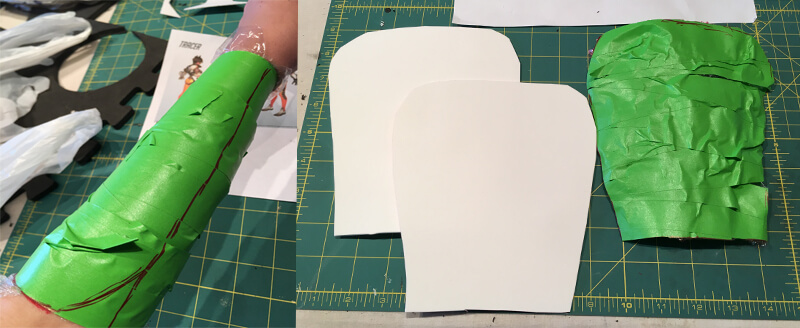
PATTERN: Wrap arms in saran wrap. Cover in masking tape. Draw out base layer design for bracers. Cut your tape mock up in half, and clean up lines. Trim. This will be your stencil for your bracers.Cut out two of your bracers using your pattern from thin craft foam. Cut out 4 sheets of worbla slightly larger than your pattern.
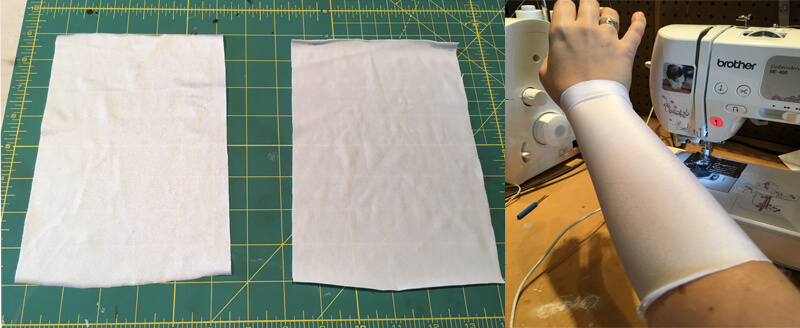
Sew tubes of spandex just big enough for your arms. These will act as a protective layer between the bracers and your arms.
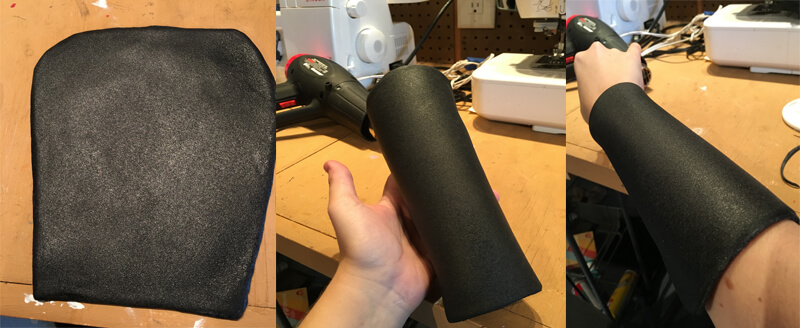
Heat worbla, and sandwich foam in the middle, blending edges. Gently heat and form around your arm.
NOTE: Be careful when forming worbla to your body! It is hot plastic!
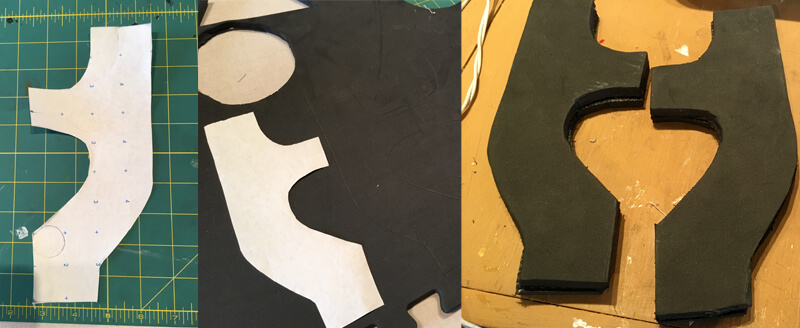
Sketch out a pattern for your outer “wings”. Cut out this pattern, and cut out 4 of these shapes from your 5/8” EVA foam. Glue these together using hot glue. Sand out any rough edges.
Cut out 4 pieces of worbla slightly larger than your foam shapes. Heat worbla and wrap all sides of your wing shapes.Gently heat your bracers and ends of your wings, and adhere. Worbla is self adhesive, so you can stick the pieces together. Hold in place and allow to cool.
Prime with Plastidip spray, allowing drying time between coats. Spray paint bracers white, allowing drying time between coats.
Goggles Tutorial
Materials:
- 1-2 Sheets thin craft foam
- Worbla Black Art
- Worbla TranspArt or PETG Plastic Sheeting
- iDye Poly in Orange
- 1/2 yard 3/4″-1″ Black Elastic
- Craft Paint in Black and White
- Gloss Medium (Optional)
Tools:
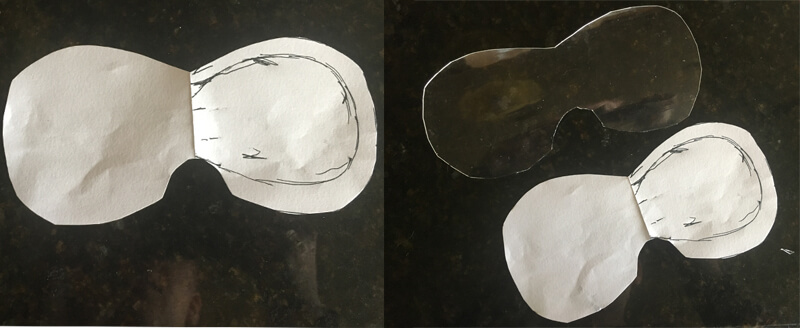
PATTERN: Take a piece of paper folded in half, and trace around one side of your eye. Even out your lines to create the general shape of the goggles, and then cut. This will create your stencil for your lenses.Cut out a piece of clear worbla or PETG plastic.
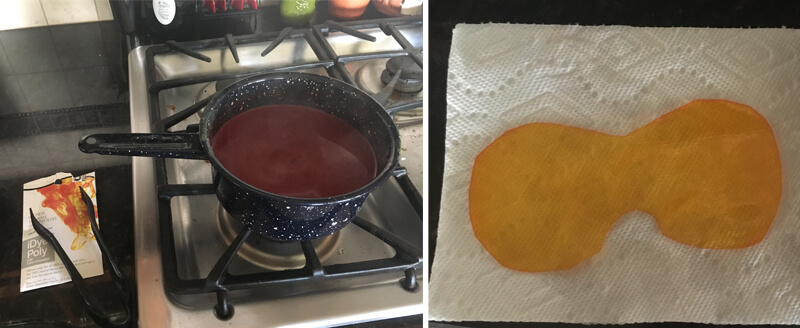
Follow instructions on your dye to create dye bath, and place plastic in for 30 minutes. Don’t stir or mess with it too much, you don’t want to warp the plastic. Remove, rinse off excess dye, and allow to cool on a flat surface.
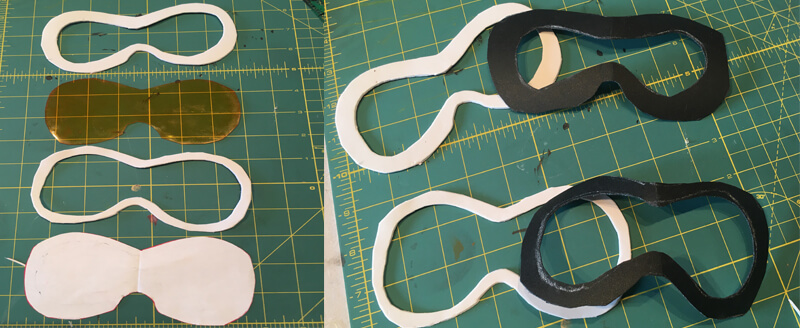
Take your same stencil, and cut out two thin foam layers 1/4-1/2” larger than this frame. Cut out worbla in these shapes as well. Adhere worbla to both frames, and allow to cool.
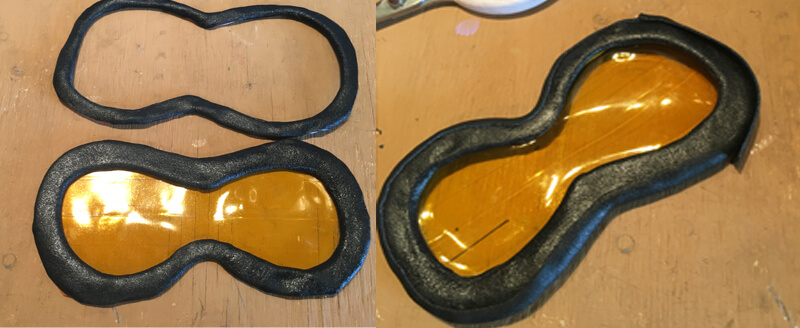
Sandwich your tinted layer in between your worbla pieces, and gently heat them to adhere everything together. You may need to wrap an additional strip of worbla around all edges to cover any gaps. While it is still warm, gently take your goggles, and bend them to fit your face (alternatively, bend them around a knee to avoid burning your face, it is hot plastic after all).
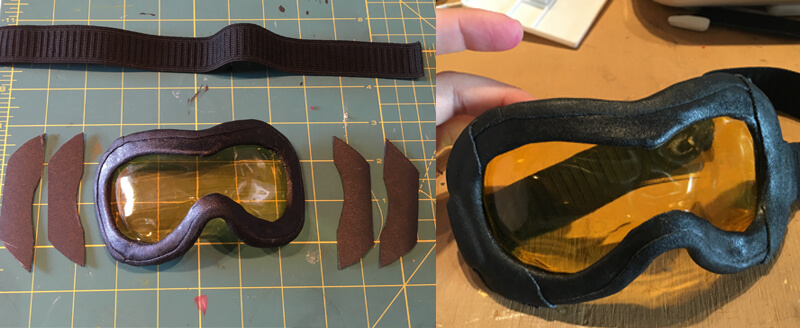
Cut 4 small beveled pieces of worbla. This will attach our elastic. Cut a strip of elastic just long enough to reach around your head. Heat your small pieces, and attach to ends of elastic. Heat all pieces and attach to your goggles. Allow to cool.
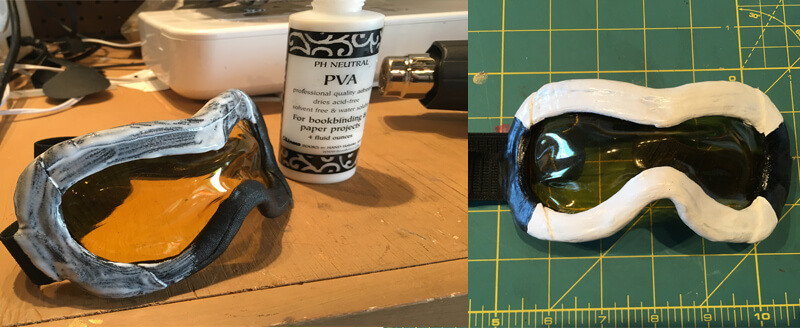
Prime 2 coats with PVA glue, allowing full drying time in between coats. Mix acrylic paint with gloss medium, and paint your goggles.
Putting it all together, your Tracer costume is complete!
About the Author
Alexa O'Neill
Costume Designer and fabricator by day, Magical Girl crime fighter by night. Cosplay enthusiast extraordinaire .

4 Comments
Leave a Comment
Stay connected. Don't miss out!
Get new costume guides in your inbox once a month.


so. how much would it cost me to make a cheap mens chronno accelerator? or if i can just pay you to make one for a man. because they usually ony fit girls. id really love to have one for my tracer costume.
This is awesome! What was the price of the whole thing?
would you be willing to make a Chronal Accelerator for me to buy from you? if so you could let me know buy emailing me [email protected]! :)
Would it be possible for you to make one of the coronal accelerators (without the wiring and working light), for me to purchase from you? I’m hoping it would be cheaper than the ones they’re trying to sell online (250/300 US Dollars. Woah!), and I just can’t seem to be able to get the accelerator. If possible, can you email me at [email protected] ?
Thank you. 😊